ASTM D7635/D7635M-18
(Test Method)Standard Test Method for Measurement of Thickness of Coatings Over Fabric Reinforcement
Standard Test Method for Measurement of Thickness of Coatings Over Fabric Reinforcement
SCOPE
1.1 This test method covers measuring the thickness of the coating over fiber backing or reinforcing fabric.
1.2 The values stated in either SI units or inch-pound units are to be regarded separately as standard. The values stated in each system may not be exact equivalents; therefore, each system shall be used independently of the other. Combining values from the two systems may result in non-conformance with the standard.
1.3 This standard may involve hazardous materials, operations, and equipment. This standard does not purport to address all of the safety concerns, if any, associated with its use. It is the responsibility of the user of this standard to establish appropriate safety, health, and environmental practices and determine the applicability of regulatory limitations prior to use.
1.4 This international standard was developed in accordance with internationally recognized principles on standardization established in the Decision on Principles for the Development of International Standards, Guides and Recommendations issued by the World Trade Organization Technical Barriers to Trade (TBT) Committee.
General Information
- Status
- Published
- Publication Date
- 31-Oct-2018
- Technical Committee
- D08 - Roofing and Waterproofing
- Drafting Committee
- D08.18 - Nonbituminous Organic Roof Coverings
Relations
- Effective Date
- 01-Nov-2018
- Effective Date
- 01-May-2014
- Effective Date
- 01-May-2013
- Effective Date
- 01-May-2013
- Effective Date
- 15-Jul-2012
- Effective Date
- 01-Nov-2011
- Effective Date
- 01-May-2011
- Effective Date
- 01-Oct-2010
- Effective Date
- 01-Jan-2009
- Effective Date
- 01-Oct-2008
- Effective Date
- 01-Oct-2008
- Refers
ASTM E177-06b - Standard Practice for Use of the Terms Precision and Bias in ASTM Test Methods - Effective Date
- 15-Nov-2006
- Refers
ASTM E177-06a - Standard Practice for Use of the Terms Precision and Bias in ASTM Test Methods - Effective Date
- 01-Nov-2006
- Effective Date
- 01-Nov-2005
- Refers
ASTM E177-04e1 - Standard Practice for Use of the Terms Precision and Bias in ASTM Test Methods - Effective Date
- 01-Nov-2004
Overview
ASTM D7635/D7635M-18 is the standard test method developed by ASTM International for measuring the thickness of coatings over fabric reinforcement. This standard outlines a procedure to determine the coating thickness applied to fiber-backed or reinforced fabrics, using precise optical equipment. The primary aim is to ensure uniformity and quality in products such as roofing membranes, engineered textiles, or composite materials where coated reinforcement is critical. The standard addresses both SI and inch-pound units independently, promoting consistency in measurement and reporting on a global scale.
Key Topics
- Measurement Principle: The method specifies the use of calibrated optical or digital microscopy to measure coating thickness over fabric, scrim, or fiber. Both analog and digital viewing devices are permitted, provided they have appropriate magnification and calibration.
- Specimen Preparation: Detailed procedures for sampling, cutting, mounting, and preparing cross-sections are provided to achieve accurate and repeatable measurements.
- Calibration: The test method requires calibration with a stage micrometer or calibrated blocks, ensuring measurements to the nearest 10 μm (or 0.0005 in.).
- Measurement and Analysis: Measurements should be taken on both machine and cross-machine direction yarns, averaged for statistical representation. Standard deviation and repeatability/reproducibility metrics are used for quality assurance.
- Safety Considerations: Users must follow proper safety, health, and environmental practices, as the procedure may involve hazardous materials or equipment.
Applications
This standard test method is valuable for industries and applications where controlled coating thickness over fabric reinforcement is essential, including:
- Roofing Systems: Validation of poly(vinyl chloride) (PVC) and other synthetic roofing sheets for consistent thickness and durability over reinforcement materials.
- Textiles and Composites: Ensures that fabrics used in engineered composites or technical textiles meet specifications for coating thickness, impacting product strength and performance.
- Quality Control: Manufacturers use ASTM D7635/D7635M-18 to monitor production consistency and comply with customer or regulatory requirements for coated fabric products.
- Material Development: Research and development teams apply this standard to test and validate new coating processes, formulations, or reinforcement methods.
Related Standards
The test method references several related ASTM standards, offering broader context and integration within the field:
- ASTM D4434/D4434M: Specification for Poly(Vinyl Chloride) Sheet Roofing, often used alongside this test method for roofing materials.
- ASTM E177: Practice for Use of the Terms Precision and Bias in ASTM Test Methods, providing guidelines for statistical analysis of results.
- ASTM E691: Practice for Conducting an Interlaboratory Study to Determine the Precision of a Test Method.
Practical Value
Adhering to ASTM D7635/D7635M-18 ensures reliable, repeatable, and unbiased measurement of coating thickness over reinforced fabrics, promoting:
- Product Quality: Accurate assessment of coating thickness helps meet industry standards and performance criteria.
- Process Improvement: Enables manufacturers to refine coating processes based on precise measurement data.
- Regulatory Compliance: Aligns with international trade and product standards, facilitating global commerce.
- Documentation and Traceability: Supports robust reporting and traceability in quality assurance systems.
Keywords
Coating thickness measurement, fabric reinforcement, coated fabrics, optical microscopy, quality control, ASTM D7635, test method, roofing materials, composite textiles, international standards.
Buy Documents
ASTM D7635/D7635M-18 - Standard Test Method for Measurement of Thickness of Coatings Over Fabric Reinforcement
REDLINE ASTM D7635/D7635M-18 - Standard Test Method for Measurement of Thickness of Coatings Over Fabric Reinforcement
Get Certified
Connect with accredited certification bodies for this standard

ICC Evaluation Service
Building products evaluation and certification.

QAI Laboratories
Building and construction product testing and certification.

Aboma Certification B.V.
Specialized in construction, metal, and transport sectors.
Sponsored listings
Frequently Asked Questions
ASTM D7635/D7635M-18 is a standard published by ASTM International. Its full title is "Standard Test Method for Measurement of Thickness of Coatings Over Fabric Reinforcement". This standard covers: SCOPE 1.1 This test method covers measuring the thickness of the coating over fiber backing or reinforcing fabric. 1.2 The values stated in either SI units or inch-pound units are to be regarded separately as standard. The values stated in each system may not be exact equivalents; therefore, each system shall be used independently of the other. Combining values from the two systems may result in non-conformance with the standard. 1.3 This standard may involve hazardous materials, operations, and equipment. This standard does not purport to address all of the safety concerns, if any, associated with its use. It is the responsibility of the user of this standard to establish appropriate safety, health, and environmental practices and determine the applicability of regulatory limitations prior to use. 1.4 This international standard was developed in accordance with internationally recognized principles on standardization established in the Decision on Principles for the Development of International Standards, Guides and Recommendations issued by the World Trade Organization Technical Barriers to Trade (TBT) Committee.
SCOPE 1.1 This test method covers measuring the thickness of the coating over fiber backing or reinforcing fabric. 1.2 The values stated in either SI units or inch-pound units are to be regarded separately as standard. The values stated in each system may not be exact equivalents; therefore, each system shall be used independently of the other. Combining values from the two systems may result in non-conformance with the standard. 1.3 This standard may involve hazardous materials, operations, and equipment. This standard does not purport to address all of the safety concerns, if any, associated with its use. It is the responsibility of the user of this standard to establish appropriate safety, health, and environmental practices and determine the applicability of regulatory limitations prior to use. 1.4 This international standard was developed in accordance with internationally recognized principles on standardization established in the Decision on Principles for the Development of International Standards, Guides and Recommendations issued by the World Trade Organization Technical Barriers to Trade (TBT) Committee.
ASTM D7635/D7635M-18 is classified under the following ICS (International Classification for Standards) categories: 91.080.40 - Concrete structures. The ICS classification helps identify the subject area and facilitates finding related standards.
ASTM D7635/D7635M-18 has the following relationships with other standards: It is inter standard links to ASTM D7635/D7635M-10, ASTM E177-14, ASTM E691-13, ASTM E177-13, ASTM D4434/D4434M-12, ASTM E691-11, ASTM D4434/D4434M-11, ASTM E177-10, ASTM D4434/D4434M-09, ASTM E177-08, ASTM E691-08, ASTM E177-06b, ASTM E177-06a, ASTM E691-05, ASTM E177-04e1. Understanding these relationships helps ensure you are using the most current and applicable version of the standard.
ASTM D7635/D7635M-18 is available in PDF format for immediate download after purchase. The document can be added to your cart and obtained through the secure checkout process. Digital delivery ensures instant access to the complete standard document.
Standards Content (Sample)
This international standard was developed in accordance with internationally recognized principles on standardization established in the Decision on Principles for the
Development of International Standards, Guides and Recommendations issued by the World Trade Organization Technical Barriers to Trade (TBT) Committee.
Designation: D7635/D7635M − 18
Standard Test Method for
Measurement of Thickness of Coatings Over Fabric
Reinforcement
This standard is issued under the fixed designation D7635/D7635M; the number immediately following the designation indicates the
year of original adoption or, in the case of revision, the year of last revision. A number in parentheses indicates the year of last
reapproval. A superscript epsilon (´) indicates an editorial change since the last revision or reapproval.
1. Scope MEASUREMENT METHOD
1.1 This test method covers measuring the thickness of the
3. Principle
coating over fiber backing or reinforcing fabric.
3.1 The thickness of coating material over fiber, fabric, or
1.2 The values stated in either SI units or inch-pound units
scrim can be measured with a standard or digital optical or
are to be regarded separately as standard. The values stated in
reflectancemicroscope.Measurementismadewithacalibrated
each system may not be exact equivalents; therefore, each
viewing device.
system shall be used independently of the other. Combining
values from the two systems may result in non-conformance
4. Apparatus
with the standard.
4.1 Microscope, 30 to 100× magnification capability.
1.3 This standard may involve hazardous materials,
4.1.1 Light Source—If the light source on the microscope is
operations, and equipment. This standard does not purport to
not adequate, use a small high-intensity lamp.
address all of the safety concerns, if any, associated with its
4.1.2 Stage Micrometer, 25 µm [0.001 in.] divisions.
use. It is the responsibility of the user of this standard to
4.2 Calibrated Viewing Device—A digital or analog device
establish appropriate safety, health, and environmental prac-
designed to provide an enlarged electronic image with calibra-
tices and determine the applicability of regulatory limitations
tions to provide measurements.
prior to use.
1.4 This international standard was developed in accor-
5. Calibration Procedure
dance with internationally recognized principles on standard-
5.1 Place a standard reflectance stage micrometer or cali-
ization established in the Decision on Principles for the
brated sample blocks in place of the specimen.
Development of International Standards, Guides and Recom-
mendations issued by the World Trade Organization Technical
5.2 Turn on the light source.
Barriers to Trade (TBT) Committee.
5.3 Position the viewing device (calibrated reticule or cam-
era) such that the scales are superimposed. For electronic
2. Referenced Documents
imaging, place the calibrated scale marker on the microscope
2.1 ASTM Standards:
stage. Focus the viewing device on the specimen.
D4434/D4434M Specification for Poly(Vinyl Chloride)
5.4 Calibrate using micrometer or calibrated sample blocks
Sheet Roofing
to nearest 10 µm.
E177Practice for Use of the Terms Precision and Bias in
5.5 If using digital image for calibration step, record reso-
ASTM Test Methods
lution and magnification of calibration image.
E691Practice for Conducting an Interlaboratory Study to
Determine the Precision of a Test Method
6. Specimen Preparation
6.1 Make a clean cut perpendicular to the plane of the
specimen, normal to one of the yarn intersections, completely
ThistestmethodisunderthejurisdictionofASTMCommitteeD08onRoofing
throughthesheetexposingtheareatobemeasured(seeFig.1).
and Waterproofing and is the direct responsibility of Subcommittee D08.18 on
Nonbituminous Organic Roof Coverings.
6.2 Remove the razor-cut section and mount with the cut
Current edition approved Nov. 1, 2018. Published December 2018. Originally
surface (analytical plane) facing downward into a sample clip.
approved in 2010. Last previous edition approved in 2010 as D7635/D7635M–10.
DOI: 10.1520/D7635_D7635M-18.
Securesampleclipin3.175-cm[1.25-in.]samplecupwithcap.
For referenced ASTM standards, visit the ASTM website, www.astm.org, or
Use a piece of double-sided tape to securely attach clip to the
contact ASTM Customer Service at service@astm.org. For Annual Book of ASTM
cap part of the cup. Record sample orientation and position
Standards volume information, refer to the standard’s Document Summary page on
the ASTM website. within cup. Multiclips can be used for mounting multiple
Copyright © ASTM International, 100 Barr Harbor Drive, PO Box C700, West Conshohocken, PA 19428-2959. United States
D7635/D7635M − 18
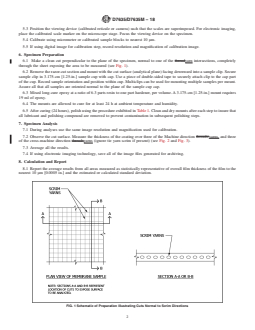
FIG. 1 Schematic of Preparation Illustrating Cuts Normal to Scrim Directions
samples per mount. Assure all that all samples are oriented 7.3 Average all the results.
normal to the plane of the sample cup cap.
7.4 If using electronic imaging technology, save all of the
6.3 Mixedlong-cureepoxyataratioof6.3partsresintoone image files generated for archiving.
part hardener, per volume. A 3.175-cm [1.25-in.] mount
8. Calculation and Report
requires 19 ml of epoxy.
8.1 Report the average results from all areas measured as
6.4 The mounts are allowed to cure for at least 24 h at
statistically representative of overall film thickness of the film
ambient temperature and humidity.
to the nearest 10 µm [0.0005 in.] and the estimated or
6.5 After curing (24 hours), polish using the procedure
calculated standard deviation.
exhibited in Table 1. Clean and dry mounts after each step to
insure that all lubricant and polishing compound are removed 9. Precision and Bias
to prevent contamination in subsequent polishing steps.
9.1 Precision Statement—The precision of this specification
is based on an interlaboratory study (ILS) of D4434/D4434M-
7. Specimen Analysis
06, Standard Specification for Poly (Vinyl Chloride) Sheet
7.1 During analyses use the same image resolution and
Roofing, conducted in 2008 and submitted under number
magnification used for calibration.
ILS-351. Analysts from six laboratories tested three different
7.2 Observe the cut surface. Measure the thickness of the coatings under four different conditions. Every “test result”
coating over three of the Machine direction yarns, and three of represents an individual determination. Each laboratory was
the cross-machine direction yarns (ignore tie yarn scrim if asked to report five replicate measurements for each material.
present) (see Fig. 2 and Fig. 3). Except for the use of data from only five laboratories, Practice
TABLE 1 Recommended Metallographic Polishing Procedure
Grinding Lubricant Time Pressure Wheel Material Removed
Min:Sec KPa [psi] Speed (approximate)
RPM mm [mils]
320 Grit Water 0:30 241.2 [35] 300 0.7 [28]
400 Grit Water 0:30 241.2 [35] 300 0.5 [19]
600 Grit Water 0:30 241.2 [35] 300 0.25 [10]
800 Grit Water 0:30 241.2 [35] 300 0.13 [5]
6 µm diamond/cloth Oil 3:00 241.2 [35] 200 0.025 [1]
3 µm diamond/cloth Oil 3:00 241.2 [35] 200 0.013 [0.5]
0.05 µm colloidal Si/cloth — 1:30 206.84 [30] 150
...
This document is not an ASTM standard and is intended only to provide the user of an ASTM standard an indication of what changes have been made to the previous version. Because
it may not be technically possible to adequately depict all changes accurately, ASTM recommends that users consult prior editions as appropriate. In all cases only the current version
of the standard as published by ASTM is to be considered the official document.
Designation: D7635/D7635M − 10 D7635/D7635M − 18
Standard Test Method for
Measurement of Thickness of Coatings Over Fabric
Reinforcement
This standard is issued under the fixed designation D7635/D7635M; the number immediately following the designation indicates the
year of original adoption or, in the case of revision, the year of last revision. A number in parentheses indicates the year of last
reapproval. A superscript epsilon (´) indicates an editorial change since the last revision or reapproval.
1. Scope
1.1 This test method covers measuring the thickness of the coating over fiber backing or reinforcing fabric.
1.2 The values stated in either SI units or inch-pound units are to be regarded separately as standard. The values stated in each
system may not be exact equivalents; therefore, each system shall be used independently of the other. Combining values from the
two systems may result in non-conformance with the standard.
1.3 This standard may involve hazardous materials, operations, and equipment. This standard does not purport to address all
of the safety concerns, if any, associated with its use. It is the responsibility of the user of this standard to establish appropriate
safety and health practices and determine the applicability of regulatory limitations prior to use.
1.3 This standard may involve hazardous materials, operations, and equipment. This standard does not purport to address all
of the safety concerns, if any, associated with its use. It is the responsibility of the user of this standard to establish appropriate
safety, health, and environmental practices and determine the applicability of regulatory limitations prior to use.
1.4 This international standard was developed in accordance with internationally recognized principles on standardization
established in the Decision on Principles for the Development of International Standards, Guides and Recommendations issued
by the World Trade Organization Technical Barriers to Trade (TBT) Committee.
2. Referenced Documents
2.1 ASTM Standards:
D4434D4434/D4434M Specification for Poly(Vinyl Chloride) Sheet Roofing
E177 Practice for Use of the Terms Precision and Bias in ASTM Test Methods
E691 Practice for Conducting an Interlaboratory Study to Determine the Precision of a Test Method
MEASUREMENT METHOD
3. Principle
3.1 The thickness of coating material over fiber, fabric, or scrim can be measured with a standard or digital optical or reflectance
microscope. Measurement is made with a calibrated viewing device.
4. Apparatus
4.1 Microscope, 30 to 100× magnification capability.
4.1.1 Light Source—If the light source on the microscope is not adequate, use a small high-intensity lamp.
4.1.2 Stage Micrometer, 25 μm [0.001 in.] divisions.
4.2 Calibrated Viewing Device—A digital or analog device designed to provide an enlarged electronic image with calibrations
to provide measurements.
5. Calibration Procedure
5.1 Place a standard reflectance stage micrometer or calibrated sample blocks in place of the specimen.
5.2 Turn on the light source.
This test method is under the jurisdiction of ASTM Committee D08 on Roofing and Waterproofing and is the direct responsibility of Subcommittee D08.18 on
Nonbituminous Organic Roof Coverings.
Current edition approved June 1, 2010Nov. 1, 2018. Published July 2010December 2018. Originally approved in 2010. Last previous edition approved in 2010 as
D7635/D7635M – 10. DOI: 10.1520/D7635_D7635M–10. 10.1520/D7635_D7635M-18.
For referenced ASTM standards, visit the ASTM website, www.astm.org, or contact ASTM Customer Service at service@astm.org. For Annual Book of ASTM Standards
volume information, refer to the standard’s Document Summary page on the ASTM website.
Copyright © ASTM International, 100 Barr Harbor Drive, PO Box C700, West Conshohocken, PA 19428-2959. United States
D7635/D7635M − 18
5.3 Position the viewing device (calibrated reticule or camera) such that the scales are superimposed. For electronic imaging,
place the calibrated scale marker on the microscope stage. Focus the viewing device on the specimen.
5.4 Calibrate using micrometer or calibrated sample blocks to nearest 10 μm.
5.5 If using digital image for calibration step, record resolution and magnification of calibration image.
6. Specimen Preparation
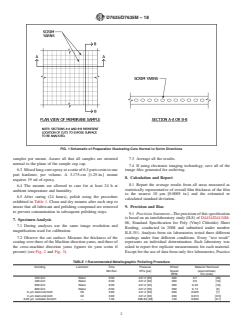
6.1 Make a clean cut perpendicular to the plane of the specimen, normal to one of the threadyarn intersections, completely
through the sheet exposing the area to be measured (see Fig. 1).
6.2 Remove the razor-cut section and mount with the cut surface (analytical plane) facing downward into a sample clip. Secure
sample clip in 3.175-cm [1.25-in.] sample cup with cap. Use a piece of double-sided tape to securely attach clip to the cap part
of the cup. Record sample orientation and position within cup. Multiclips can be used for mounting multiple samples per mount.
Assure all that all samples are oriented normal to the plane of the sample cup cap.
6.3 Mixed long-cure epoxy at a ratio of 6.3 parts resin to one part hardener, per volume. A 3.175-cm [1.25-in.] mount requires
19 ml of epoxy.
6.4 The mounts are allowed to cure for at least 24 h at ambient temperature and humidity.
6.5 After curing (24 hours), polish using the procedure exhibited in Table 1. Clean and dry mounts after each step to insure that
all lubricant and polishing compound are removed to prevent contamination in subsequent polishing steps.
7. Specimen Analysis
7.1 During analyses use the same image resolution and magnification used for calibration.
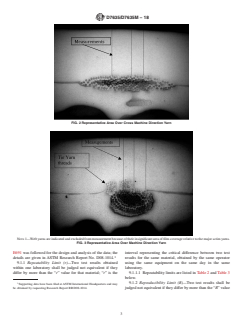
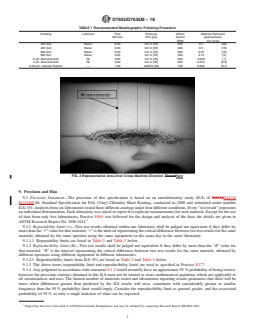
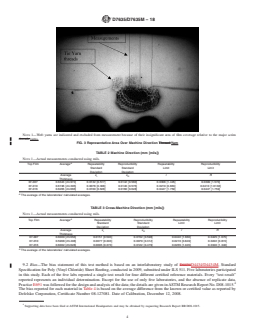
7.2 Observe the cut surface. Measure the thickness of the coating over three of the Machine direction threads,yarns, and three
of the cross-machine direction threadsyarns (ignore tie yarn scrim if present) (see Fig. 2 and Fig. 3).
7.3 Average all the results.
7.4 If using electronic imaging technology, save all of the image files generated for archiving.
8. Calculation and Report
8.1 Report the average results from all areas measured as statistically representative of overall film thickness of the film to the
nearest 10 μm [0.0005 in.] and the estimated or calculated standard deviation.
FIG. 1 Schematic of Preparation Illustrating Cuts Normal to Scrim Directions
D7635/D7635M − 18
TABLE 1 Recommended Metallographic Polishing Procedure
Grinding Lubricant Time Pressure Wheel Material Removed
Min:Sec KPa [psi] Speed (approximate)
RPM mm [mils]
320 Grit Water 0:30 241.2 [35] 300 0.7 [28]
400 Grit Water 0:30 241.2 [35] 300 0.5 [19]
600 Grit Water 0:30 241.2 [35] 300 0.25 [10]
800 Grit Water 0:30 241.2 [35] 300 0.13 [5]
6 μm diamond/cloth Oil 3:00 241.2 [35] 200 0.025 [1]
3 μm diamond/cloth Oil 3:00 241.2 [35] 200 0.013 [0.5]
0.05 μm colloidal Si/cloth — 1:30 206.84 [30] 150 0.003 [0.1]
FIG. 2 Representative Area Over Cross Machine Direction ThreadYarn
9. Precision and Bias
9.1 Precision Statement—The precision of this specification is based on an interlaboratory study (ILS) of D4434D4434/
D44
...
Questions, Comments and Discussion
Ask us and Technical Secretary will try to provide an answer. You can facilitate discussion about the standard in here.
Loading comments...