ASTM D7378-10
(Practice)Standard Practice for Measurement of Thickness of Applied Coating Powders to Predict Cured Thickness
Standard Practice for Measurement of Thickness of Applied Coating Powders to Predict Cured Thickness
SIGNIFICANCE AND USE
Many physical and appearance properties of the finished coating are affected by the film thickness. Film thickness can affect the color, gloss, surface profile, adhesion, flexibility, impact resistance and hardness of the coating. The fit of pieces assembled after coating can be affected when film thickness is not within tolerance. Therefore coatings must be applied within certain minimum and maximum film thickness specifications to optimize their intended use.
All procedures involve taking measurements of applied coating powders in the pre-cured, pre-gelled state to help insure correct cured film thickness. This enables the application system to be set up and fine-tuned prior to the curing process. In turn, this will reduce the amount of scrap and over-spray. Accurate predictions help avoid stripping and re-coating which can cause problems with adhesion and coating integrity.
Measurements of cured powder coating thickness can be made using different methods depending upon the substrate. Non-destructive measurements over metal substrates can be made with magnetic and eddy current coating thickness gages (see Practice D7091). Non-destructive measurements over non-metal substrates can be made with ultrasonic coating thickness gages (see Test Method D6132). Destructive measurements over rigid substrates can be made with cross-sectioning instruments (see Practices D4138).
SCOPE
1.1 This practice describes the thickness measurement of dry coating powders applied to a variety of rigid substrates. Use of some of these procedures may require repair of the coating powder. This practice is intended to supplement the manufacturers’ instructions for the operation of the gages and is not intended to replace them. It includes definitions of key terms, reference documents, the significance and use of the practice, and the advantages and limitations of the instruments.
1.2 Three procedures are provided for measuring dry coating powder thickness:
1.2.1 Procedure A—Using rigid metal notched (comb) gages.
1.2.2 Procedure B—Using magnetic or eddy current dry film thickness gages.
1.2.3 Procedure C—Using non-contact ultrasonic powder thickness instruments.
1.3 Coating powders generally diminish in thickness during the curing process. Some of these procedures therefore require a reduction factor be established to predict cured film thickness of powder coatings.
1.4 Procedure A and Procedure B
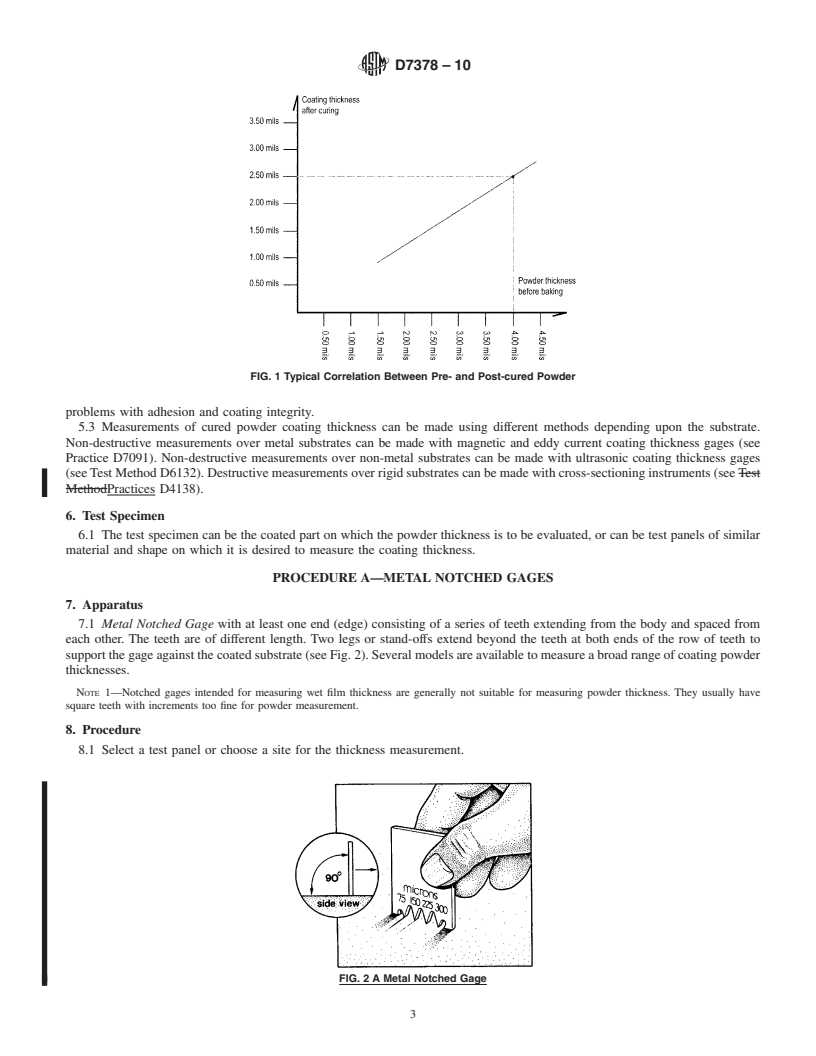
measure the thickness (height or depth) of the applied coating powders in the pre-cured, pre-gelled state. By comparing results to the measured cured powder thickness in the same location, a reduction factor can be determined and applied to future thickness measurements of the same coating powder.
1.5 Procedure C
results in a predicted thickness value of the cured state based on a calibration for typical coating powders. If the powder in question is not typical then an adjustment can be made to align gage readings with the actual cured values as determined by other measurement methods.
1.6 The values stated in SI units are to be regarded as the standard. The values given in parentheses are for information only.
1.7 This standard does not purport to address all of the safety concerns, if any, associated with its use. It is the responsibility of the user of this standard to establish appropriate safety and health practices and determine the applicability of regulatory limitations prior to use.
General Information
Relations
Buy Standard
Standards Content (Sample)
NOTICE: This standard has either been superseded and replaced by a new version or withdrawn.
Contact ASTM International (www.astm.org) for the latest information
Designation: D7378 − 10
Standard Practice for
Measurement of Thickness of Applied Coating Powders to
1
Predict Cured Thickness
This standard is issued under the fixed designation D7378; the number immediately following the designation indicates the year of
original adoption or, in the case of revision, the year of last revision. A number in parentheses indicates the year of last reapproval. A
superscript epsilon (´) indicates an editorial change since the last revision or reapproval.
1. Scope 1.7 This standard does not purport to address all of the
safety concerns, if any, associated with its use. It is the
1.1 This practice describes the thickness measurement of
responsibility of the user of this standard to establish appro-
dry coating powders applied to a variety of rigid substrates.
priate safety and health practices and determine the applica-
Use of some of these procedures may require repair of the
bility of regulatory limitations prior to use.
coating powder. This practice is intended to supplement the
manufacturers’ instructions for the operation of the gages and
2. Referenced Documents
is not intended to replace them. It includes definitions of key
2
terms, reference documents, the significance and use of the
2.1 ASTM Standards:
practice, and the advantages and limitations of the instruments. D4138 Practices for Measurement of Dry Film Thickness of
Protective Coating Systems by Destructive, Cross-
1.2 Three procedures are provided for measuring dry coat-
Sectioning Means
ing powder thickness:
D6132 Test Method for Nondestructive Measurement of Dry
1.2.1 Procedure A—Using rigid metal notched (comb)
Film Thickness of Applied Organic Coatings Using an
gages.
Ultrasonic Coating Thickness Gage
1.2.2 Procedure B—Using magnetic or eddy current dry
D7091 Practice for Nondestructive Measurement of Dry
film thickness gages.
Film Thickness of Nonmagnetic Coatings Applied to
1.2.3 Procedure C—Using non-contact ultrasonic powder
Ferrous Metals and Nonmagnetic, Nonconductive Coat-
thickness instruments.
ings Applied to Non-Ferrous Metals
1.3 Coating powders generally diminish in thickness during
the curing process. Some of these procedures therefore require
3. Terminology
a reduction factor be established to predict cured film thickness
3.1 Definitions of Terms Specific to This Standard:
of powder coatings.
3.1.1 accuracy, n—the measure of the magnitude of error
1.4 Procedure A and Procedure B measure the thickness
between the result of a measurement and the true thickness of
(height or depth) of the applied coating powders in the
the item being measured.
pre-cured, pre-gelled state. By comparing results to the mea-
3.1.2 adjustment, n—the physical act of aligning a gage’s
sured cured powder thickness in the same location, a reduction
thickness readings to match those of a known thickness sample
factor can be determined and applied to future thickness
(reduction of bias) in order to improve the accuracy of the gage
measurements of the same coating powder.
on a specific surface, within a specific portion of its measure-
1.5 Procedure C results in a predicted thickness value of the
ment range or to specific operating conditions.
cured state based on a calibration for typical coating powders.
3.1.2.1 Discussion—An adjustment will affect the outcome
If the powder in question is not typical then an adjustment can
of subsequent readings.
be made to align gage readings with the actual cured values as
3.1.3 coating powders, n—finely divided particles of resin,
determined by other measurement methods.
either thermoplastic or thermosetting, generally incorporating
1.6 The values stated in SI units are to be regarded as the
pigments, fillers, and additives and remaining finely divided
standard. The values given in parentheses are for information
during storage under suitable conditions, which, after fusing
only.
and possibly curing, give a continuous film.
1
This practice is under the jurisdiction of ASTM Committee D01 on Paint and
Related Coatings, Materials, and Applications and is the direct responsibility of
2
Subcommittee D01.51 on Powder Coatings. For referenced ASTM standards, visit the ASTM website, www.astm.org, or
Current edition approved Dec. 1, 2010. Published January 2011. Originally contact ASTM Customer Service at service@astm.org. For Annual Book of ASTM
approved in 2007. Last previous edition approved in 2007 as D7378 – 07. DOI: Standards volume information, refer to the standard’s Document Summary page on
10.1520/D7378-10. the ASTM website.
Copyright © ASTM International, 100 Barr Harbor Drive, PO Box C700, West Conshohocken, PA 19428-2959. United States
1
---------------------- Page: 1 ----------------------
D7378 − 10
3.1.4 calibration, n—the high-level, controlled and docu- 4.2 Procedure A—Uses a metal notched gage to manually
mented process of obtaini
...
This document is not an ASTM standard and is intended only to provide the user of an ASTM standard an indication of what changes have been made to the previous version. Because
it may not be technically possible to adequately depict all changes accurately, ASTM recommends that users consult prior editions as appropriate. In all cases only the current version
of the standard as published by ASTM is to be considered the official document.
Designation:D7378–07 Designation:D7378–10
Standard Practice for
Measurement of Thickness of Applied Coating Powders to
1
Predict Cured Thickness
This standard is issued under the fixed designation D7378; the number immediately following the designation indicates the year of
original adoption or, in the case of revision, the year of last revision. A number in parentheses indicates the year of last reapproval. A
superscript epsilon (´) indicates an editorial change since the last revision or reapproval.
1. Scope
1.1 This practice describes the thickness measurement of dry coating powders applied to a variety of rigid substrates. Use of
some of these procedures may require repair of the coating powder. This practice is intended to supplement the manufacturers’
instructions for the operation of the gages and is not intended to replace them. It includes definitions of key terms, reference
documents, the significance and use of the practice, and the advantages and limitations of the instruments.
1.2 Three procedures are provided for measuring dry coating powder thickness:
1.2.1 Procedure A—Using rigid metal notched (comb) gages.
1.2.2 Procedure B—Using magnetic or eddy current coatingdry film thickness gages.
1.2.3 Procedure C—Using non-contact ultrasonic powder thickness instruments.
1.3 Coating powders generally diminish in thickness during the curing process. TheseSome of these procedures therefore
require a reduction factor be established to predict cured film thickness of powder coatings.
1.4 Procedure A and Procedure B measure the thickness (height or depth) of the applied coating powders in the pre-cured,
pre-gelled state. By comparing results to the measured cured powder thickness in the same location, a reduction factor can be
determined and applied to future thickness measurements of the same coating powder.
1.5 Procedure C results in a predicted thickness value of the cured state based on a calibration for typical coating powders. If
the powder in question is not typical then a calibrationan adjustment can be made to align gage readings with the actual cured
values as determined by other measurement methods.
1.6 The values stated in SI units are to be regarded as the standard. The values given in parentheses are for information only.
1.7 This standard does not purport to address all of the safety concerns, if any, associated with its use. It is the responsibility
of the user of this standard to establish appropriate safety and health practices and determine the applicability of regulatory
limitations prior to use.
2. Referenced Documents
2
2.1 ASTM Standards:
D4138 Practices for Measurement of Dry Film Thickness of Protective Coating Systems by Destructive, Cross-Sectioning
Means
D6132 Test Method for Nondestructive Measurement of Dry Film Thickness ofApplied Organic Coatings Using an Ultrasonic
Gage
D7091 Practice for Nondestructive Measurement of Dry Film Thickness of Nonmagnetic Coatings Applied to Ferrous Metals
and Nonmagnetic, Nonconductive Coatings Applied to Non-Ferrous Metals
3. Terminology
3.1 Definitions of Terms Specific to This Standard:
3.1.1 accuracy, n—themeasureofthemagnitudeoferrorbetweentheresultofameasurementandthetruethicknessoftheitem
being measured.
3.1.2 adjustment, n—the physical act of aligning a gage’s thickness readings to match those of a known thickness sample
(removal(reduction of bias) in order to improve the accuracy of the gage on a specific surface, within a specific portion of its
measurement range or to specific operating conditions.
1
This practice is under the jurisdiction of ASTM Committee D01 on Paint and Related Coatings, Materials, and Applications and is the direct responsibility of
Subcommittee D01.51 on Powder Coatings.
Current edition approved July 1, 2007. Published July 2007. DOI: 10.1520/D7378-07.
Current edition approved Dec. 1, 2010. Published January 2011. Originally approved in 2007. Last previous edition approved in 2007 as D7378 - 07. DOI:
10.1520/D7378-10.
2
For referencedASTM standards, visit theASTM website, www.astm.org, or contactASTM Customer Service at service@astm.org. For Annual Book of ASTM Standards
volume information, refer to the standard’s Document Summary page on the ASTM website.
Copyright © ASTM International, 100 Barr Harbor Drive, PO Box C700, West Conshohocken, PA 19428-2959, United States.
1
---------------------- Page: 1 ----------------------
D7378–10
3.1.2.1 Discussion—An adjustment will affect the outcome of subsequent readings.
3.1.3 coating powders, n—finely divided particles of resin, either t
...


Questions, Comments and Discussion
Ask us and Technical Secretary will try to provide an answer. You can facilitate discussion about the standard in here.