ASTM G99-23
(Test Method)Standard Test Method for Wear and Friction Testing with a Pin-on-Disk or Ball-on-Disk Apparatus
Standard Test Method for Wear and Friction Testing with a Pin-on-Disk or Ball-on-Disk Apparatus
SIGNIFICANCE AND USE
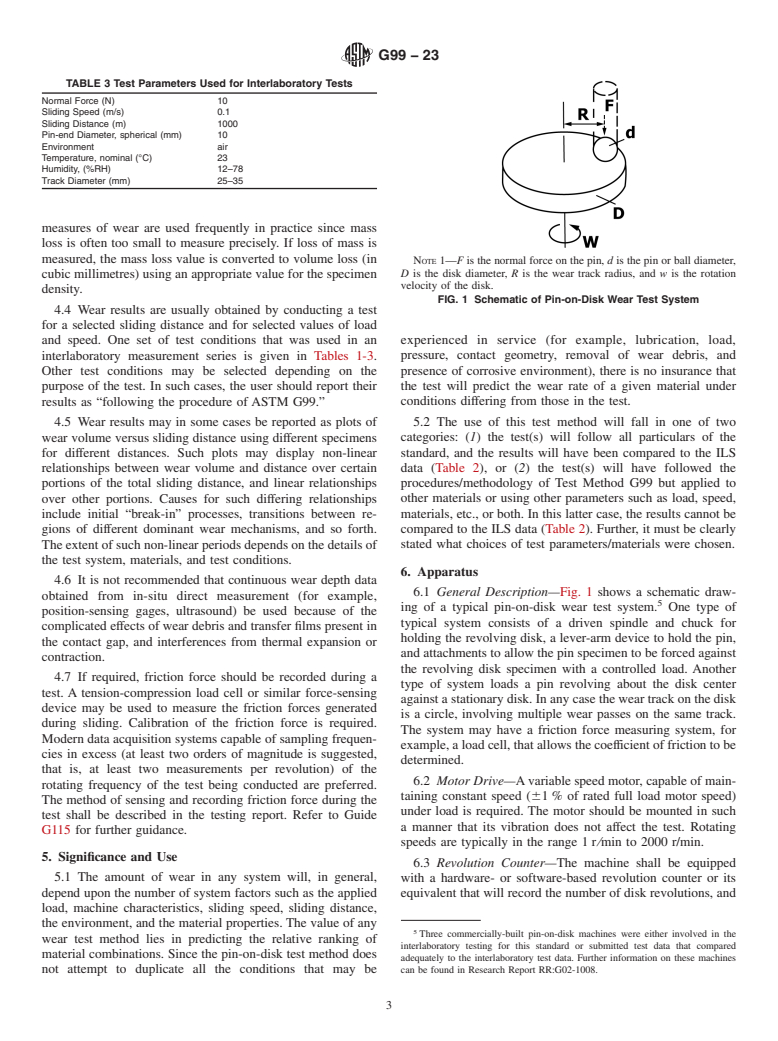
5.1 The amount of wear in any system will, in general, depend upon the number of system factors such as the applied load, machine characteristics, sliding speed, sliding distance, the environment, and the material properties. The value of any wear test method lies in predicting the relative ranking of material combinations. Since the pin-on-disk test method does not attempt to duplicate all the conditions that may be experienced in service (for example, lubrication, load, pressure, contact geometry, removal of wear debris, and presence of corrosive environment), there is no insurance that the test will predict the wear rate of a given material under conditions differing from those in the test.
5.2 The use of this test method will fall in one of two categories: (1) the test(s) will follow all particulars of the standard, and the results will have been compared to the ILS data (Table 2), or (2) the test(s) will have followed the procedures/methodology of Test Method G99 but applied to other materials or using other parameters such as load, speed, materials, etc., or both. In this latter case, the results cannot be compared to the ILS data (Table 2). Further, it must be clearly stated what choices of test parameters/materials were chosen.
SCOPE
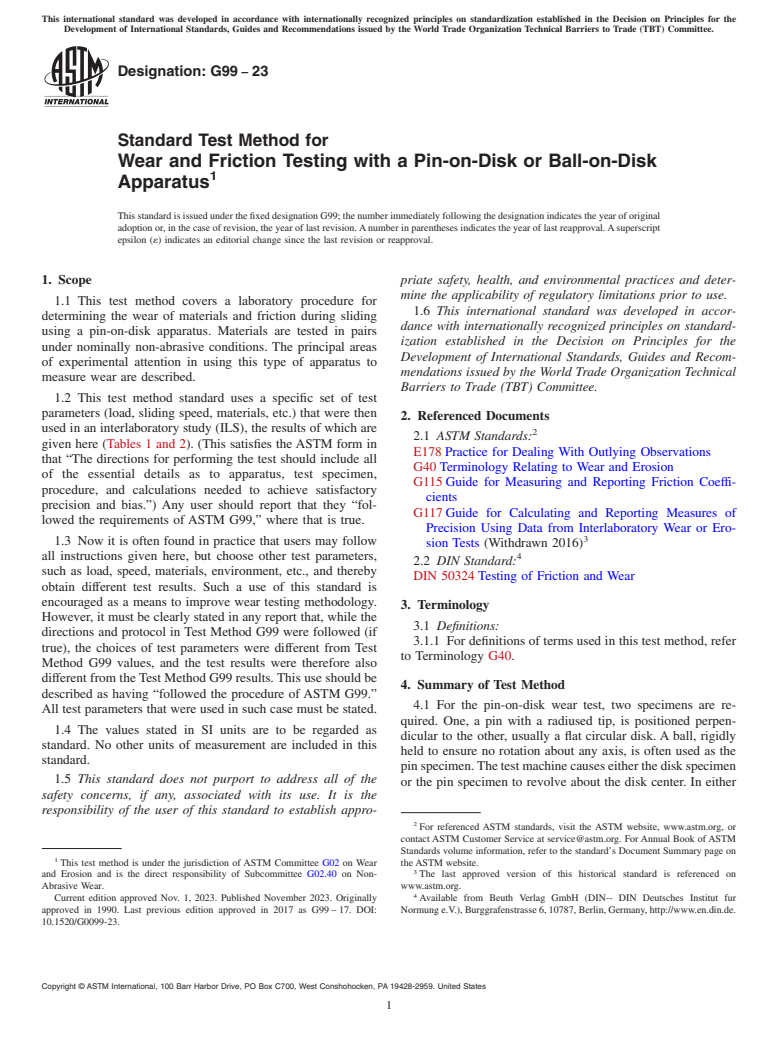
1.1 This test method covers a laboratory procedure for determining the wear of materials and friction during sliding using a pin-on-disk apparatus. Materials are tested in pairs under nominally non-abrasive conditions. The principal areas of experimental attention in using this type of apparatus to measure wear are described.
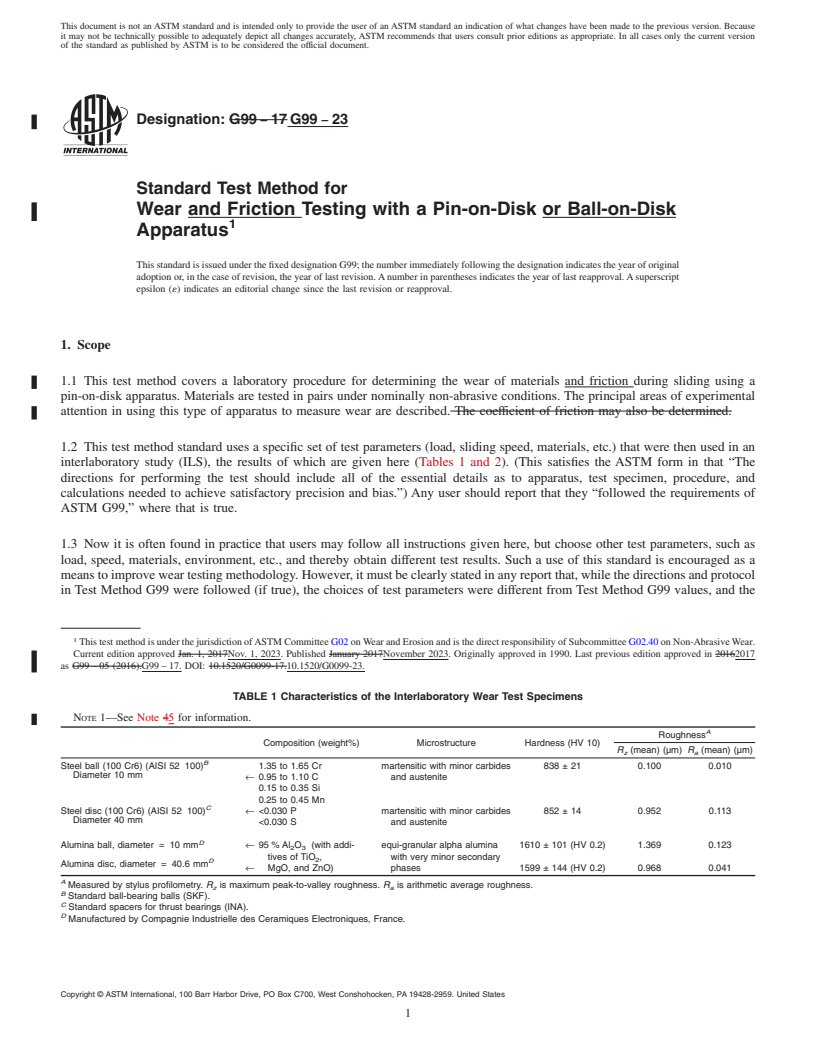
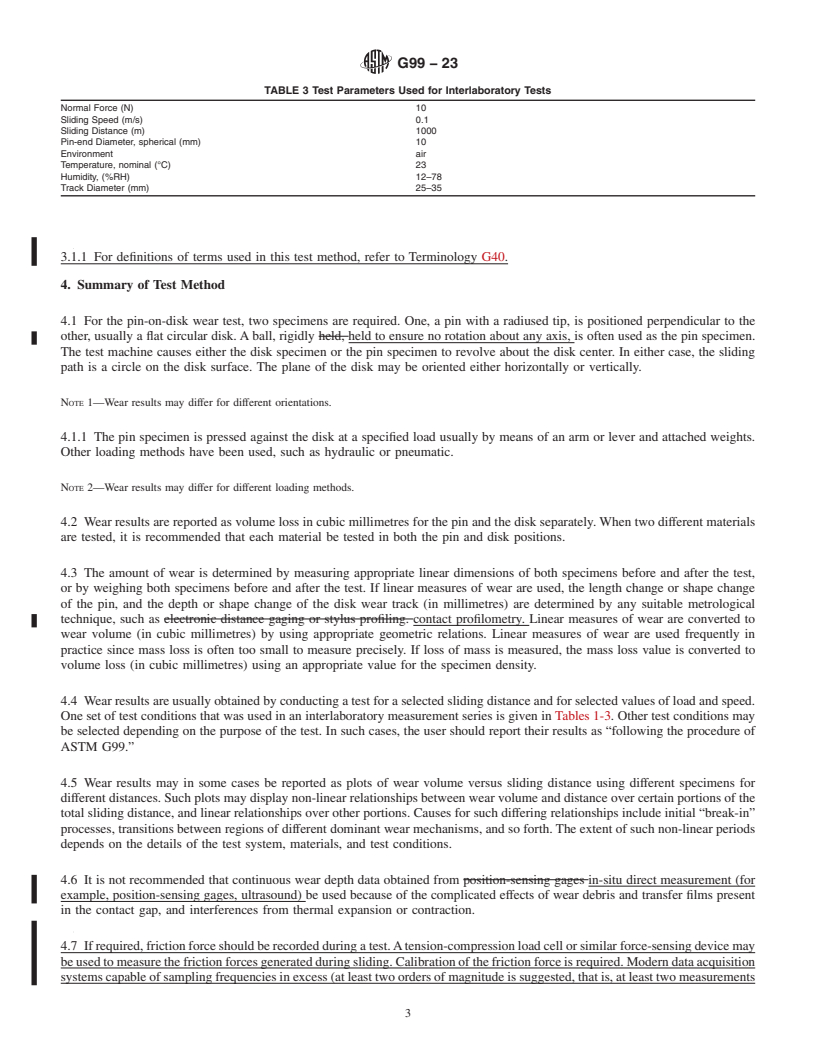
1.2 This test method standard uses a specific set of test parameters (load, sliding speed, materials, etc.) that were then used in an interlaboratory study (ILS), the results of which are given here (Tables 1 and 2). (This satisfies the ASTM form in that “The directions for performing the test should include all of the essential details as to apparatus, test specimen, procedure, and calculations needed to achieve satisfactory precision and bias.”) Any user should report that they “followed the requirements of ASTM G99,” where that is true.
1.3 Now it is often found in practice that users may follow all instructions given here, but choose other test parameters, such as load, speed, materials, environment, etc., and thereby obtain different test results. Such a use of this standard is encouraged as a means to improve wear testing methodology. However, it must be clearly stated in any report that, while the directions and protocol in Test Method G99 were followed (if true), the choices of test parameters were different from Test Method G99 values, and the test results were therefore also different from the Test Method G99 results. This use should be described as having “followed the procedure of ASTM G99.” All test parameters that were used in such case must be stated.
1.4 The values stated in SI units are to be regarded as standard. No other units of measurement are included in this standard.
1.5 This standard does not purport to address all of the safety concerns, if any, associated with its use. It is the responsibility of the user of this standard to establish appropriate safety, health, and environmental practices and determine the applicability of regulatory limitations prior to use.
1.6 This international standard was developed in accordance with internationally recognized principles on standardization established in the Decision on Principles for the Development of International Standards, Guides and Recommendations issued by the World Trade Organization Technical Barriers to Trade (TBT) Committee.
General Information
Relations
Buy Standard
Standards Content (Sample)
This international standard was developed in accordance with internationally recognized principles on standardization established in the Decision on Principles for the
Development of International Standards, Guides and Recommendations issued by the World Trade Organization Technical Barriers to Trade (TBT) Committee.
Designation: G99 − 23
Standard Test Method for
Wear and Friction Testing with a Pin-on-Disk or Ball-on-Disk
1
Apparatus
This standard is issued under the fixed designation G99; the number immediately following the designation indicates the year of original
adoption or, in the case of revision, the year of last revision. A number in parentheses indicates the year of last reapproval. A superscript
epsilon (´) indicates an editorial change since the last revision or reapproval.
1. Scope priate safety, health, and environmental practices and deter-
mine the applicability of regulatory limitations prior to use.
1.1 This test method covers a laboratory procedure for
1.6 This international standard was developed in accor-
determining the wear of materials and friction during sliding
dance with internationally recognized principles on standard-
using a pin-on-disk apparatus. Materials are tested in pairs
ization established in the Decision on Principles for the
under nominally non-abrasive conditions. The principal areas
Development of International Standards, Guides and Recom-
of experimental attention in using this type of apparatus to
mendations issued by the World Trade Organization Technical
measure wear are described.
Barriers to Trade (TBT) Committee.
1.2 This test method standard uses a specific set of test
parameters (load, sliding speed, materials, etc.) that were then
2. Referenced Documents
used in an interlaboratory study (ILS), the results of which are
2
2.1 ASTM Standards:
given here (Tables 1 and 2). (This satisfies the ASTM form in
E178 Practice for Dealing With Outlying Observations
that “The directions for performing the test should include all
G40 Terminology Relating to Wear and Erosion
of the essential details as to apparatus, test specimen,
G115 Guide for Measuring and Reporting Friction Coeffi-
procedure, and calculations needed to achieve satisfactory
cients
precision and bias.”) Any user should report that they “fol-
G117 Guide for Calculating and Reporting Measures of
lowed the requirements of ASTM G99,” where that is true.
Precision Using Data from Interlaboratory Wear or Ero-
3
1.3 Now it is often found in practice that users may follow
sion Tests (Withdrawn 2016)
all instructions given here, but choose other test parameters, 4
2.2 DIN Standard:
such as load, speed, materials, environment, etc., and thereby
DIN 50324 Testing of Friction and Wear
obtain different test results. Such a use of this standard is
encouraged as a means to improve wear testing methodology.
3. Terminology
However, it must be clearly stated in any report that, while the
3.1 Definitions:
directions and protocol in Test Method G99 were followed (if
3.1.1 For definitions of terms used in this test method, refer
true), the choices of test parameters were different from Test
to Terminology G40.
Method G99 values, and the test results were therefore also
different from the Test Method G99 results. This use should be
4. Summary of Test Method
described as having “followed the procedure of ASTM G99.”
4.1 For the pin-on-disk wear test, two specimens are re-
All test parameters that were used in such case must be stated.
quired. One, a pin with a radiused tip, is positioned perpen-
1.4 The values stated in SI units are to be regarded as
dicular to the other, usually a flat circular disk. A ball, rigidly
standard. No other units of measurement are included in this
held to ensure no rotation about any axis, is often used as the
standard.
pin specimen. The test machine causes either the disk specimen
1.5 This standard does not purport to address all of the
or the pin specimen to revolve about the disk center. In either
safety concerns, if any, associated with its use. It is the
responsibility of the user of this standard to establish appro-
2
For referenced ASTM standards, visit the ASTM website, www.astm.org, or
contact ASTM Customer Service at service@astm.org. For Annual Book of ASTM
Standards volume information, refer to the standard’s Document Summary page on
1
This test method is under the jurisdiction of ASTM Committee G02 on Wear the ASTM website.
3
and Erosion and is the direct responsibility of Subcommittee G02.40 on Non- The last approved version of this historical standard is referenced on
Abrasive Wear. www.astm.org.
4
Current edition approved Nov. 1, 2023. Published November 2023. Originally Available from Beuth Verlag GmbH (DIN-- DIN Deutsches Institut fur
approved in 1990. Last previous edition approved in 2017 as G99 – 17. DOI: Normung e.V.), Burggrafenstrasse 6, 10787, Berlin, Germany, http://www.en.din.de.
10.1520/G0099-23.
Copyright © ASTM International, 100 Barr Harbor Drive, PO Box C700, West Cons
...
This document is not an ASTM standard and is intended only to provide the user of an ASTM standard an indication of what changes have been made to the previous version. Because
it may not be technically possible to adequately depict all changes accurately, ASTM recommends that users consult prior editions as appropriate. In all cases only the current version
of the standard as published by ASTM is to be considered the official document.
Designation: G99 − 17 G99 − 23
Standard Test Method for
Wear and Friction Testing with a Pin-on-Disk or Ball-on-Disk
1
Apparatus
This standard is issued under the fixed designation G99; the number immediately following the designation indicates the year of original
adoption or, in the case of revision, the year of last revision. A number in parentheses indicates the year of last reapproval. A superscript
epsilon (´) indicates an editorial change since the last revision or reapproval.
1. Scope
1.1 This test method covers a laboratory procedure for determining the wear of materials and friction during sliding using a
pin-on-disk apparatus. Materials are tested in pairs under nominally non-abrasive conditions. The principal areas of experimental
attention in using this type of apparatus to measure wear are described. The coefficient of friction may also be determined.
1.2 This test method standard uses a specific set of test parameters (load, sliding speed, materials, etc.) that were then used in an
interlaboratory study (ILS), the results of which are given here (Tables 1 and 2). (This satisfies the ASTM form in that “The
directions for performing the test should include all of the essential details as to apparatus, test specimen, procedure, and
calculations needed to achieve satisfactory precision and bias.”) Any user should report that they “followed the requirements of
ASTM G99,” where that is true.
1.3 Now it is often found in practice that users may follow all instructions given here, but choose other test parameters, such as
load, speed, materials, environment, etc., and thereby obtain different test results. Such a use of this standard is encouraged as a
means to improve wear testing methodology. However, it must be clearly stated in any report that, while the directions and protocol
in Test Method G99 were followed (if true), the choices of test parameters were different from Test Method G99 values, and the
1
This test method is under the jurisdiction of ASTM Committee G02 on Wear and Erosion and is the direct responsibility of Subcommittee G02.40 on Non-Abrasive Wear.
Current edition approved Jan. 1, 2017Nov. 1, 2023. Published January 2017November 2023. Originally approved in 1990. Last previous edition approved in 20162017
as G99 – 05 (2016).G99 – 17. DOI: 10.1520/G0099-17.10.1520/G0099-23.
TABLE 1 Characteristics of the Interlaboratory Wear Test Specimens
NOTE 1—See Note 45 for information.
A
Roughness
Composition (weight%) Microstructure Hardness (HV 10)
R (mean) (μm) R (mean) (μm)
z a
B
Steel ball (100 Cr6) (AISI 52 100) 1.35 to 1.65 Cr martensitic with minor carbides 838 ± 21 0.100 0.010
Diameter 10 mm
← 0.95 to 1.10 C and austenite
0.15 to 0.35 Si
0.25 to 0.45 Mn
C
Steel disc (100 Cr6) (AISI 52 100) ← <0.030 P martensitic with minor carbides 852 ± 14 0.952 0.113
Diameter 40 mm
<0.030 S and austenite
D
Alumina ball, diameter = 10 mm ← 95 % Al O (with addi- equi-granular alpha alumina 1610 ± 101 (HV 0.2) 1.369 0.123
2 3
tives of TiO , with very minor secondary
2
D
Alumina disc, diameter = 40.6 mm
← MgO, and ZnO) phases 1599 ± 144 (HV 0.2) 0.968 0.041
A
Measured by stylus profilometry. R is maximum peak-to-valley roughness. R is arithmetic average roughness.
z a
B
Standard ball-bearing balls (SKF).
C
Standard spacers for thrust bearings (INA).
D
Manufactured by Compagnie Industrielle des Ceramiques Electroniques, France.
Copyright © ASTM International, 100 Barr Harbor Drive, PO Box C700, West Conshohocken, PA 19428-2959. United States
1
---------------------- Page: 1 ----------------------
G99 − 23
A
TABLE 2 Results of the Interlaboratory Tests
NOTE 1—See NoteFootnote A for test conditions.
NOTE 2—Numbers in parentheses refer to all data received in the tests. In accordance with Practice E178, outlier data values were identified in some
cases and discarded, resulting in the numbers without parentheses. The differences are seen to be small.
NOTE 3—Values preceded by ± are one standard deviation.
NOTE 4—Data were provided by 28 laboratories.
NOTE 5—Calculated quantities (for example, wear volume) are given as mean values only.
NOTE 6—Values labeled “NM” were found to be smaller than the reproducible limit of measurement.
NOTE 7—A similar compilation of test data is given in DIN 50324.
Specimen Pairs
Results (ball) (disk)
Steel-steel Alumina-steel Steel-alumina Alumina-alumina
Ball wear scar diameter (mm) 2.11 ± 0.27 NM 2.08 ± 0.35 0.3± 0.06
(2.11 ± 0.27) (2.03 ± 0.41) (0.3 ± 0.06)
−3 3
Ball wear volume (10 mm ) 198 . 186 0.08
(198) (169) (0.08)
Number of values 10
...


Questions, Comments and Discussion
Ask us and Technical Secretary will try to provide an answer. You can facilitate discussion about the standard in here.