ISO 1101:1983/Ext 1:1983
(Main)Technical drawings - Geometrical tolerancing - Tolerancing of form, orientation, location and run-out - Generalities, definitions, symbols, indications on drawings - Extract 1: Toleranced characteristics and symbols - Examples of indication and interpretation
Technical drawings - Geometrical tolerancing - Tolerancing of form, orientation, location and run-out - Generalities, definitions, symbols, indications on drawings - Extract 1: Toleranced characteristics and symbols - Examples of indication and interpretation
Dessins techniques — Tolérancement géométrique — Tolérancement de forme, orientation, position et battement — Généralités, définitions, symboles, indications sur les dessins — Extrait 1: géométrique — Caractéristiques à tolérancer et symboles — Exemples d'indication et d'interprétation
General Information
Relations
Frequently Asked Questions
ISO 1101:1983/Ext 1:1983 is a standard published by the International Organization for Standardization (ISO). Its full title is "Technical drawings - Geometrical tolerancing - Tolerancing of form, orientation, location and run-out - Generalities, definitions, symbols, indications on drawings - Extract 1: Toleranced characteristics and symbols - Examples of indication and interpretation". This standard covers: Technical drawings - Geometrical tolerancing - Tolerancing of form, orientation, location and run-out - Generalities, definitions, symbols, indications on drawings - Extract 1: Toleranced characteristics and symbols - Examples of indication and interpretation
Technical drawings - Geometrical tolerancing - Tolerancing of form, orientation, location and run-out - Generalities, definitions, symbols, indications on drawings - Extract 1: Toleranced characteristics and symbols - Examples of indication and interpretation
ISO 1101:1983/Ext 1:1983 is classified under the following ICS (International Classification for Standards) categories: 01.100.20 - Mechanical engineering drawings. The ICS classification helps identify the subject area and facilitates finding related standards.
ISO 1101:1983/Ext 1:1983 has the following relationships with other standards: It is inter standard links to ISO 1101:1983; is excused to ISO 1101:1983. Understanding these relationships helps ensure you are using the most current and applicable version of the standard.
You can purchase ISO 1101:1983/Ext 1:1983 directly from iTeh Standards. The document is available in PDF format and is delivered instantly after payment. Add the standard to your cart and complete the secure checkout process. iTeh Standards is an authorized distributor of ISO standards.
Standards Content (Sample)
Technical drawings - Geometrical tolerancing - Toleranced
Extract from
characteristics and symbols - Examples of indication and
International Standard
interpretation
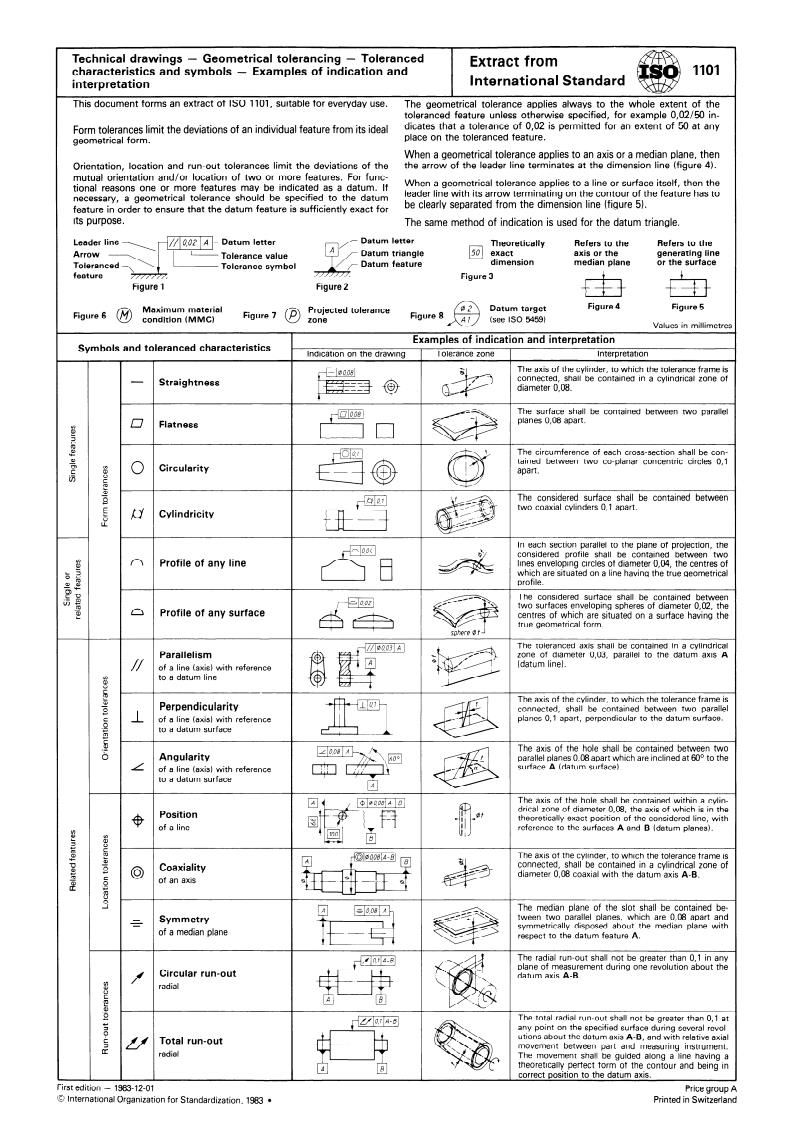
This document forms an extract of IS0 1101, suitable for everyday use.
The geometrical tolerance applies always to the whole extent of the
I toleranced feature unless otherwise SDecified. for examde 0.02/50 in-
dicates that a tolerance of 0.02 is permitted for an extent of 50 at any
Form tolerances limit the deviations of an individual feature from its ideal
place on the toleranced feature.
geometrical form.
When a geometrical tolerance applies to an axis or a median plane, then
I Orientation. location and run-out tolerances limit the deviations of the the arrow of the leader line terminates at the dimension line (figure 4).
mutual orientation and/or location of two or more features. For func-
When a geometrical tolerance applies to a line or surface itself, then the
tional reasons one or features may be indicated as a If
leader line with its arrow terminating on the contour of the feature has to
neceçsary, a geometrical tolerance should be specified to the datum
line (figure 5).
be clearly separated from the
feature in order to ensure that the datum feature is sufficiently exact for
its purpose.
The same method of indication is used for the datum triangle.
Lz Datum letter Theoretically Refers to the Refers to the
Tolerance value Datum triangle exact axis or the generating line
Datum feature dimension median plane or the surface
Tolerance symbol
Figure 3
Figure 1 Figure 2
Projected tolerance Figure ,@ Datum target Figure 4 Figure 5
Maximum material
Figure 6 Figure 7
8 condition (MMC) @ zone (see IS0 54591
Values . .~ in millimetres . .
Examoies of indication and interoretation
Symbols and toleranced characteristics
Indication on the drawing Tolerance zone Interpretation
-
The axis of the cylinder, to which the tolerance frame is
connected, shall be contained in a cylindrical zone of
7 Straightness
diameter 0.08.
The surface shall be contained between two parallel
planes 0.08 apart.
0 Flatness
The circumference of each cross-section shall be con-
tained between two co-planar concentric circles 0.1
Circularity
apart.
0 c
O1
m
-
The considered surface shall be contained between
e
a ,
two coaxial cylinders 0.1 apart.
E
Cylindricity
- -
LL
In each section parallel to the plane of projection, the
c
...
This document forms an extract of ISO 1101, suitable for everyday use.
The geometrical tolerante applies always to the whole extent of the
toleranced feature unless otherwise specified, for example 0,02/50 in-
dicates that a tolerante of 0,02 is permitted for an extent of 50 at any
Form tolerantes limit the deviations of an individual feature from its ideal
place on the toleranced feature.
geometrical form.
When a geometrical tolerante applies to an axis or a median plane, then
the arrow of the leader line terminates at the dimension line (figure 4).
Orientation, location and run-out tolerantes limit the deviations of the
mutual orientation and/or location of two or more features. For func-
When a geometrical tolerante applies to a line or surface itself, then the
tional reasons one or more features may be indicated as a datum. If
leader line with its arrow terminating on the contour of the feature has to
necessary, a geometrical tolerante should be specified to the datum
be clearly separated from the dimension line (figure 5).
feature in Order to ensure that the datum feature is sufficiently exact for
its purpose.
The same method of indication is used for the datum triangle.
Datum letter
Refers to the Refers to the
generating line
axis or the
median plane or the surface
Figure 3
Figure 4
Figure 5
Maximum material
condition (M MC)
Values in millimetres
Examples of indication and interpretation
Symbols and toleranced characteristics
Indication on the drawing Tolerante zone Interpretation
The axis of the cylinder, to which the tolerante frame is
connected shall be contained in a cylindrical zone of
- Straightness
fs* @ & diameter 0108.
The surface shall be contained between two parallel
planes 0,08 apart.
fl Flatness
z
Cl
The circumference of each Cross-section shall be con-
tained between two co-planar concentric circles 0,l
two coaxial cylinders 0,l apart.
Profile of any line
Profile of any surface
centres of which are situated on a surface having the
true geometrical form.
The toleranced axis shall be contained in a cylindrical
zone of diameter 0,03, parallel to the datum axis A
of a line (axis) with reference
Perpendicularity
of a line (axis) with reference
to a datum surface
The axis of the hole shall be contained between two
parallel planes 0,08 apart which are inclined at 60° to the
surface A (datum surface).
The axis of the cylinder, to which the tolerante frame is
connected, shall be contained in a cylindrical zone of
diameter 0,08 coaxial with the datum axis A-B.
of the slot shall be contained be-
planes, which are 0,08 apart and
sed about the median plane with
Circular run-out
un-out shall not be greater than 0,l at
specified surface during several revol-
datum axis A-B, and with relative axial
een part and measuring instrument.
along a line having a
ontour and being in
First edition -
...
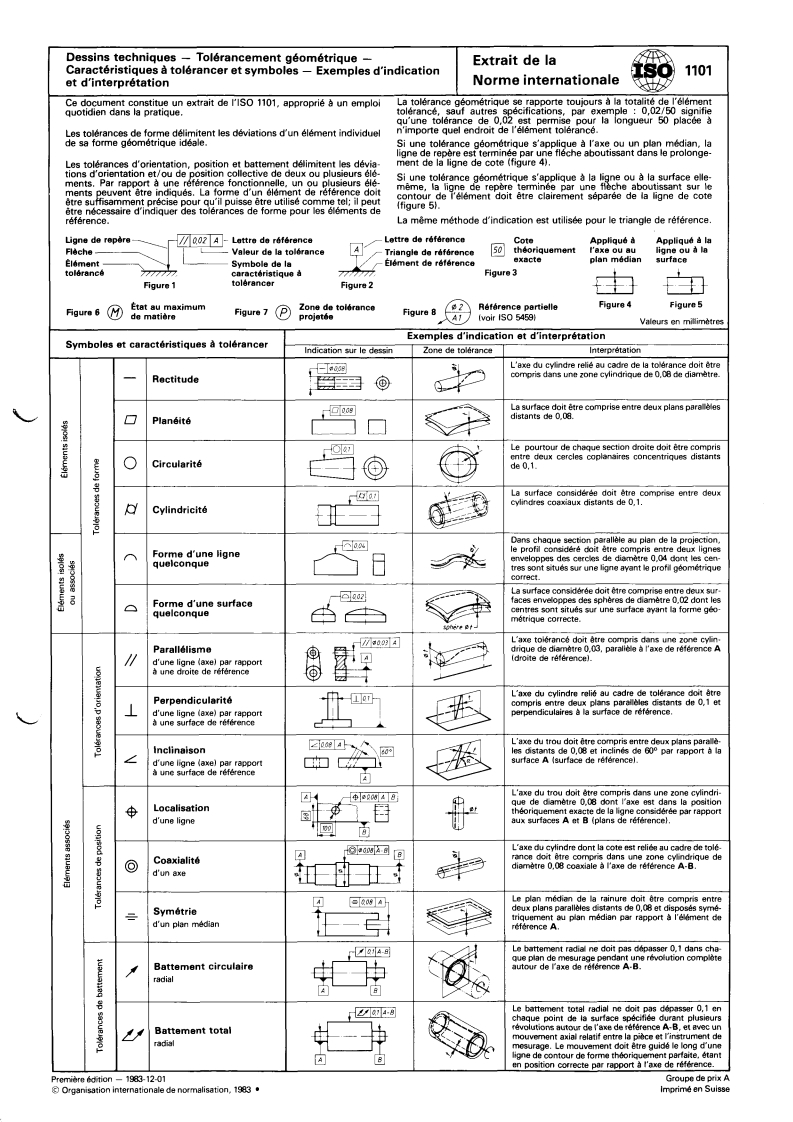
La tolérance géométrique se.rapporte toujours à la totalité de l'élément
Ce document constitue un extrait de 1'1S0 1101, approprié 3 un emploi
tolérancé, sauf autres spécifications, par exemple : 0,02/50 signifie
quotidien dans la pratique.
qu'une tolérance de 0.02 est permise pour la longueur 50 placée à
quel endroit de I'é1ément tolérancé.
Les tolérances de forme délimitent les déviations d'un élément individuel
de sa forme géométrique idéale.
Si une tolérance géométrique s'applique à l'axe ou un plan médian, la
ligne de repère est terminée par une fléche aboutissant dans le prolonge-
ment de la ligne de cote (figure 4).
Les tolérances d'orientation. oosition et battement délimitent les dévia-
~ .~-. ., r.~ ~ ~~~~ ~ ~~ ~ ~~ ~~ .-
tions d'orientation et/ou de position collective de deux ou plusieurs 618-
Si une tolérance géométrique s'applique à la li ne ou a la surface elle-
mentS. Par rapport à une fonctionnelle, un ou plusieurs
même, la ligne de repère terminée par une fiche aboutissant sur ie
ments euvent être indiqués, La forme dru,, élément de doit
contour de l'élément doit être clairement séparée de la ligne de cote
être su,$isamment orecise au,iI Duisse être utilisé tel; II Deut f&.-." CI
'''y"'r
être nécessaire d'indiquer des tolérances de forme pour les éléments de
référence. La même méthode d'indication est utilisée pour le triangle de référence
Ligne de repère
Lettre de référence Cote Appliqué à Appliqué à la
Flèche Triangle de @ théoriquement t'axe ou au ligne ou à ia
exacte plan médian surface
Symbole de la Élément de référence
caractéristique à Figure 3
Figure 1 tolérancer Figure 2
Référence partielle Figure 4 Figure 5
État au maximum
Figure 8 de matière Figure 7 @ ~~~~~
Figure ôB (voir IS0 5459)
Valeurs en millimètre:
Exemples d'indication et d'interprétation
Symboles et caractéristiques A tolérancer
Indication sur le dessin Zone de tolérance Interprétation
L'axe du cylindre relié au cadre de la tolérance doit être
compris dans une zone cylindrique de 0.08 de diamètre.
-
Rectitude
La surface doit être comprise entre deux plans parallèles
distants de 0.08.
0 Pianéité
Le pourtour de chaque section droite doit être compris
mtre deux cercles coplanaires concentriques distants
de0.1.
0 Circularité
La surface considérée doit être comprise entre deux
cylindres coaxiaux distants de O, 1.
Dans chaque section parallèle au plan de la projection,
le profil considéré doit ê
...


Questions, Comments and Discussion
Ask us and Technical Secretary will try to provide an answer. You can facilitate discussion about the standard in here.
Loading comments...