EN 13480-5:2002
(Main)Metallic industrial piping - Part 5: Inspection and testing
Metallic industrial piping - Part 5: Inspection and testing
This part of EN 13480 describes the requirements for inspection and testing to be performed on individual spools or piping systems, including supports, designed in accordance with EN 13480-3 and fabricated and installed in accordance with EN 13480-4.
Metallische industrielle Rohrleitungen - Teil 5: Prufüng
Dieser Teil der EN 13480 beschreibt die Anforderungen an die Prüfungen, die bei Fertigung und Verlegung nach EN 13480-4 an einzelnen, nach EN 13480-3 ausgelegten vorgefertigten Baugruppen (Spools) oder Rohrleitungssystemen einschließlich Halterungen durchzuführen sind.
Tuyauteries industrielles métalliques - Partie 5: Inspection et contrôle
La présente partie de la norme européenne spécifie les exigences relatives à l'inspection et au contrôle tels que définis dans prEN 13480-1:1999, à exécuter sur les éléments de tuyauteries préfabriqués ou sur les réseaux de tuyauteries, supports compris, conçus conformément à prEN 13480-3 et à prEN 13480-6, et fabriqués et installés conformément à prEN 13480-4.
Kovinski industrijski cevovodi - 5. del: Kontrola in preskušanje
General Information
- Status
- Withdrawn
- Publication Date
- 28-May-2002
- Withdrawal Date
- 26-Jun-2012
- Technical Committee
- CEN/TC 267 - Industrial piping and pipelines
- Drafting Committee
- CEN/TC 267/WG 5 - Inspection and testing
- Current Stage
- 9960 - Withdrawal effective - Withdrawal
- Start Date
- 27-Jun-2012
- Completion Date
- 27-Jun-2012
- Directive
- 97/23/EC - Pressure equipment
Relations
- Effective Date
- 20-Jun-2012
- Effective Date
- 28-Jan-2026
- Effective Date
- 28-Jan-2026
- Effective Date
- 28-Jan-2026
- Effective Date
- 28-Jan-2026
- Effective Date
- 08-Jun-2022
- Effective Date
- 22-Dec-2008
Get Certified
Connect with accredited certification bodies for this standard

Institut za varilstvo d.o.o. (Welding Institute)
Slovenia's leading welding institute since 1952. ISO 3834, EN 1090, pressure equipment certification, NDT personnel, welder qualification. Only IIW Au
Sponsored listings
Frequently Asked Questions
EN 13480-5:2002 is a standard published by the European Committee for Standardization (CEN). Its full title is "Metallic industrial piping - Part 5: Inspection and testing". This standard covers: This part of EN 13480 describes the requirements for inspection and testing to be performed on individual spools or piping systems, including supports, designed in accordance with EN 13480-3 and fabricated and installed in accordance with EN 13480-4.
This part of EN 13480 describes the requirements for inspection and testing to be performed on individual spools or piping systems, including supports, designed in accordance with EN 13480-3 and fabricated and installed in accordance with EN 13480-4.
EN 13480-5:2002 is classified under the following ICS (International Classification for Standards) categories: 23.040.01 - Pipeline components and pipelines in general. The ICS classification helps identify the subject area and facilitates finding related standards.
EN 13480-5:2002 has the following relationships with other standards: It is inter standard links to EN 13480-5:2012, EN 14656:2006+A1:2010, EN 378-2:2008+A2:2012, EN 15001-1:2009, EN 14673:2006+A1:2010, EN 13480-5:2002/A1:2011; is excused to EN 13480-1:2002. Understanding these relationships helps ensure you are using the most current and applicable version of the standard.
EN 13480-5:2002 is associated with the following European legislation: EU Directives/Regulations: 97/23/EC; Standardization Mandates: M/071. When a standard is cited in the Official Journal of the European Union, products manufactured in conformity with it benefit from a presumption of conformity with the essential requirements of the corresponding EU directive or regulation.
EN 13480-5:2002 is available in PDF format for immediate download after purchase. The document can be added to your cart and obtained through the secure checkout process. Digital delivery ensures instant access to the complete standard document.
Standards Content (Sample)
2003-01.Slovenski inštitut za standardizacijo. Razmnoževanje celote ali delov tega standarda ni dovoljeno.Kovinski industrijski cevovodi - 5. del: Kontrola in preskušanjeMetallische industrielle Rohrleitungen - Teil 5: PrufüngTuyauteries industrielles métalliques - Partie 5: Inspection et contrôleMetallic industrial piping - Part 5: Inspection and testing77.140.75Jeklene cevi in cevni profili za posebne nameneSteel pipes and tubes for specific useICS:Ta slovenski standard je istoveten z:EN 13480-5:2002SIST EN 13480-5:2002en01-november-2002SIST EN 13480-5:2002SLOVENSKI
STANDARD
EUROPEAN STANDARDNORME EUROPÉENNEEUROPÄISCHE NORMEN 13480-5May 2002ICS 23.040.01English versionMetallic industrial piping - Part 5: Inspection and testingTuyauteries industrielles métalliques - Partie 5: Inspectionet contrôleMetallische industrielle Rohrleitungen - Teil 5: PrufüngThis European Standard was approved by CEN on 23 May 2002.CEN members are bound to comply with the CEN/CENELEC Internal Regulations which stipulate the conditions for giving this EuropeanStandard the status of a national standard without any alteration. Up-to-date lists and bibliographical references concerning such nationalstandards may be obtained on application to the Management Centre or to any CEN member.This European Standard exists in three official versions (English, French, German). A version in any other language made by translationunder the responsibility of a CEN member into its own language and notified to the Management Centre has the same status as the officialversions.CEN members are the national standards bodies of Austria, Belgium, Czech Republic, Denmark, Finland, France, Germany, Greece,Iceland, Ireland, Italy, Luxembourg, Malta, Netherlands, Norway, Portugal, Spain, Sweden, Switzerland and United Kingdom.EUROPEAN COMMITTEE FOR STANDARDIZATIONCOMITÉ EUROPÉEN DE NORMALISATIONEUROPÄISCHES KOMITEE FÜR NORMUNGManagement Centre: rue de Stassart, 36
B-1050 Brussels© 2002 CENAll rights of exploitation in any form and by any means reservedworldwide for CEN national Members.Ref. No. EN 13480-5:2002 ESIST EN 13480-5:2002
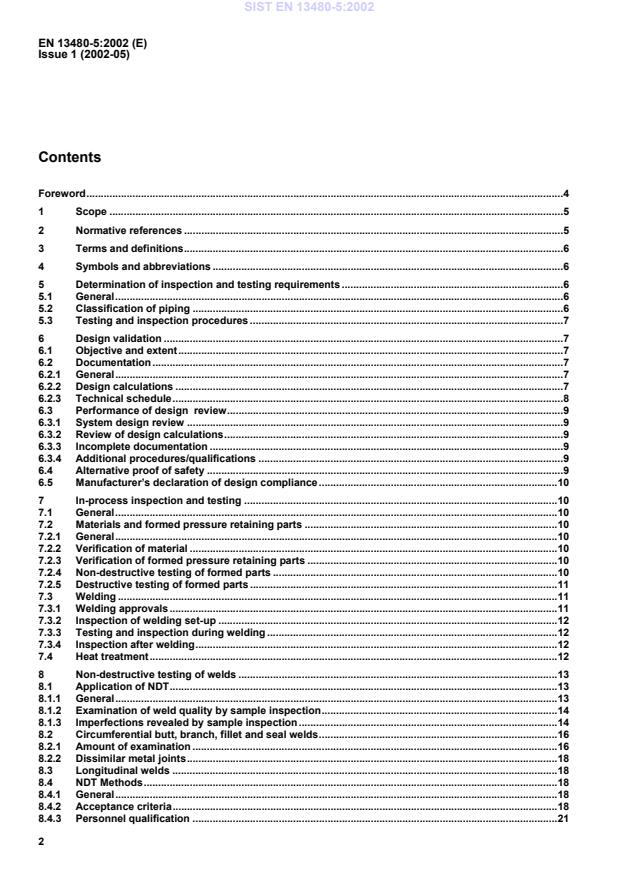
review.96.3.1System design review.96.3.2Review of design calculations.96.3.3Incomplete documentation.96.3.4Additional procedures/qualifications.96.4Alternative proof of safety.96.5Manufacturer’s declaration of design compliance.107In-process inspection and testing.107.1General.107.2Materials and formed pressure retaining parts.107.2.1General.107.2.2Verification of material.107.2.3Verification of formed pressure retaining parts.107.2.4Non-destructive testing of formed parts.107.2.5Destructive testing of formed parts.117.3Welding.117.3.1Welding approvals.117.3.2Inspection of welding set-up.127.3.3Testing and inspection during welding.127.3.4Inspection after welding.127.4Heat treatment.128Non-destructive testing of welds.138.1Application of NDT.138.1.1General.138.1.2Examination of weld quality by sample inspection.148.1.3Imperfections revealed by sample inspection.148.2Circumferential butt, branch, fillet and seal welds.168.2.1Amount of examination.168.2.2Dissimilar metal joints.188.3Longitudinal welds.188.4NDT Methods.188.4.1General.188.4.2Acceptance criteria.188.4.3Personnel qualification.21SIST EN 13480-5:2002
Inspection of safety systems.31Annex ZA (informative)
Clauses of this European Standard addressing essential requirements orother provisions of EU directives.32SIST EN 13480-5:2002
review6.3.1 System design review A review of isometrics and/or construction drawings, including parts lists and technical schedules, shall beperformed with regard to operating conditions of the following items: the suitability of the material for the pressurised and un-pressurised parts including the required materialinspection documents; the suitability of welding procedure specifications and approvals; suitability of weld joint design; provision for appropriate in-service testing and inspection ,where necessary; structural stability, including supports and fixed points; provision and adequacy of safety devices. The system design review shall be performed against the requirements of this European Standard.6.3.2 Review of design calculations The review of design calculations shall be carried out to verify that the dimensions specified meet the requirementsof EN 13480-3. The review shall also ensure that the stresses considered include pressure, temperature and thatall loads that may be applied during operating and testing have been considered.6.3.3 Incomplete documentation When all required data is not available at the time of the design validation, fabrication/installation may proceedprovided it shall not go beyond the applicable fabrication/installation stage, until approval is received.6.3.4 Additional procedures/qualifications Prior to the performance of the specific task involved, for piping class III the following shall be verified, preferably aspart of the design examination: Approval of welders; Qualification and certification
of NDT personnel; Procedures for finishing, e.g. cleaning, painting, insulation etc.6.4 Alternative proof of safety If the design proposed by the manufacturer has not been prepared by a method acceptable under the requirementsof EN 13480-3, then the manufacturer shall supply all the necessary information in support of the alternative designapproach. This may consist of mathematical analysis, proof test data, operating experience or any other data themanufacturer considers relevant to support this method of design. The documents submitted shall be reviewed toensure that the design of the piping is as safe as that provided by this European Standard and include theprinciples given in 6.3.SIST EN 13480-5:2002
5 000, 100 % volumetric testing of butt and branch welds; where PS · DN
3 500, 25 % volumetric testing of butt and branch welds;together with other testing specified in Table 8.2-1 for the combination of material, piping category andthickness;NOTE
For piping operating at 100 C or more, at least 10 % of socket welds should be radiographed to confirm that anadequate expansion gap has been achieved.f) For the selection of the appropriate NDT method for volumetric testing, see Table 8.4-4.SIST EN 13480-5:2002
prEN 13480-5:2002 (E)Issue 1 (2002-05)17 Table 8.2-1 — Extent of testing for circumferential, branch, fillet and seal welds Allwelds Circumferential welds Branch welds Socket/filletwelds Seal welds
Surface testing Volumetrictesting Surface testing Volumetric testing Surface testing Surface testing Materialgroup a Piping Class VT% en bmm MT/PT c% RT/UT%
Branchdiameter enmm MT/PT c% Branchdiameter en bmm RT/UT %
enmm MT/PT % enmm MT/PT %
5 I
5 d
5 II
Nil
All Nil All Nil Nil
10 1.11.28.1 III 100
All 10 > DN 100 > 15 10
10 All 10
5 10 I > 30
10 10
5 10 II > 30
10 10 All e All Nil All e 10 All e 5
25 1.3, 1.42.1, 2.24.1, 4.28.2, 8.39.1, 9.2, 9.310.1, 10.2 III 100 > 30
25 d All 10 > DN 100 > 15 10 All 25 All 25
25 I > 30
25 II > 30
25 d 25 25 25 10
30 100 100 3.1, 3.2, 3.3 5.1, 5.2, 5.35.4, 6.1, 6.2,6.3, 6.4, 7.1,7.2, 11 III 100 > 30 100
100 d All 100 All 100 All 100 All 100 a
Material group, see CR ISO 15608. bFor the selection of the appropriate NDT-method for volumetric testing, see Table 8.4.2. cFor ferritic materials preference shall be given to MT. dAdditional testing for transverse defects from weld surface (see 8.4.4.2). e
Only if PWHT has been carried out.SIST EN 13480-5:2002
prEN 13480-5:2002 (E)Issue 1 (2002-05)188.2.2 Dissimilar metal joints The test methods and extent of testing for joints between ferritic and other materials (e.g. austenitic, nickel-basedalloys) shall be according to the highest material group which is applicable to the base materials.8.3 Longitudinal welds Longitudinal welds, except those in components made to material specifications acceptable to this EuropeanStandard, shall be subject to the level of NDT appropriate to the joint coefficient required (see Table 8.3-1). Table 8.3-1 — Extent of NDT for longitudinal welds Joint coefficient z VT
% MT or PT a
% RT or UT b
% z
0,7 100 0 0
0,7 < z
0,85 100 10 10
0,85 < z
1,0 100 100 100 a for ferritic materials preference shall be given to MT. b see Table 8.4-3 8.4 NDT Methods8.4.1 General The NDT methods specified in the following clauses shall be performed in accordance with written NDT procedures,and, where appropriate, with NDT instructions.8.4.2 Acceptance criteria The acceptance criteria for the NDT techniques shall follow the European Standards in Table 8.4-1. Requirements foracceptance criteria for surface imperfections are given in Table 8.4-2 and additional requirements for acceptancecriteria for internal imperfections detected by RT are given in Table 8.4-3. Table 8.4-1 —
NDT techniques, method, acceptance criteria NDT Technique(abbreviation) Method Acceptance Criteria Visual Examination (VT) EN 970 Table 8.4-2 Radiographic Testing (RT) EN 1435:1997, class B a b EN 12517:1998Acceptance level 2 and additionalrequirements of Table 8.4-3 Ultrasonic Testing (UT) EN 1714:1998, class B b EN 1712 :1997, cAcceptance level 2 d Penetrant Testing (PT) EN 571-1 EN 1289 :1998,Acceptance level 1 Magnetic Particle Testing (MT) EN 1290 EN 1291
:1998,Acceptance level 1 a
However, the maximum area for single exposure shall correspond to the requirements of EN 1435:1997, class A. b
Class A for material group 1.1, 1.2, 8.1 when piping class is I or II. c
For the characterization of indications EN 1713 may be used. d
Acceptance level 3 for material group 1.1, 1.2, 8.1 when piping class is I or II. SIST EN 13480-5:2002
prEN 13480-5:2002 (E)Issue 1 (2002-05)19 Table 8.4-2 — Acceptance criteria for surface imperfections Identification of surface imperfection Maximum permitted imperfection Piping class in accordance withEN 13480-1:2002, Table 4.1-1 III II I EN ISO 6520-1:1998,Referencenumber Designation EN 25817:1992Referencenumber EN 25817:1992, quality level Additional requirements a 1001-1064 Cracks (all) 1 Not permitted
2011-20172021-2024 Gas cavity (all)Shrinkage cavity (all) 3 to 5 B1) B C 1) When occurring at the surface,- diameter = 2 mm and- depth = 1 mmwith additional conditions that:- it does not occur at a stop or restart- it is not systematic on the same weld for pressure welds or load carrying attachment welds. 3011-30143021-30243033041-3043 Slag inclusions (all)Flux inclusions (all)Oxide inclusionsMetallic inclusions (all) 6666,7 Not permitted shall be removed e. g. by grinding 4011-4013 Lack of fusion (all) 8 Not permitted
402 Lack of penetration 9 Not permitted If a full penetration weld is required 5011-5012 Undercut 11 B2) C C 2) t
16 mm :h
0,5 mm for longimperfections6 mm
t < 16 mm:h = 0,3 mm for longimperfections;h = 0,5 mm forshort imperfectionst < 6 mm: h < 0,3 mm forshort imperfections 5013 Shrinkage grove 21 B C C
502 Excessive weld metal 12 B C C Smooth transition is required.Weld toe angle
120 503 Excessive convexity 13 C C C Same as for 502 504 Excess penetration 16 B C C
5041 Local excess penetration 17 B B C
506 Overlap 22 Not permitted
507 Linear misalignment 18
See EN 13480-4 508 Angular misalignment -
See EN 13480-4 509 Sagging 19 B B B
511 Incompletely filled groove 19 B B B
512 Excessive asymmetry offillet welds 20 D D D
512 Excessive asymmetry offillet welds 20 D D D
515 Root concavity 21 B B B Long imperfection: not permitted (continued)SIST EN 13480-5:2002
prEN 13480-5:2002 (E)Issue 1 (2002-05)20 Table 8.4-2 (concluded) Identification of surface imperfection Maximum permitted imperfection Piping class in accordance withEN 13480-1:2002, Table 4.1-1 III II I EN ISO 6520-1:1998,Referencenumber Designation EN 25817:1992Referencenumber EN 25817:1992, quality level Additional requirements a 516 Root porosity - Not permitted
517 Poor restart 23 Not permitted
601 Stray flash 24 Not permitted shall be removed, e.g. by grinding plus MT or PTor ensure that no crack is left 602 Spatter 25 Not permitted NOTE: in the special case of circumferentialwelded fins which are attached to tubes by amechanised welding process, spatter shall beminimised, but any produced may remain,regardless of the material or heat treatmentinvolved. 603 Torn surface - Not permitted shall be ground, a smooth transition is required. 604 Grinding mark
Not permitted shall be ground flash, a smooth transition isrequired 605 Chipping mark
Not permitted shall be ground flash, a smooth transition isrequired. 606 Under flushing
Not permitted any local underflushing shall be related to thedesign characteristics (calculated thichness +corrosion allowance = minimum thickness forbase material) (Thickness shall be measured by ultrasonicmethod) a
Symbols according to EN 25817:1992. SIST EN 13480-5:2002
prEN 13480-5:2002 (E)Issue 1 (2002-05)21 Table 8.4-3 — Additional requirements for acceptance criteria for internal imperfections detected by RT Identification of internal
imperfection Maximum permitted imperfection Piping class in accordance withEN 13480-1:2002, Table 4.1-1 III II I ENISO 6520-1:1998Referencenumber Designation EN 25817:1992Referencenumber EN 25817:1992, quality level Additional requirements a 1001-1064 Cracks (all) 1 Not permitted
2011-2016 Gas cavity (all) 3-5 B B C For No 2012, the distance between two poresshall always be greater than twice the diameterof the bigger one, and not less than 4 mm (toensure that there is no chance of having a lack offusion) For No 2014 same as for uniformly distributedpores.For No 2015 and 2016 l = 0,3 t, maximum 5 mm,and w = 2 mm 2021-2024 Shrinkage cavity (all) - Not permitted
3011-30143021-3024303 Slag inclusions (all)Flux inclusions (all)Oxide inclusions 6 1) 1) w = 0,3 t, maximum 3 mm and depending ofthe application:1 < t
25 mmIn case of several line at slag inclusions with adistance between 2 of them less than twice thelongest of them, the total length is to beconsidered as a defect. 3042 Metallic inclusions (copper) 7 Not permitted
3041 and3043 Metallic inclusions (allothers) - 2) 2)
Same as for gas cavities
No 2011 – 2012 –2013 4011-4013 Lack of fusion (all) 8 Not permitted
402 Lack of penetration 9
Not permitted If a full penetration weld is required – Multiple imperfections inany cross section 26 B B B
a
Symbols according to EN 25817:1992, w = maximum size of cavity 8.4.3 Personnel qualification Testing sha
...


Questions, Comments and Discussion
Ask us and Technical Secretary will try to provide an answer. You can facilitate discussion about the standard in here.
Loading comments...