ASTM F2328-04
(Test Method)Standard Test Method for Determining Decarburization and Carburization in Hardened and Tempered Threaded Steel Bolts, Screws and Studs
Standard Test Method for Determining Decarburization and Carburization in Hardened and Tempered Threaded Steel Bolts, Screws and Studs
SCOPE
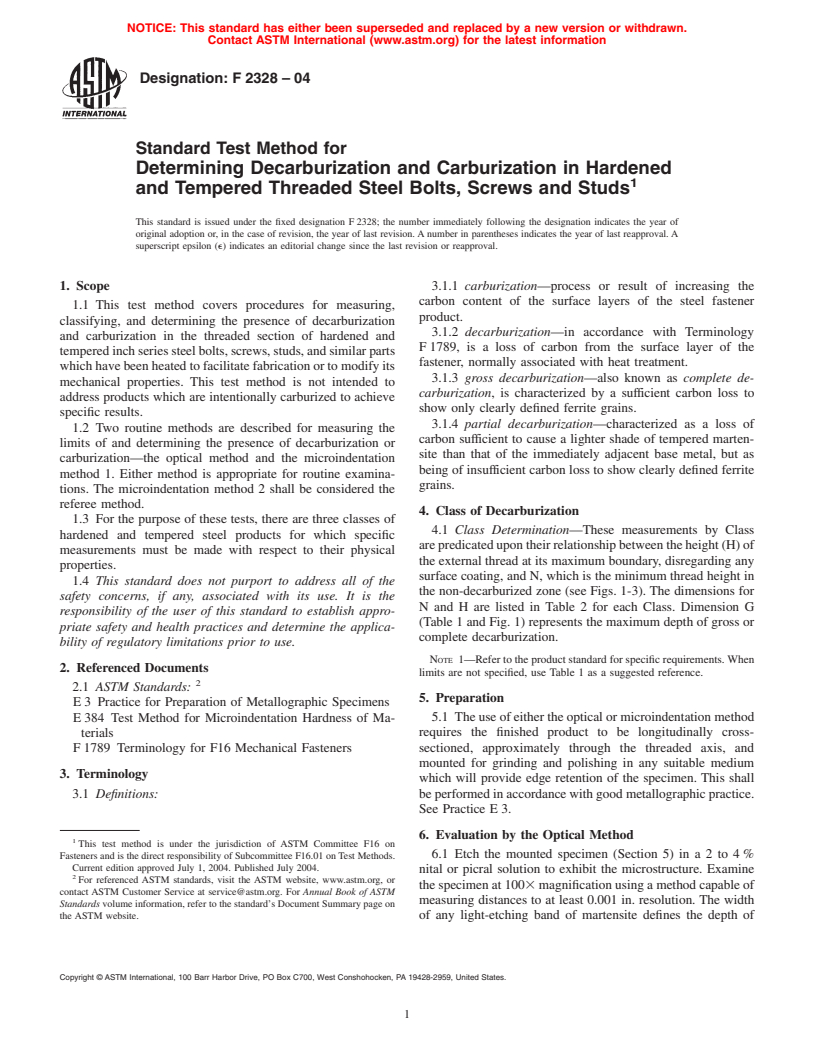
1.1 This test method covers procedures for measuring, classifying, and determining the presence of decarburization and carburization in the threaded section of hardened and tempered inch series steel bolts, screws, studs, and similar parts which have been heated to facilitate fabrication or to modify its mechanical properties. This test method is not intended to address products which are intentionally carburized to achieve specific results.
1.2 Two routine methods are described for measuring the limits of and determining the presence of decarburization or carburization-the optical method and the microindentation method 1. Either method is appropriate for routine examinations. The microindentation method 2 shall be considered the referee method.
1.3 For the purpose of these tests, there are three classes of hardened and tempered steel products for which specific measurements must be made with respect to their physical properties.
1.4 This standard does not purport to address all of the safety concerns, if any, associated with its use. It is the responsibility of the user of this standard to establish appropriate safety and health practices and determine the applicability of regulatory limitations prior to use.
General Information
Relations
Standards Content (Sample)
NOTICE: This standard has either been superseded and replaced by a new version or withdrawn.
Contact ASTM International (www.astm.org) for the latest information
Designation: F 2328 – 04
Standard Test Method for
Determining Decarburization and Carburization in Hardened
1
and Tempered Threaded Steel Bolts, Screws and Studs
This standard is issued under the fixed designation F 2328; the number immediately following the designation indicates the year of
original adoption or, in the case of revision, the year of last revision. A number in parentheses indicates the year of last reapproval. A
superscript epsilon (e) indicates an editorial change since the last revision or reapproval.
1. Scope 3.1.1 carburization—process or result of increasing the
carbon content of the surface layers of the steel fastener
1.1 This test method covers procedures for measuring,
product.
classifying, and determining the presence of decarburization
3.1.2 decarburization—in accordance with Terminology
and carburization in the threaded section of hardened and
F 1789, is a loss of carbon from the surface layer of the
temperedinchseriessteelbolts,screws,studs,andsimilarparts
fastener, normally associated with heat treatment.
whichhavebeenheatedtofacilitatefabricationortomodifyits
3.1.3 gross decarburization—also known as complete de-
mechanical properties. This test method is not intended to
carburization, is characterized by a sufficient carbon loss to
address products which are intentionally carburized to achieve
show only clearly defined ferrite grains.
specific results.
3.1.4 partial decarburization—characterized as a loss of
1.2 Two routine methods are described for measuring the
carbon sufficient to cause a lighter shade of tempered marten-
limits of and determining the presence of decarburization or
site than that of the immediately adjacent base metal, but as
carburization—the optical method and the microindentation
being of insufficient carbon loss to show clearly defined ferrite
method 1. Either method is appropriate for routine examina-
grains.
tions. The microindentation method 2 shall be considered the
referee method.
4. Class of Decarburization
1.3 For the purpose of these tests, there are three classes of
4.1 Class Determination—These measurements by Class
hardened and tempered steel products for which specific
arepredicatedupontheirrelationshipbetweentheheight(H)of
measurements must be made with respect to their physical
the external thread at its maximum boundary, disregarding any
properties.
surface coating, and N, which is the minimum thread height in
1.4 This standard does not purport to address all of the
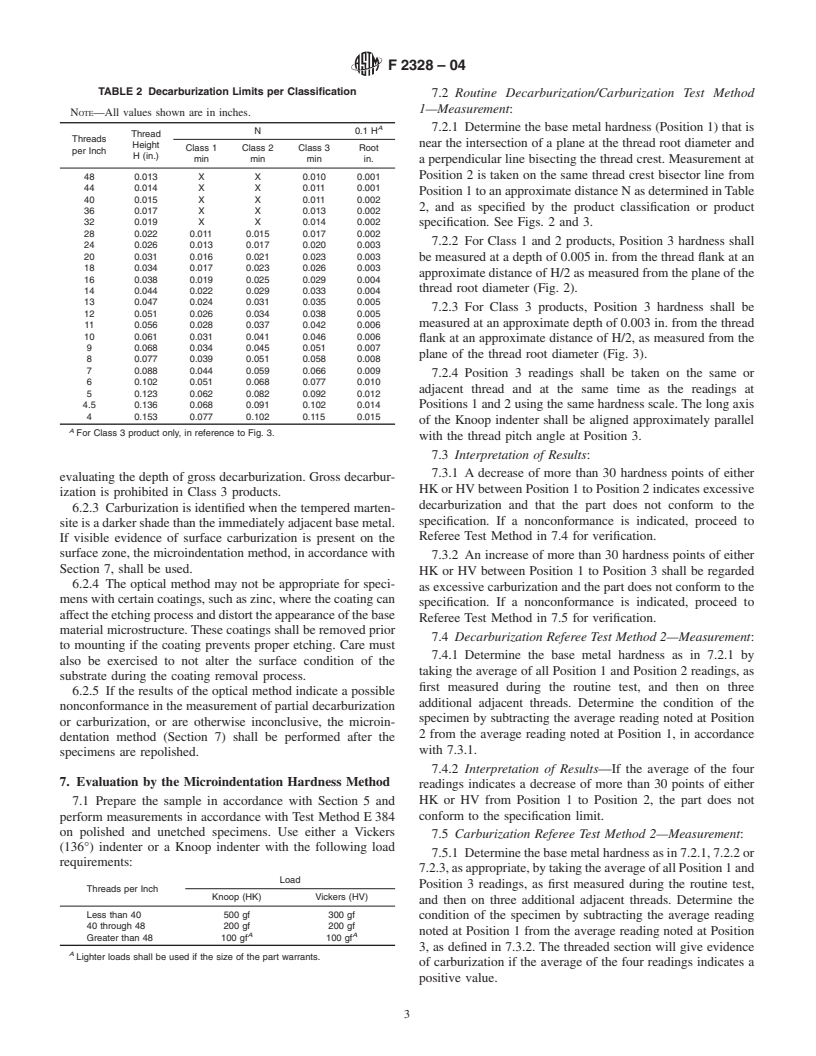
the non-decarburized zone (see Figs. 1-3). The dimensions for
safety concerns, if any, associated with its use. It is the
N and H are listed in Table 2 for each Class. Dimension G
responsibility of the user of this standard to establish appro-
(Table 1 and Fig. 1) represents the maximum depth of gross or
priate safety and health practices and determine the applica-
complete decarburization.
bility of regulatory limitations prior to use.
NOTE 1—Refer to the product standard for specific requirements.When
2. Referenced Documents
limits are not specified, use Table 1 as a suggested reference.
2
2.1 ASTM Standards:
5. Preparation
E 3 Practice for Preparation of Metallographic Specimens
5.1 The use of either the optical or microindentation method
E 384 Test Method for Microindentation Hardness of Ma-
terials requires the finished product to be longitudinally cross-
sectioned, approximately through the threaded axis, and
F 1789 Terminology for F16 Mechanical Fasteners
mounted for grinding and polishing in any suitable medium
3. Terminology
which will provide edge retention of the specimen. This shall
3.1 Definitions: beperformedinaccordancewithgoodmetallographicpractice.
See Practice E 3.
6. Evaluation by the Optical Method
1
This test method is under the jurisdiction of ASTM Committee F16 on
6.1 Etch the mounted specimen (Section 5) ina2to4%
Fasteners and is the direct responsibility of Subcommittee F16.01 on Test Methods.
Current edition approved July 1, 2004. Published July 2004.
nital or picral solution to exhibit the microstructure. Examine
2
For referenced ASTM standards, visit the ASTM website, www.astm.org, or
the specimen at 1003 magnification using a method capable of
contact ASTM Customer Service at service@astm.org. For Annual Book of ASTM
measuring distances to at least 0.001 in. resolution. The width
Standards volume information, refer to the standard’s Document Summary page on
the ASTM website. of any light-etching band of martensite defines the depth of
Copyright © ASTM International, 100 Barr Harbor Drive, PO Box C700, West Conshohocken, PA 19428-2959, United States.
1
---------------------- Page: 1 ----------------------
F2328–04
FIG. 1 Decarburization Zones
FIG. 2 Position for Microindentation Measurements
FIG. 3 Microindentation Measurements for Class 3 Products
TABLE 1 Classes of Decarburization: Guide
decar
...


Questions, Comments and Discussion
Ask us and Technical Secretary will try to provide an answer. You can facilitate discussion about the standard in here.