ASTM F2082-01
(Test Method)Standard Test Method for Determination of Transformation Temperature of Nickel-Titanium Shape Memory Alloys by Bend and Free Recovery
Standard Test Method for Determination of Transformation Temperature of Nickel-Titanium Shape Memory Alloys by Bend and Free Recovery
SCOPE
1.1 This test method describes a procedure for determining the martensite-to-austenite transformation temperatures of nickel titanium alloys by measuring the deformation recovered during the thermal transformation.
1.2 The values in SI units are to be regarded as the standard. The values given in inch-pound units are provided for information only.
1.3 This standard does not purport to address all of the safety concerns, if any, associated with its use. It is the responsibility of the user of this standard to establish appropriate safety and health practices and determine the applicability of regulatory limitations prior to use.
General Information
Relations
Standards Content (Sample)
NOTICE: This standard has either been superceded and replaced by a new version or discontinued.
Contact ASTM International (www.astm.org) for the latest information.
Designation: F 2082 – 01
Standard Test Method for
Determination of Transformation Temperature of Nickel-
Titanium Shape Memory Alloys by Bend and Free Recovery
This standard is issued under the fixed designation F 2082; the number immediately following the designation indicates the year of
original adoption or, in the case of revision, the year of last revision. A number in parentheses indicates the year of last reapproval. A
superscript epsilon (e) indicates an editorial change since the last revision or reapproval.
1. Scope tion, the R’ , R’ , A , and A , as defined in Terminology F 2005,
s f s f
are determined. For a single-stage transformation, the A and A
s f
1.1 This test method describes a procedure for determining
are determined.
the martensite-to-austenite transformation temperatures of
nickel titanium alloys by measuring the deformation recovered
5. Significance and Use
during the thermal transformation.
5.1 This test method provides a rapid, economical method
1.2 The values in SI units are to be regarded as the standard.
for determination of transformation temperatures.
The values given in inch-pound units are provided for infor-
5.2 Measurement of the specimen motion closely parallels
mation only.
many shape memory applications and provides a result that is
1.3 This standard does not purport to address all of the
applicable to the function of the material.
safety concerns, if any, associated with its use. It is the
5.3 This test method uses wire, tube, or strip samples; thus,
responsibility of the user of this standard to establish appro-
it is able to provide an assessment of the product in its
priate safety and health practices and determine the applica-
semifinished form.
bility of regulatory limitations prior to use.
5.4 This test method may be used on annealed samples to
2. Referenced Documents determine the transformation temperatures and assure the alloy
formulation, since chemical analysis is not precise enough to
2.1 ASTM Standards:
determine adequately the nickel-to-titanium ratio of shape
E 220 Test Method for Calibration of Thermocouples by
memory alloys.
Comparison Techniques
5.5 Transformation temperatures derived from this test
F 2005 Terminology for Nickel-Titanium Shape Memory
method may differ from those derived from other methods as a
Alloys
result of effects of strain and load on the transformation
3. Terminology temperature.
5.6 The test method is applicable to shape memory alloys
3.1 Definitions—Specific technical terms used in this test
with A temperatures in the range of approximately –25 to
f
method are found in Terminology F 2005.
+90°C.
3.2 Abbreviations:
3.2.1 LVDT—linear variable differential transducer.
6. Apparatus
3.2.2 RVDT—rotary variable differential transducer.
6.1 LVDT, with range greater than half the mandrel diameter
4. Summary of Test Method
(see 9.2), with power supply, mounted in an appropriate fixture
with counterbalanced probe (see Fig. 1); or RVDT with range
4.1 This test method involves cooling a test specimen to its
greater than 45°, with power supply, mounted in an appropriate
nominally fully martensitic phase, deforming the specimen,
fixture (see Fig. 2).
and heating the specimen to its fully austenitic phase. During
6.2 Thermocouple and Indicator, with resolution of 0.1°C
heating, the motion of the specimen is measured and plotted
(0.2°F) or better.
versus the specimen temperature. For a two-stage transforma-
6.3 XY Chart Recorder, or equivalent manual or automated
data acquisition system.
6.4 Hot Plate and Stirrer.
This test method is under the jurisdiction of ASTM Committee F04 on Medical
and Surgical Materials and Devices and is the direct responsibility of Subcommittee
6.5 Denatured Alcohol Bath, or water bath.
F04.15 on Material Test Methods.
6.6 Mandrel, for deforming the sample in the martensitic
Current edition approved Jan. 10, 2001. Published April 2001.
2 state.
Annual Book of ASTM Standards, Vol 14.03.
Annual Book of ASTM Standards, Vol 13.01. 6.7 Fixture, for holding the sample during recovery.
Copyright © ASTM International, 100 Barr Harbor Drive, PO Box C700, West Conshohocken, PA 19428-2959, United States.
NOTICE: This standard has either been superceded and replaced by a new version or discontinued.
Contact ASTM International (www.astm.org) for the latest information.
F2082–01
FIG. 1 Schematic Showing Side View of Test Apparatus Using a Vertically Mounted and Counterbalanced LVDT (LVDT Power Supply,
Thermocouple Indicator, and Data Acquisition System Are Not Shown)
FIG. 2 Schematic Showing Top View of Test Apparatus Using an RVDT (RVDT Power Supply, Thermocouple Indicator, and Data
Acquisition System Are Not Shown)
6.8 Probe or Needle, for contacting and moving with the 6.9 Liquid Nitrogen, or dry ice.
sample during recovery.
NOTICE: This standard has either been superceded and replaced by a new version or discontinued.
Contact ASTM International (www.astm.org) for the latest information.
F2082–01
7. Sampling
7.1 Test specimen can be a wire, tube, or strip with diameter
or thickness in the range of 0.3 to 3.0 mm (0.012 to 0.12 in.).
7.2 Specimens may be tested in the semifinished (heat-
treated) or annealed condition. Anneal is defined in Terminol-
ogy F 2005.
8. Calibration
8.1 The thermocouple and indicator shall be kept in a
calibrated condition, traceable to the National Institute for
Standards and Technology.
8.2 The thermocouple shall be calibrated using Test Method
E 220.
9. LVDT Procedure
9.1 For alloys that are superelastic at room temperature,
cool the alcohol bath to –40°C (–40°F) or lower using liquid
nitrogen or dry ice. For alloys that are martensitic at room
temperature, cool the water bath to 10°C (50°F) or lower.
9.2 Select a mandrel according to the sample diameter or
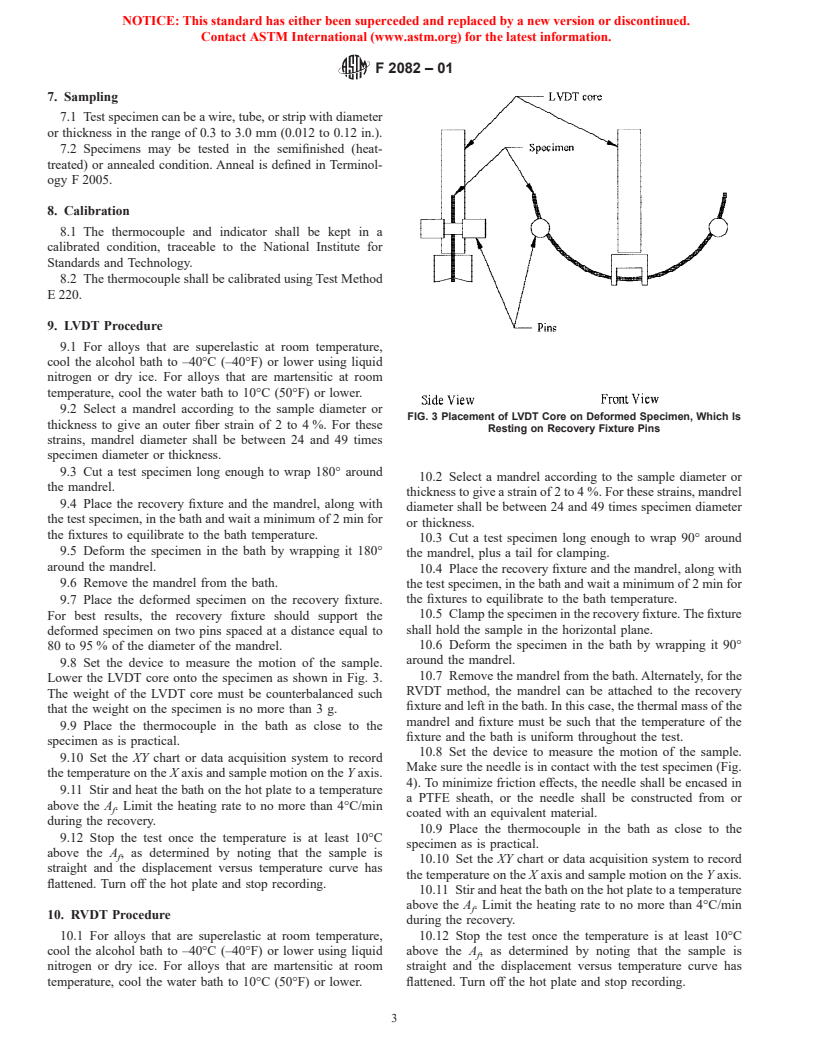
FIG. 3 Placement of LVDT Core on Deformed Specimen, Which Is
thickness to give an outer fiber strain of 2 to 4 %. For these
Resting on Recovery Fixture Pins
strains, mandrel diameter shall be between 24 and 49 times
specimen diameter or thickness.
9.3 Cut a test specimen long enough to wrap 180° around
10.2 Select a mandrel according to the sample diameter or
the mandrel.
thickness to give a strain of 2 to 4 %. For these strains, mandrel
9.4 Place the recovery fixture and the mandrel, along with
diameter shall be between 24 and 49 times specimen diameter
the test specimen, in the bath and wait a minimum of 2 min for
or thickness.
the fixtures to equilibrate to the bath temperature.
10.3 Cut a test specimen long enough to wrap 90° around
9.5 Deform the specimen in the bath by wrapping it 180°
the mandrel, plus a tail for clamping.
around the mandrel.
10.4 Place the recovery fixture and the mandrel, along with
9.6 Remove the mandrel from the bath. the test specimen, in the bath and wait a minimum of 2 min for
the fixtures to equilibrate to the bath temperature.
9.7 Place the deformed specimen on the recovery fixture.
10.5 Clamp the specimen in the recovery fixture. The fixture
For best results, the recovery fixture should support the
shall hold the sample in the horizontal plane.
deformed specimen on two pins spaced at a distance equal to
10.6 Deform the specimen in the bath by wrapping it 90°
80 to 95 % of the diameter of the mandre
...


Questions, Comments and Discussion
Ask us and Technical Secretary will try to provide an answer. You can facilitate discussion about the standard in here.