ASTM F791-18(2023)
(Test Method)Standard Test Method for Stress Crazing of Transparent Plastics
Standard Test Method for Stress Crazing of Transparent Plastics
SIGNIFICANCE AND USE
4.1 This test method provides a guide for evaluating whether a specific solvent, chemical, or compound is detrimental to a transparent plastic as a result of a manufacturing process, a fabrication operation, or the operational environment. All transparent plastics are susceptible to crazing, though in widely varying degree and from a variety of causes. This test method is intended to allow establishment of the crazing stress when the simultaneous action of both load and a material that will cause crazing is applied, producing non-reversible damage that limits the usage of that transparent plastic in a specific application.
SCOPE
1.1 This test method covers the determination of the critical crazing stress for a transparent plastic material when exposed to a specific solvent, chemical, or compound at a specific temperature.
1.2 This standard does not purport to address all of the safety concerns, if any, associated with its use. It is the responsibility of the user of this standard to establish appropriate safety, health, and environmental practices and determine the applicability of regulatory limitations prior to use.
1.3 This international standard was developed in accordance with internationally recognized principles on standardization established in the Decision on Principles for the Development of International Standards, Guides and Recommendations issued by the World Trade Organization Technical Barriers to Trade (TBT) Committee.
General Information
- Status
- Published
- Publication Date
- 31-Dec-2022
- Technical Committee
- F07 - Aerospace and Aircraft
- Drafting Committee
- F07.08 - Transparent Enclosures and Materials
Relations
- Effective Date
- 01-May-2013
- Effective Date
- 01-Nov-2011
- Effective Date
- 01-Nov-2008
- Effective Date
- 01-Oct-2008
- Effective Date
- 01-Nov-2005
- Effective Date
- 01-Nov-2005
- Effective Date
- 10-Nov-2000
- Effective Date
- 10-May-1999
Overview
ASTM F791-18(2023): Standard Test Method for Stress Crazing of Transparent Plastics is a key international standard developed by ASTM for assessing the susceptibility of transparent plastics to stress crazing. Stress crazing is a phenomenon where surface fissures, appearing as small cracks, occur in plastic materials when subjected to certain chemicals, solvents, or environmental factors under stress. The standard provides a systematic method to determine the critical crazing stress for transparent plastic materials, helping manufacturers, fabricators, and end-users evaluate the compatibility of plastics with chemicals encountered during production or in service.
Stress crazing creates non-reversible damage and affects the optical and structural integrity of transparent plastics, limiting their use in demanding applications.
Key Topics
- Purpose of the Test Method: Guides the evaluation of whether a specific solvent, chemical, or compound causes detrimental stress crazing in transparent plastics during manufacturing, fabrication, or exposure.
- Applicability: All transparent plastics are potentially susceptible to crazing, with varying degree based on polymer type and service conditions.
- Test Procedures: Includes controlled exposure of test specimens to chemicals or solvents under calculated stress levels at specified temperatures, using two main procedures for stress iteration or stress tracking.
- Test Specimens and Preparation: Emphasizes the importance of machining smooth, defect-free specimens and proper preconditioning to ensure consistent and reliable results.
- Reporting Requirements: Stresses documentation of plastic type, specimen dimensions, conditioning, procedure followed, test environment, and observed effects (such as crazing or surface distortion).
Applications
The ASTM F791-18(2023) test method is widely applied in various industries where transparent plastics are used under mechanical stress and are exposed to chemicals or solvents, including:
- Aerospace and Aviation: Ensuring materials used for canopies, windows, and transparent enclosures withstand operational solvents and fuels.
- Automotive: Evaluating the resistance of clear lenses, instrument panels, and glazing to cleaning agents and environmental expose.
- Consumer Products: Assessing packaging and display cases for chemical compatibility during manufacturing or in their end-use environment.
- Architectural and Construction: Testing panels, skylights, and facade components for resilience against cleaning chemicals and environmental stress.
- Medical Devices: Determining the suitability of transparent polymers for housings or enclosures that may be cleaned with aggressive disinfectants.
By determining the critical crazing stress, organizations can select appropriate materials and processing methods to avoid premature failure and ensure long-term performance of transparent plastics.
Related Standards
For a holistic approach to plastics testing and performance evaluation, the following ASTM and international standards are often referenced alongside ASTM F791-18(2023):
- ASTM D618 - Practice for Conditioning Plastics for Testing
- ASTM E691 - Practice for Conducting an Interlaboratory Study to Determine the Precision of a Test Method
- ASTM D256 - Standard Test Methods for Determining the Impact Resistance of Plastics (for complementary toughness evaluation)
- ISO 22088 - Stress cracking test methods for plastics (international equivalent standards)
These documents ensure comprehensive material performance evaluation, fostering safety, quality, and regulatory compliance in applications involving transparent plastics and their resistance to stress crazing.
Keywords: ASTM F791, stress crazing, transparent plastics, chemical resistance, solvent resistance, test method, aerospace materials, plastics testing, polymer stress, optical plastics.
Buy Documents
ASTM F791-18(2023) - Standard Test Method for Stress Crazing of Transparent Plastics
Get Certified
Connect with accredited certification bodies for this standard

Smithers Quality Assessments
US management systems and product certification.

DIN CERTCO
DIN Group product certification.
Sponsored listings
Frequently Asked Questions
ASTM F791-18(2023) is a standard published by ASTM International. Its full title is "Standard Test Method for Stress Crazing of Transparent Plastics". This standard covers: SIGNIFICANCE AND USE 4.1 This test method provides a guide for evaluating whether a specific solvent, chemical, or compound is detrimental to a transparent plastic as a result of a manufacturing process, a fabrication operation, or the operational environment. All transparent plastics are susceptible to crazing, though in widely varying degree and from a variety of causes. This test method is intended to allow establishment of the crazing stress when the simultaneous action of both load and a material that will cause crazing is applied, producing non-reversible damage that limits the usage of that transparent plastic in a specific application. SCOPE 1.1 This test method covers the determination of the critical crazing stress for a transparent plastic material when exposed to a specific solvent, chemical, or compound at a specific temperature. 1.2 This standard does not purport to address all of the safety concerns, if any, associated with its use. It is the responsibility of the user of this standard to establish appropriate safety, health, and environmental practices and determine the applicability of regulatory limitations prior to use. 1.3 This international standard was developed in accordance with internationally recognized principles on standardization established in the Decision on Principles for the Development of International Standards, Guides and Recommendations issued by the World Trade Organization Technical Barriers to Trade (TBT) Committee.
SIGNIFICANCE AND USE 4.1 This test method provides a guide for evaluating whether a specific solvent, chemical, or compound is detrimental to a transparent plastic as a result of a manufacturing process, a fabrication operation, or the operational environment. All transparent plastics are susceptible to crazing, though in widely varying degree and from a variety of causes. This test method is intended to allow establishment of the crazing stress when the simultaneous action of both load and a material that will cause crazing is applied, producing non-reversible damage that limits the usage of that transparent plastic in a specific application. SCOPE 1.1 This test method covers the determination of the critical crazing stress for a transparent plastic material when exposed to a specific solvent, chemical, or compound at a specific temperature. 1.2 This standard does not purport to address all of the safety concerns, if any, associated with its use. It is the responsibility of the user of this standard to establish appropriate safety, health, and environmental practices and determine the applicability of regulatory limitations prior to use. 1.3 This international standard was developed in accordance with internationally recognized principles on standardization established in the Decision on Principles for the Development of International Standards, Guides and Recommendations issued by the World Trade Organization Technical Barriers to Trade (TBT) Committee.
ASTM F791-18(2023) is classified under the following ICS (International Classification for Standards) categories: 83.080.01 - Plastics in general. The ICS classification helps identify the subject area and facilitates finding related standards.
ASTM F791-18(2023) has the following relationships with other standards: It is inter standard links to ASTM E691-13, ASTM E691-11, ASTM D618-08, ASTM E691-08, ASTM D618-05, ASTM E691-05, ASTM D618-00, ASTM E691-99. Understanding these relationships helps ensure you are using the most current and applicable version of the standard.
ASTM F791-18(2023) is available in PDF format for immediate download after purchase. The document can be added to your cart and obtained through the secure checkout process. Digital delivery ensures instant access to the complete standard document.
Standards Content (Sample)
This international standard was developed in accordance with internationally recognized principles on standardization established in the Decision on Principles for the
Development of International Standards, Guides and Recommendations issued by the World Trade Organization Technical Barriers to Trade (TBT) Committee.
Designation: F791 − 18 (Reapproved 2023)
Standard Test Method for
Stress Crazing of Transparent Plastics
ThisstandardisissuedunderthefixeddesignationF791;thenumberimmediatelyfollowingthedesignationindicatestheyearoforiginal
adoption or, in the case of revision, the year of last revision.Anumber in parentheses indicates the year of last reapproval.Asuperscript
epsilon (´) indicates an editorial change since the last revision or reapproval.
This standard has been approved for use by agencies of the U.S. Department of Defense.
1. Scope 3.1.1.1 Discussion—Crazing is a form of yielding in poly-
mers characterized by a spongy void filled fibrillar structure.
1.1 This test method covers the determination of the critical
The density in the craze changes resulting in a change in the
crazing stress for a transparent plastic material when exposed
index of refraction, which causes light to be reflected off of the
to a specific solvent, chemical, or compound at a specific
crazes. This light reflection causes the crazes to sparkle when
temperature.
viewed from certain angles. The crazes are sometimes random
1.2 This standard does not purport to address all of the
and scattered with varied lengths and depths but usually are
safety concerns, if any, associated with its use. It is the
oriented perpendicular to a tensile stress. Crazing is difficult to
responsibility of the user of this standard to establish appro-
detect. It becomes more pronounced when viewed with a light
priate safety, health, and environmental practices and deter-
source that is at an oblique angle.
mine the applicability of regulatory limitations prior to use.
1.3 This international standard was developed in accor-
4. Significance and Use
dance with internationally recognized principles on standard-
4.1 This test method provides a guide for evaluating
ization established in the Decision on Principles for the
whether a specific solvent, chemical, or compound is detrimen-
Development of International Standards, Guides and Recom-
tal to a transparent plastic as a result of a manufacturing
mendations issued by the World Trade Organization Technical
process, a fabrication operation, or the operational environ-
Barriers to Trade (TBT) Committee.
ment.All transparent plastics are susceptible to crazing, though
2. Referenced Documents
inwidelyvaryingdegreeandfromavarietyofcauses.Thistest
method is intended to allow establishment of the crazing stress
2.1 ASTM Standards:
when the simultaneous action of both load and a material that
D618 Practice for Conditioning Plastics for Testing
will cause crazing is applied, producing non-reversible damage
E691 Practice for Conducting an Interlaboratory Study to
that limits the usage of that transparent plastic in a specific
Determine the Precision of a Test Method
application.
2.2 Other Method:
ARTC (Aircraft Research and Testing Committee of the
5. Apparatus
Aircraft Industries Association of America, Inc.) Condi-
tioning Method
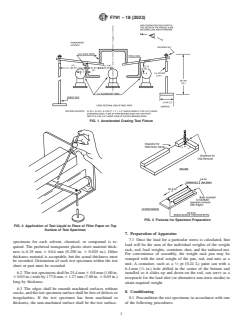
5.1 Test Fixture, with fluorescent light source illustrated and
constructed as shown in Figs. 1 and 2.
3. Terminology
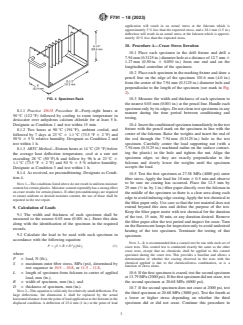
5.2 Drill Fixture constructed as shown in Fig. 3.
3.1 Definitions of Terms Specific to This Standard:
3.1.1 crazing—a group of surface fissures that appear to be
5.3 Marking Fixture, constructed as shown in Fig. 3.
small cracks in the material, although they are not.
5.4 Portable Specimen Rack, constructed in the manner as
shown in Fig. 4 for handling and conditioning test specimens.
This test method is under the jurisdiction of ASTM Committee F07 on
5.5 Weights—A container and shot for the application of
Aerospace and Aircraft and is the direct responsibility of Subcommittee F07.08 on
Transparent Enclosures and Materials.
weight on the rack as shown in Fig. 1.
Current edition approved Jan. 1, 2023. Published January 2023. Originally
approved in 1982. Last previous edition approved in 2018 as F791 – 18. DOI: 5.6 Filter Paper, quantity of 0.50 in. by 1.0 in. (12.7 mm by
10.1520/F0791-18R23.
25.4 mm) pieces of filter, medium-retention filter paper.
For referenced ASTM standards, visit the ASTM website, www.astm.org, or
contact ASTM Customer Service at service@astm.org. For Annual Book of ASTM
6. Test Specimens
Standards volume information, refer to the standard’s Document Summary page on
the ASTM website.
6.1 The test specimen shall be machined from the transpar-
Available from Aircraft Industries Association, 1725 DeSales St. NW,
Washington, DC 20034. ent plastic material to be evaluated. A minimum of six
Copyright © ASTM International, 100 Barr Harbor Drive, PO Box C700, West Conshohocken, PA 19428-2959. United States
F791 − 18 (2023)
FIG. 1 Accelerated Crazing Test Fixture
FIG. 3 Fixtures for Specimen Preparation
FIG. 2 Application of Test Liquid to Piece of Filter Paper on Top
Surface of Test Specimen
7. Preparation of Apparatus
7.1 Once the load for a particular stress is calculated, that
specimens for each solvent, chemical, or compound is re-
load will be the sum of the individual weights of the weight
quired. The preferred transparent plastic sheet material thick-
rack, rod, lead weights, container, shot, and the radiused nut.
ness is 6.35 mm 6 0.64 mm (0.250 in. 6 0.025 in.). Other
For convenience of assembly, the weight rack pan may be
thickness material is acceptable, but the actual thickness must
stamped with the total weight of the pan, rod, and nuts as a
be recorded. Orientation of each test specimen within the test
unit. A container, such as a ⁄2 pt (0.24 L) paint can with a
sheet or part must be recorded.
6.4 mm ( ⁄4 in.) hole drilled in the center of the bottom and
6.2 Thetestspecimensshallbe25.4mm 60.8mm(1.00in.
installed so it slides up and down on the rod, can serve as a
6 0.03 in.) wide by 177.8 mm 6 1.27 mm (7.00 in. 6 0.05 in.)
receptacle for the lead shot (or alternative non-toxic media) to
long by thickness.
attain required weight.
6.3 The edges shall be smooth machined surfaces without
8. Conditioning
cracks, and the test specimen surface shall be free of defects or
irregularities. If the test specimen has been machined to 8.1 Precondition the test specimens in accordance with one
thickness, the non-machined surface shall be the test surface. of the following procedures:
F791 − 18 (2023)
application will result in an actual stress at the fulcrum which is
approximately 5 % less than the expected stress, and a 38.1 mm (1.5 in.)
deflection will result in an actual stress at the fulcrum which is approxi-
mately 10 % less than the expected stress.
10. Procedure A—Craze Stress Iteration
10.1 Place each specimen in the drill fixture and drill a
7.94 mm(0.3125in.)diameterholeatadistanceof12.7 mm 6
1.27 mm (0.50 in. 6 0.050 in.) from one end and on the
longitudinal centerline of the specimen.
10.2 Place each specimen in the marking fixture and draw a
pencil line on the edge of the specimen 101.6 mm (4.0 in.)
from the center of the 7.94 mm (0.3125 in.) diameter hole and
perpendicular to the length of the specimen (see mark in Fig.
2).
FIG. 4 Specimen Rack 10.3 Measure the width and thickness of each specimen to
the nearest 0.03 mm (0.001 in.) at the pencil line. Handle each
specimen only by its edges. Do not clean test specimens in any
8.1.1 Practice D618 Procedure B—Forty-eight hours at
manner during the time period between conditioning and
50 °C (122 °F) followed by cooling to room temperature in
testing.
desiccator over anhydrous calcium chloride for at least 5 h.
10.4 Inserttheconditionedspecimenimmediatelyinthetest
Designate as Condition 1 and test within 15 min.
fixture with the pencil mark on the specimen in line with the
8.1.2 Two hours at 90 °C (194 °F), ambient cooled, and
center of the fulcrum. Raise the weights and insert the end of
followed by 7 days at 23 °C 6 1.1 °C (73.5 °F 6 2 °F) and
the rod through the 7.94 mm (0.3125 in.) hole in the test
50 % 6 5 % relative humidity. Designate as Condition 2 and
specimen. Carefully center the load supporting nut (with a
test within 1 h.
7.94 mm (0.3125 in.) machined radius on the surface contact-
8.1.3 ARTC Method—Sixteen hours at 14 °C (25 °F) below
ing the plastic) in the hole and tighten the nut. Align the
the average heat deflection temperature, cool at a rate not
specimen edges so they are exactly perpendicular to the
exceeding 28 °C (50 °F)⁄h and follow by 96 h at 23 °C 6
fulcrum and slowly lower the weights until the specimen
1.1 °C (73.5 °F 6 2 °F) and 50 % 6 5 % relative humidity.
accepts the load.
Designate as Condition 3 and test within 1 h.
8.1.4 As received, no preconditioning. Designate as Condi-
10.5 Test the first specimen at 27.58 MPa (4000 psi) outer
tion 4.
fiber stress. Apply the load for 10 min 6 0.5 min and observe
to be sure no crazing has occurred. Place the 12.5 mm by
NOTE 1—The conditions listed above do not result in uniform moisture
content for certain plastics. Moisture content reportedly has a strong effect 25 mm ( ⁄2 in. by 1 in.) filter paper directly over the fulcrum in
on craze results for certain plastics. If other preconditionings are required
the middle of the specimen so there is a clear area along each
to ensure uniform or desired moisture content, the use of these shall be
edgetoavoidinducingedgecrazing.Applythetestchemicalto
reported in the test report.
the filter paper only. Use care so that the test material does not
extend beyond this area and defeat the purpose of the test.
9. Calculation of Loads
Keep the filter paper moist with test chemical for the duration
9.1 The width and thickness of each specimen shall be
of the test, 15 min, 30 min, or any duration desired. Remove
measured to the nearest 0.03 mm (0.001 in.). Enter this data
the filter paper after the test period and inspect for craze. Turn
along with the identification of the specimen in the required
on the fluorescent lamps for inspection only to avoid undesired
records.
heating of the test specimen. Terminate the testing of that
9.2 Calculate the load to be used with each specimen in
specimen.
accordance with the following equation:
NOTE 3—It is recommended that a control test be run with each set of
P 5 ~S 3B 3D !/~6L! (1) craze tests. This control test is conducted exactly the same as the other
craze tests, except that no chemicals shall be applied to this control
where:
specimen during the craze test. This provides a baseline and allows a
determination of whether the crazing observed in the tests with the
P = load, N (lb.),
chemical applied is due to the chemical/stress combination, or is a
S = maximum outer fiber stress, MPa (psi), determined by
function of stress alone.
test sequence in 10.5 – 10.8,or 11.5 – 11.8,
10.6 Ifthefirstspecimeniscrazed,testthesecondspecimen
L = length of specimen from fulcrum to center of applied
load, mm (in.), at13.79MPa(2000psi).Ifthefirstspecimendidnotcraze,test
B = width of specimen, mm (in.), and the second specimen at 20.68 MPa (6000 psi).
D = thickness of specimen, mm (in.).
10.7 If the second specimen does not craze at 2000 psi, test
NOTE2—Thisequationisvalidonlyforrelativelysmalldeflections.For
the third specimen at 20.68 MPa (3000 psi). Test the fourth at
large deflections, the dimension L shall be replaced by the actual
a lower or higher stress depending on whether the third
horizontal distance from the point of load application to the fulcrum in the
displaced condition. A deflection of 25.4 mm (1 in.) at the point of load specimen did or did not craze. Continue this procedure in
F791 − 18 (2023)
suitable increments until the critical crazing stress for specific 11.5 Test the first specimen at 27.58 MPa (4000 psi) outer
solvent, chemical, or compound is determined
...


Questions, Comments and Discussion
Ask us and Technical Secretary will try to provide an answer. You can facilitate discussion about the standard in here.
Loading comments...