ASTM B587-19
(Specification)Standard Specification for Welded Brass Tube
Standard Specification for Welded Brass Tube
ABSTRACT
This specification establishes the requirements for round, rectangular, and square copper alloy welded tube for general engineering applications. The tubes are classified into four types: Type I tubes which are finished by passing through sizing and straightening rolls at ambient temperature; Type II tubes which are finished by sizing, straightening, and annealing; Type III tubes which are finished by cold reducing or cold drawing over a plug or mandrel; and Type IV tubes which are finished by cold drawing over a plug or mandrel and annealing, and redrawing and annealing when necessary to conform to a specified size and temper. Tubes shall be welded by any process which produces forged or fusion welds. Forged-welded tube shall be scarfed to remove both internal and external flash. Forged-welded tube to be drawn over a mandrel to produce Types III and IV may have the internal flash completely removed. Fusion-welded tube shall be mechanically worked to produce a smooth external and internal surface without the application of scarfing or other removal of the weld metal bead. Grain size and mechanical properties such as tensile strength and Rockwell hardness shall be determined. The tubes shall be subjected to mercury nitrate, expansion, flattening, and reverse bend tests for performance evaluation. Non-destructive tests such as eddy-current test, hydrostatic test, and pneumatic tests shall be done as well.
SIGNIFICANCE AND USE
19.1 For the purpose of determining compliance with the specified limits for requirements of the properties listed in the following table, an observed value or a calculated value shall be rounded as indicated in accordance with the rounding method of Practice E29:
Property
Rounded Unit for Observed or Calculated Value
Chemical composition
Hardness
nearest unit in the last right-hand place of figures of
the specified limit
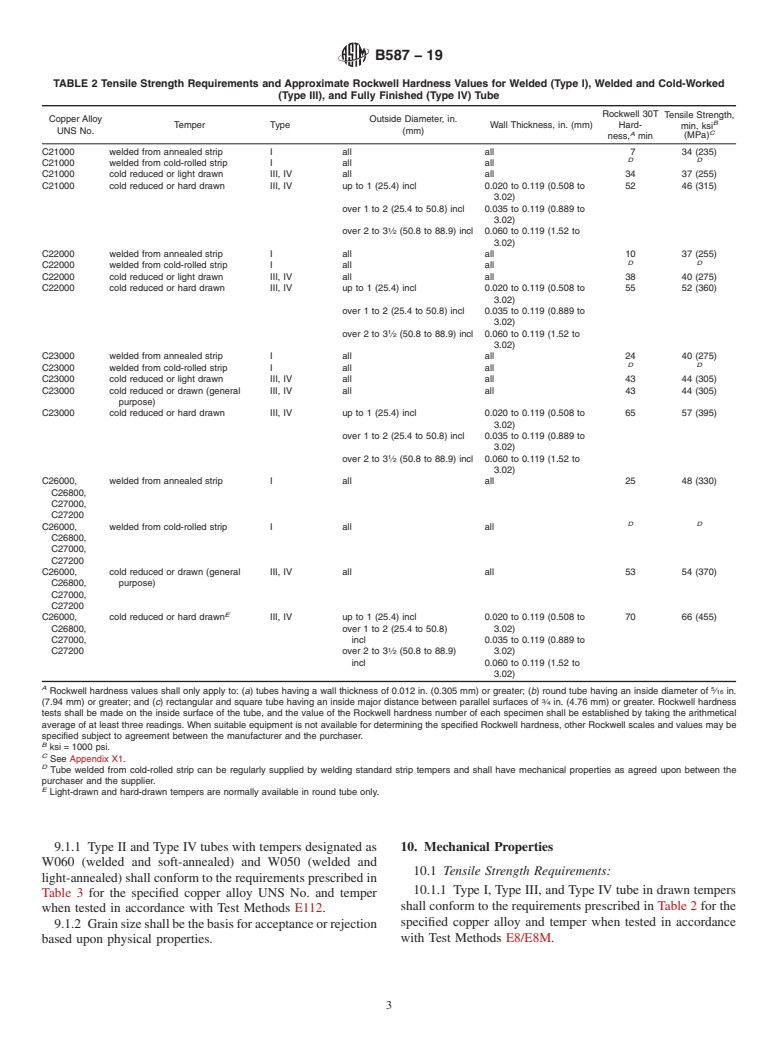
Tensile strength
nearest ksi
Grain size up to 0.060
mm, incl
nearest multiple of 0.005 mm
SCOPE
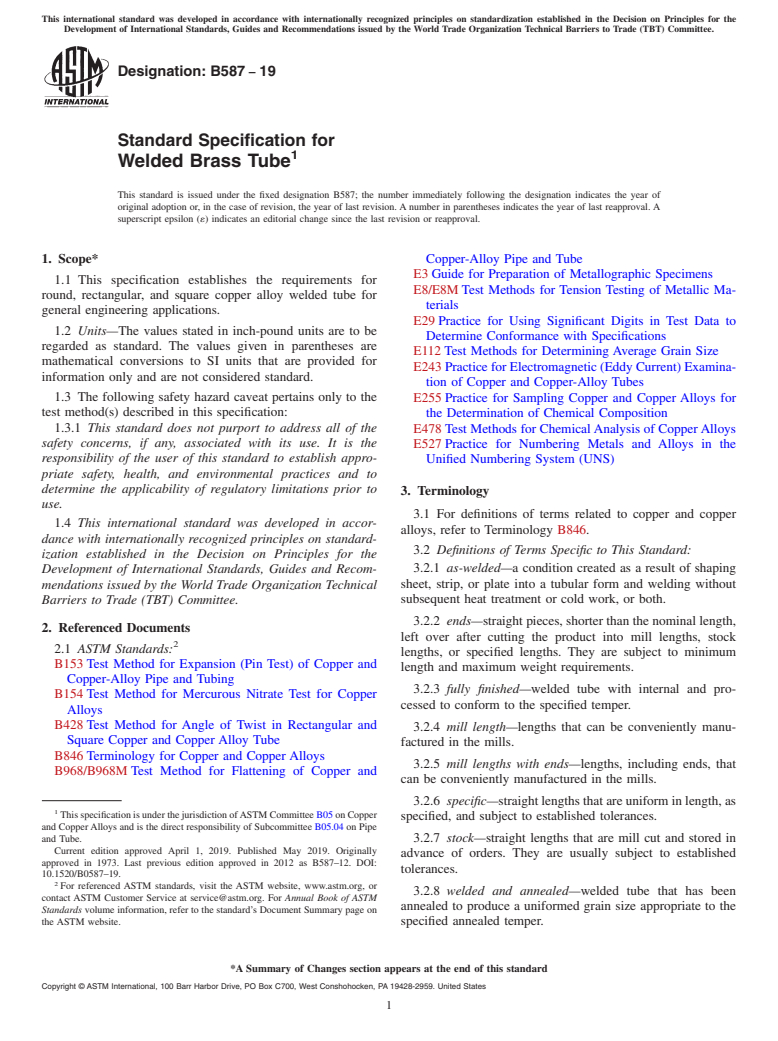
1.1 This specification establishes the requirements for round, rectangular, and square copper alloy welded tube for general engineering applications.
1.2 Units—The values stated in inch-pound units are to be regarded as standard. The values given in parentheses are mathematical conversions to SI units that are provided for information only and are not considered standard.
1.3 The following safety hazard caveat pertains only to the test method(s) described in this specification:
1.3.1 This standard does not purport to address all of the safety concerns, if any, associated with its use. It is the responsibility of the user of this standard to establish appropriate safety, health, and environmental practices and to determine the applicability of regulatory limitations prior to use.
1.4 This international standard was developed in accordance with internationally recognized principles on standardization established in the Decision on Principles for the Development of International Standards, Guides and Recommendations issued by the World Trade Organization Technical Barriers to Trade (TBT) Committee.
General Information
Relations
Buy Standard
Standards Content (Sample)
This international standard was developed in accordance with internationally recognized principles on standardization established in the Decision on Principles for the
Development of International Standards, Guides and Recommendations issued by the World Trade Organization Technical Barriers to Trade (TBT) Committee.
Designation:B587 −19
Standard Specification for
1
Welded Brass Tube
This standard is issued under the fixed designation B587; the number immediately following the designation indicates the year of
original adoption or, in the case of revision, the year of last revision. A number in parentheses indicates the year of last reapproval. A
superscript epsilon (´) indicates an editorial change since the last revision or reapproval.
1. Scope* Copper-Alloy Pipe and Tube
E3 Guide for Preparation of Metallographic Specimens
1.1 This specification establishes the requirements for
E8/E8M Test Methods for Tension Testing of Metallic Ma-
round, rectangular, and square copper alloy welded tube for
terials
general engineering applications.
E29 Practice for Using Significant Digits in Test Data to
1.2 Units—The values stated in inch-pound units are to be
Determine Conformance with Specifications
regarded as standard. The values given in parentheses are
E112 Test Methods for Determining Average Grain Size
mathematical conversions to SI units that are provided for
E243 Practice for Electromagnetic (Eddy Current) Examina-
information only and are not considered standard.
tion of Copper and Copper-Alloy Tubes
1.3 The following safety hazard caveat pertains only to the E255 Practice for Sampling Copper and Copper Alloys for
test method(s) described in this specification:
the Determination of Chemical Composition
1.3.1 This standard does not purport to address all of the E478 Test Methods for ChemicalAnalysis of CopperAlloys
safety concerns, if any, associated with its use. It is the
E527 Practice for Numbering Metals and Alloys in the
responsibility of the user of this standard to establish appro-
Unified Numbering System (UNS)
priate safety, health, and environmental practices and to
determine the applicability of regulatory limitations prior to
3. Terminology
use.
3.1 For definitions of terms related to copper and copper
1.4 This international standard was developed in accor-
alloys, refer to Terminology B846.
dance with internationally recognized principles on standard-
3.2 Definitions of Terms Specific to This Standard:
ization established in the Decision on Principles for the
3.2.1 as-welded—a condition created as a result of shaping
Development of International Standards, Guides and Recom-
sheet, strip, or plate into a tubular form and welding without
mendations issued by the World Trade Organization Technical
subsequent heat treatment or cold work, or both.
Barriers to Trade (TBT) Committee.
3.2.2 ends—straight pieces, shorter than the nominal length,
2. Referenced Documents
left over after cutting the product into mill lengths, stock
2
2.1 ASTM Standards:
lengths, or specified lengths. They are subject to minimum
B153 Test Method for Expansion (Pin Test) of Copper and
length and maximum weight requirements.
Copper-Alloy Pipe and Tubing
3.2.3 fully finished—welded tube with internal and pro-
B154 Test Method for Mercurous Nitrate Test for Copper
cessed to conform to the specified temper.
Alloys
B428 Test Method for Angle of Twist in Rectangular and
3.2.4 mill length—lengths that can be conveniently manu-
Square Copper and Copper Alloy Tube
factured in the mills.
B846 Terminology for Copper and Copper Alloys
3.2.5 mill lengths with ends—lengths, including ends, that
B968/B968M Test Method for Flattening of Copper and
can be conveniently manufactured in the mills.
3.2.6 specific—straight lengths that are uniform in length, as
1
ThisspecificationisunderthejurisdictionofASTMCommitteeB05onCopper
specified, and subject to established tolerances.
and CopperAlloys and is the direct responsibility of Subcommittee B05.04 on Pipe
and Tube.
3.2.7 stock—straight lengths that are mill cut and stored in
Current edition approved April 1, 2019. Published May 2019. Originally
advance of orders. They are usually subject to established
approved in 1973. Last previous edition approved in 2012 as B587–12. DOI:
tolerances.
10.1520/B0587–19.
2
For referenced ASTM standards, visit the ASTM website, www.astm.org, or
3.2.8 welded and annealed—welded tube that has been
contact ASTM Customer Service at service@astm.org. For Annual Book of ASTM
annealed to produce a uniformed grain size appropriate to the
Standards volume information, refer to the standard’s Document Summary page on
the ASTM website. specified annealed temper.
*A Summary of Changes section appears at the end of this standard
Copyright © ASTM International, 100 Barr Harbor Drive, PO Box C700, West Conshohocken, PA 19428-2959. United States
1
---------------------- Page: 1 ----------------------
B587−19
3.2.9 welded and cold-drawn—welded tube with internal 6.2 Manufacture:
flash removed
...
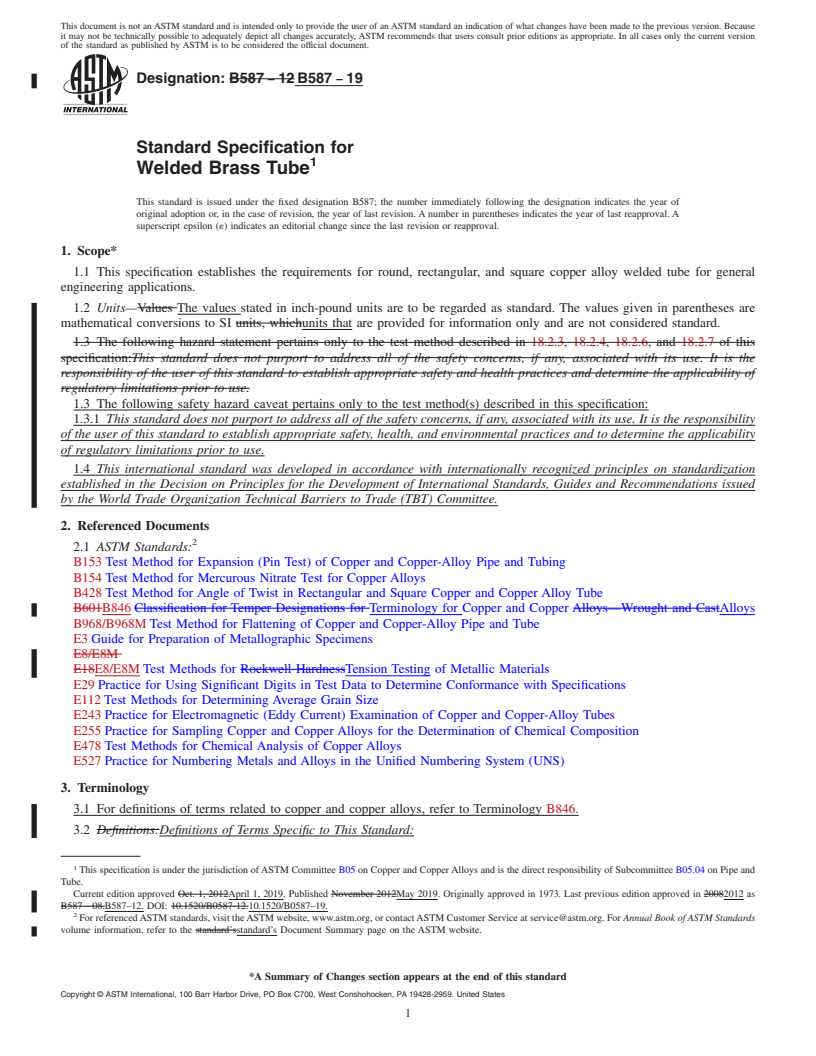
This document is not an ASTM standard and is intended only to provide the user of an ASTM standard an indication of what changes have been made to the previous version. Because
it may not be technically possible to adequately depict all changes accurately, ASTM recommends that users consult prior editions as appropriate. In all cases only the current version
of the standard as published by ASTM is to be considered the official document.
Designation: B587 − 12 B587 − 19
Standard Specification for
1
Welded Brass Tube
This standard is issued under the fixed designation B587; the number immediately following the designation indicates the year of
original adoption or, in the case of revision, the year of last revision. A number in parentheses indicates the year of last reapproval. A
superscript epsilon (´) indicates an editorial change since the last revision or reapproval.
1. Scope*
1.1 This specification establishes the requirements for round, rectangular, and square copper alloy welded tube for general
engineering applications.
1.2 Units—Values The values stated in inch-pound units are to be regarded as standard. The values given in parentheses are
mathematical conversions to SI units, whichunits that are provided for information only and are not considered standard.
1.3 The following hazard statement pertains only to the test method described in 18.2.3, 18.2.4, 18.2.6, and 18.2.7 of this
specification:This standard does not purport to address all of the safety concerns, if any, associated with its use. It is the
responsibility of the user of this standard to establish appropriate safety and health practices and determine the applicability of
regulatory limitations prior to use.
1.3 The following safety hazard caveat pertains only to the test method(s) described in this specification:
1.3.1 This standard does not purport to address all of the safety concerns, if any, associated with its use. It is the responsibility
of the user of this standard to establish appropriate safety, health, and environmental practices and to determine the applicability
of regulatory limitations prior to use.
1.4 This international standard was developed in accordance with internationally recognized principles on standardization
established in the Decision on Principles for the Development of International Standards, Guides and Recommendations issued
by the World Trade Organization Technical Barriers to Trade (TBT) Committee.
2. Referenced Documents
2
2.1 ASTM Standards:
B153 Test Method for Expansion (Pin Test) of Copper and Copper-Alloy Pipe and Tubing
B154 Test Method for Mercurous Nitrate Test for Copper Alloys
B428 Test Method for Angle of Twist in Rectangular and Square Copper and Copper Alloy Tube
B601B846 Classification for Temper Designations for Terminology for Copper and Copper Alloys—Wrought and CastAlloys
B968/B968M Test Method for Flattening of Copper and Copper-Alloy Pipe and Tube
E3 Guide for Preparation of Metallographic Specimens
E8/E8M
E18E8/E8M Test Methods for Rockwell HardnessTension Testing of Metallic Materials
E29 Practice for Using Significant Digits in Test Data to Determine Conformance with Specifications
E112 Test Methods for Determining Average Grain Size
E243 Practice for Electromagnetic (Eddy Current) Examination of Copper and Copper-Alloy Tubes
E255 Practice for Sampling Copper and Copper Alloys for the Determination of Chemical Composition
E478 Test Methods for Chemical Analysis of Copper Alloys
E527 Practice for Numbering Metals and Alloys in the Unified Numbering System (UNS)
3. Terminology
3.1 For definitions of terms related to copper and copper alloys, refer to Terminology B846.
3.2 Definitions:Definitions of Terms Specific to This Standard:
1
This specification is under the jurisdiction of ASTM Committee B05 on Copper and Copper Alloys and is the direct responsibility of Subcommittee B05.04 on Pipe and
Tube.
Current edition approved Oct. 1, 2012April 1, 2019. Published November 2012May 2019. Originally approved in 1973. Last previous edition approved in 20082012 as
B587 – 08.B587–12. DOI: 10.1520/B0587-12.10.1520/B0587–19.
2
For referenced ASTM standards, visit the ASTM website, www.astm.org, or contact ASTM Customer Service at service@astm.org. For Annual Book of ASTM Standards
volume information, refer to the standard’sstandard’s Document Summary page on the ASTM website.
*A Summary of Changes section appears at the end of this standard
Copyright © ASTM International, 100 Barr Harbor Drive, PO Box C700, West Conshohocken, PA 19428-2959. United States
1
---------------------- Page: 1 ----------------------
B587 − 19
3.2.1 average diameter (for round tubes only), as-welded—n—the average of the maximum and minimum outside diameters,
or the maximum and minimum inside diameters, whichever is applicable, as determined at any one cross section of the tube.a
condition created as a result of shaping sheet, strip, or plate into a tubular form and welding without subsequent heat treatment
or cold work, or both.
...


Questions, Comments and Discussion
Ask us and Technical Secretary will try to provide an answer. You can facilitate discussion about the standard in here.