ASTM B76-90(2018)
(Test Method)Standard Test Method for Accelerated Life of Nickel-Chromium and Nickel-Chromium-Iron Alloys for Electrical Heating
Standard Test Method for Accelerated Life of Nickel-Chromium and Nickel-Chromium-Iron Alloys for Electrical Heating
SIGNIFICANCE AND USE
2.1 This test method is used by producers of electrical heating alloys to measure the cyclic oxidation resistance of these alloys.
2.2 Because of the effect of the environment, design, and use, the life values obtained from this test method may not correlate with that of an appliance or industrial heating unit.
SCOPE
1.1 This test method 2 covers the determination of the resistance to oxidation of nickel-chromium and nickel-chromium-iron electrical heating alloys at elevated temperatures under intermittent heating. Procedures for a constant-temperature cycle are provided. This test method is used for internal comparative purposes only.
1.2 The values stated in inch-pound units are to be regarded as standard. The values given in parentheses are mathematical conversions to SI units that are provided for information only and are not considered standard.
1.3 This standard does not purport to address all of the safety concerns, if any, associated with its use. It is the responsibility of the user of this standard to become familiar with all hazards including those identified in the appropriate Safety Data Sheet (SDS) for this product/material as provided by the manufacturer, to establish appropriate safety, health, and environmental practices, and determine the applicability of regulatory limitations prior to use.
1.4 This international standard was developed in accordance with internationally recognized principles on standardization established in the Decision on Principles for the Development of International Standards, Guides and Recommendations issued by the World Trade Organization Technical Barriers to Trade (TBT) Committee.
General Information
- Status
- Published
- Publication Date
- 31-Oct-2018
- Technical Committee
- B02 - Nonferrous Metals and Alloys
- Drafting Committee
- B02.10 - Thermostat Metals and Electrical Resistance Heating Materials
Relations
- Effective Date
- 01-Nov-2018
- Effective Date
- 01-Nov-2018
Overview
ASTM B76-90(2018) - Standard Test Method for Accelerated Life of Nickel-Chromium and Nickel-Chromium-Iron Alloys for Electrical Heating provides a recognized procedure for evaluating the cyclic oxidation resistance of nickel-chromium (NiCr) and nickel-chromium-iron (NiCrFe) alloys under high temperatures with intermittent heating. This test method is widely used by producers of electrical heating alloys to perform internal comparative analysis and quality assessments of materials intended for use in electric heating elements.
Key Topics
- Purpose: Establishes a test procedure to measure the oxidation resistance and longevity of NiCr and NiCrFe electrical heating alloys when exposed to cyclic, elevated temperature conditions.
- Test Conditions: Includes instructions for mounting specimens, establishing controlled temperature cycles, and measuring changes in electrical resistance and physical length.
- Apparatus Requirements: Details necessary equipment such as power supplies, voltage control, temperature measurement devices (optical pyrometers or infrared thermometers), and timing mechanisms to ensure reliability and repeatability.
- Data Collection: Outlines the need for systematic recording of specimen dimensions, operational parameters, and life values, emphasizing accurate monitoring of resistance and length changes over the test duration.
- Use and Limitations: Results are for internal comparative purposes only and may not directly predict service life in actual appliances or industrial heating units due to environmental and design variations.
Applications
The ASTM B76-90(2018) test method is a critical tool for:
- Quality Control: Manufacturers of electrical heating alloys use this standard to ensure product consistency and identify the best performing wire compositions suitable for high-temperature applications.
- Material Development: Research and development teams utilize this test to compare new alloy formulations or optimize existing ones for improved cyclic oxidation resistance and longer service life in heating elements.
- Performance Benchmarking: Enables internal performance comparisons between different materials or production batches, supporting data-driven decisions in product development or process improvement.
- Reference for Procurement: Industrial users of heating elements may reference this standard in material specifications and procurement contracts to ensure reliable performance when sourcing NiCr or NiCrFe resistance wire.
Related Standards
For comprehensive evaluation of electrical heating alloys and related materials, consider these related ASTM standards:
- ASTM B267 - Standard Specification for Wire for Use in Resistance Heating Elements.
- ASTM E255 - Standard Test Methods for Apparent Porosity and Water Absorption of Burned Refractory Brick.
- ASTM B536 - Standard Test Method for Measurement of Thermal Expansion of Nonferrous Alloys.
- ASTM E139 - Standard Test Methods for Conducting Creep, Creep-Rupture, and Stress-Rupture Tests of Metallic Materials.
Practical Value
Following ASTM B76-90(2018) ensures a rigorous and repeatable approach to assessing the oxidation resistance and accelerated life of nickel-chromium-based alloys for electrical heating. The test method identifies alloy performance trends under accelerated aging conditions, contributing to safer, more reliable, and high-performing heating elements in consumer appliances and industrial equipment. Adherence to this standard supports international best practices in material testing and aligns with globally recognized quality assurance frameworks in metallurgy and manufacturing.
Keywords: ASTM B76-90, accelerated life test, nickel-chromium alloys, nickel-chromium-iron alloys, electrical heating, oxidation resistance, test method, resistance heating wire, quality control, material testing.
Buy Documents
ASTM B76-90(2018) - Standard Test Method for Accelerated Life of Nickel-Chromium and Nickel-Chromium-Iron Alloys for Electrical Heating
Get Certified
Connect with accredited certification bodies for this standard

Element Materials Technology
Materials testing and product certification.

Inštitut za kovinske materiale in tehnologije
Institute of Metals and Technology. Materials testing, metallurgical analysis, NDT.
Sponsored listings
Frequently Asked Questions
ASTM B76-90(2018) is a standard published by ASTM International. Its full title is "Standard Test Method for Accelerated Life of Nickel-Chromium and Nickel-Chromium-Iron Alloys for Electrical Heating". This standard covers: SIGNIFICANCE AND USE 2.1 This test method is used by producers of electrical heating alloys to measure the cyclic oxidation resistance of these alloys. 2.2 Because of the effect of the environment, design, and use, the life values obtained from this test method may not correlate with that of an appliance or industrial heating unit. SCOPE 1.1 This test method 2 covers the determination of the resistance to oxidation of nickel-chromium and nickel-chromium-iron electrical heating alloys at elevated temperatures under intermittent heating. Procedures for a constant-temperature cycle are provided. This test method is used for internal comparative purposes only. 1.2 The values stated in inch-pound units are to be regarded as standard. The values given in parentheses are mathematical conversions to SI units that are provided for information only and are not considered standard. 1.3 This standard does not purport to address all of the safety concerns, if any, associated with its use. It is the responsibility of the user of this standard to become familiar with all hazards including those identified in the appropriate Safety Data Sheet (SDS) for this product/material as provided by the manufacturer, to establish appropriate safety, health, and environmental practices, and determine the applicability of regulatory limitations prior to use. 1.4 This international standard was developed in accordance with internationally recognized principles on standardization established in the Decision on Principles for the Development of International Standards, Guides and Recommendations issued by the World Trade Organization Technical Barriers to Trade (TBT) Committee.
SIGNIFICANCE AND USE 2.1 This test method is used by producers of electrical heating alloys to measure the cyclic oxidation resistance of these alloys. 2.2 Because of the effect of the environment, design, and use, the life values obtained from this test method may not correlate with that of an appliance or industrial heating unit. SCOPE 1.1 This test method 2 covers the determination of the resistance to oxidation of nickel-chromium and nickel-chromium-iron electrical heating alloys at elevated temperatures under intermittent heating. Procedures for a constant-temperature cycle are provided. This test method is used for internal comparative purposes only. 1.2 The values stated in inch-pound units are to be regarded as standard. The values given in parentheses are mathematical conversions to SI units that are provided for information only and are not considered standard. 1.3 This standard does not purport to address all of the safety concerns, if any, associated with its use. It is the responsibility of the user of this standard to become familiar with all hazards including those identified in the appropriate Safety Data Sheet (SDS) for this product/material as provided by the manufacturer, to establish appropriate safety, health, and environmental practices, and determine the applicability of regulatory limitations prior to use. 1.4 This international standard was developed in accordance with internationally recognized principles on standardization established in the Decision on Principles for the Development of International Standards, Guides and Recommendations issued by the World Trade Organization Technical Barriers to Trade (TBT) Committee.
ASTM B76-90(2018) is classified under the following ICS (International Classification for Standards) categories: 77.120.40 - Nickel, chromium and their alloys. The ICS classification helps identify the subject area and facilitates finding related standards.
ASTM B76-90(2018) has the following relationships with other standards: It is inter standard links to ASTM B76-90(2013), ASTM B344-20. Understanding these relationships helps ensure you are using the most current and applicable version of the standard.
ASTM B76-90(2018) is available in PDF format for immediate download after purchase. The document can be added to your cart and obtained through the secure checkout process. Digital delivery ensures instant access to the complete standard document.
Standards Content (Sample)
This international standard was developed in accordance with internationally recognized principles on standardization established in the Decision on Principles for the
Development of International Standards, Guides and Recommendations issued by the World Trade Organization Technical Barriers to Trade (TBT) Committee.
Designation: B76 − 90 (Reapproved 2018)
Standard Test Method for
Accelerated Life of Nickel-Chromium and Nickel-Chromium-
Iron Alloys for Electrical Heating
This standard is issued under the fixed designation B76; the number immediately following the designation indicates the year of original
adoption or, in the case of revision, the year of last revision.Anumber in parentheses indicates the year of last reapproval.Asuperscript
epsilon (´) indicates an editorial change since the last revision or reapproval.
1. Scope 3. Test Panel
1.1 This test method covers the determination of the
3.1 Size and Location—The dimensions of the test panel
resistance to oxidation of nickel-chromium and nickel-
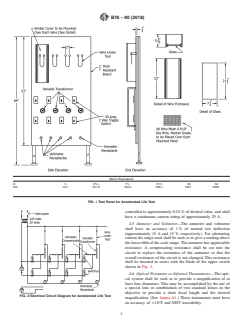
shall be similar to those shown in Fig. 1.The test panel shall be
chromium-iron electrical heating alloys at elevated tempera-
located in a position free from drafts of air.
tures under intermittent heating. Procedures for a constant-
NOTE 1—The enclosure shall fit tightly on the panel and the glass slide
temperature cycle are provided. This test method is used for
shall fit snugly to prevent leakage of air at this point during the operation
internal comparative purposes only.
of the test, as even a slight draft of air in contact with the specimen will
cause excessive variation in length of life. A screen of 40 wire mesh,
1.2 The values stated in inch-pound units are to be regarded
0.010-in.(0.025-mm)wirediameter,marketgrade,maybeusedasacover
as standard. The values given in parentheses are mathematical
over the individual stations.
conversions to SI units that are provided for information only
and are not considered standard. 3.2 Upper Terminal—The upper terminal shall consist of a
binding post attached to a rod passing through another binding
1.3 This standard does not purport to address all of the
post or through the upper bus bar.This provides for adjustment
safety concerns, if any, associated with its use. It is the
laterally and vertically, as shown in Fig. 1.
responsibility of the user of this standard to become familiar
with all hazards including those identified in the appropriate
3.3 Lower Terminal—A10-g weight shall be attached to the
Safety Data Sheet (SDS) for this product/material as provided
lowerendofthespecimen.Aflexiblesilverfoil(approximately
by the manufacturer, to establish appropriate safety, health,
0.375 in. (9.52 mm) wide and 0.0015 in. (0.038 mm) thick)
and environmental practices, and determine the applicability
connected to the 10-g weight shall constitute the lower
of regulatory limitations prior to use.
terminal.
1.4 This international standard was developed in accor-
NOTE2—Experimentshaveshownthatwithhightemperaturesalloysof
dance with internationally recognized principles on standard-
nickel-chromium and nickel-chromium-iron are subject to plastic flow
ization established in the Decision on Principles for the
when under relatively light load. The weight specified in 3.3 does not
Development of International Standards, Guides and Recom-
cause appreciable increase in length during the test.
mendations issued by the World Trade Organization Technical
Barriers to Trade (TBT) Committee.
4. Apparatus
2. Significance and Use
4.1 The test apparatus shall be similar to the requirements
specified in 4.2 to 4.8, inclusive, and shall be connected as
2.1 This test method is used by producers of electrical
shown in Fig. 2.
heating alloys to measure the cyclic oxidation resistance of
these alloys.
4.2 Power Supply—The transformer or motor generator set
2.2 Because of the effect of the environment, design, and shall be capable of delivering a controlled voltage of from 10
use, the life values obtained from this test method may not to 20 V to the circuit. It shall have a continuous current
correlate with that of an appliance or industrial heating unit. capacity of at least 20 A/specimen.
4.3 Voltage Control—The automatic voltage control shall be
This test method is under the jurisdiction of ASTM Committee B02 on
capable of maintaining across the bus bars a constant voltage
Nonferrous Metals and Alloys and is the direct responsibility of Subcommittee
within 60.5 %.
B02.10 on Thermostat Metals and Electrical Resistance Heating Materials.
Current edition approved Nov. 1, 2018. Published November 2018. Originally
NOTE 3—It has been found impossible to make accurate tests without
approved in 1929. Last previous edition approved in 2013 as B76 – 90 (2013). DOI:
voltage control, as changes in line voltage were sufficient to cause
10.1520/B0076-90R18.
Further information on this test method is given in a paper by F. E. Bash and considerable variation in the results obtained (see Annex A1).
J. W. Harsch, “Life Tests on Metallic Resistor Materials for Electrical Heating,”
4.4 Variable Transformer—Thetransformershallbecapable
Proceedings, ASTEA, American Society for Testing and Materials. Vol 29, Part II,
1929, p. 506. of adjusting the voltage across the specimen so that current is
Copyright © ASTM International, 100 Barr Harbor Drive, PO Box C700, West Conshohocken, PA 19428-2959. United States
B76 − 90 (2018)
Metric Equivalents
1 5 1 1
in. ⁄2 5 ⁄32 7 ⁄4 21 ⁄2 52 64
mm 12.7 131.0 184.2 546.1 1321 1626
FIG. 1 Test Panel for Accelerated Life Test
controlled to approximately 0.25 % of desired value, and shall
have a continuous current rating of approximately 25 A.
4.5 Ammeter and Voltmeter—The ammeter and voltmeter
shall have an accuracy of 1 % of normal test deflection
(approximately 15 A and 15 V, respectively). For alternating
current the range used shall be such as to give a reading above
the lower fifth of the scale range. The ammeter has appreciable
resistance. A compensating resistance shall be cut into the
circuit to replace the resistance of the ammeter so that the
overall resistance of the circuit is not changed. This resistance
shall be inserted in series with the blade of the upper switch
shown in Fig. 2.
4.6 Optical Pyrometer or Infrared Thermometer—The opti-
cal system shall be such as to provide a magnification of at
least four diameters. This may be accomplished by the use of
a special lens or combination of two standard lenses in the
objective to provide a short focal length and the desired
FIG. 2 Electrical Circuit Diagram for Accelerated Life Test
magnification. (See Annex A1.) These instruments must have
an accuracy of 610°F and NIST traceability.
B76 − 90 (2018)
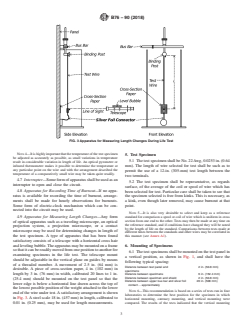
FIG. 3 Apparatus for Measuring Length Changes During Life Test
NOTE4—Itishighlyimportantthatthetemperatureofthetestspecimen
5. Test Specimen
be adjusted as accurately as possible, as small variations in temperature
5.1 The test specimen shall be No. 22Awg, 0.0253 in. (0.64
result in considerable variation in length of life. An optical pyrometer or
mm). The length of wire selected for test shall be such as to
infrared thermometer makes it possible to determine the temperature at
any particular point on the wire and with the arrangement described the
permit the use of a 12-in. (305-mm) test length between the
temperature of a comparatively small wire may be taken quite readily.
two terminals.
4.7 Interrupter—Someformofapparatusshallbeusedasan
5.2 The test specimen shall be representative, as regards
interrupter to open and close the circuit.
surface, of the average of the coil or spool of wire which has
4.8 Apparatus for Recording Time of Burnout—If no appa-
been selected for test. Particular care shall be taken to see that
ratus is available for recording the time of burnout, arrange- the specimen selected is free from kinks. This is necessary, as
ments shall be made for hourly observations for burnouts.
a kink, even though later removed, may cause burnout at that
Some form of electric-clock mechanism which can be con- point.
nected into the circuit may be used.
NOTE 5—It is also very desirable to select and keep as a reference
standard for comparison a spool or coil of wire which is uniform in cross
4.9 Apparatus for Measuring Length Changes—Any form
section from one end to the other. Tests may then be made at any time on
of optical apparatus such as a traveling microscope, an optical
the reference standard, and if conditions have changed they will be noted
projection system, a projection microscope, or a contact
by the length of life on the standard. Comparisons between tests made at
microscope may be used for determining changes in length of
different times between the standards and other wires may be correlated in
the test specimen. A type of apparatus that has been found
this manner (see Annex A1).
satisfactory consists of a telescope with a horizontal cross hair
andlevelingbubble.Theapparatusmaybemountedonaframe 6. Mounting of Specimens
so that it can be readily moved from one position to another for
6.1 The test specimens shall be mounted on the test panel in
examining specimens in the life test. The telescope mount
a vertical position, as shown in Fig. 1, and shall have the
should be adjustable in the vertical plane on guides by means
following typical spacing:
of a threaded member. A movement of 2.5 in. (64 mm) is
Distance between test panel and 2 in. (50.8 mm)
desirable. A piece of cross-section paper, 4 in. (102 mm) in
specimens
length by 3 in. (76 mm) in width, calibrated 20 lines to 1 in. Distance between specimens 6 in. (152.4 mm)
Distance between specimen and shield 2 in. (50.8 mm)
(25.4 mm) should be mounted on the test panel so that the
Distance between upper bus bar and silver foil 20 in. (508 mm)
lower edge is below a horizontal line drawn across the top of
contact . approximately
the lowest possible position of the weight attached to the lower
NOTE 6—This recommendation is based on a series of tests run in four
end of the wire under test.Asatisfactory arrangement is shown
laboratories to determine the best position for the specimen in which
in Fig. 3.Asteel scale 18 in. (457 mm) in length, calibrated to
horizontal mounting, catenary mounting, and vertical mounting were
0.01 in. (0.25 mm), may be used for length measurements. compared. The results of the tests indicated that the vertical mounting
B76 − 90 (2018)
gave the best results and was most convenient. It might be expected that NOTE7—Theinterruptershallnotbeinoperationwhilethetemperature
the vertical wire would be a great deal hotter near the top than near the is being adjusted.
bottom. This does not appear to be the case due to the fact that convection
9.1.8 Allow the specimen to operate under this condition
currents are greater near the top, and therefore largely compensate for
variations that otherwise would occur. until 2 h have elapsed in order to bring the emissivity nearer to
a black body condition.
6.2 In mounting a test specimen, one end of the specimen
9.1.9 Adjust the temperature of the specimen to the test
shall be inserted in the upper terminal and the weight attached
temperature. Maintain this balance until 1 min has elapsed.
to the other end. The upper terminal shall then be adjusted to
give a test length of the wire of approximately 12 in. (305 mm)
9.1.10 After another 13 min readjust the temperature of the
between the two terminals. Care shall be taken to see that the
specimen to the test temperature. Final adjustment shall be
weight will be able to move freely after the specimen has
completed within the next minute or a total of 15 min. The end
expanded upon heating.
of this 15-min period is the start of the test. It is important to
maintain this time schedule.
6.3 Number of Test Specimens:
9.1.11 Measure the voltage and the current and record the
6.3.1 The life value shall be the average of three simulta-
neous determinations on wire specimens of the material being values together with the starting temperature and time of
tested. starting the test.
9.1.12 Start the interrupter, the timing device of which shall
7. Ballast Resistance
have been previously regulated so that the “on” period and the
7.1 The voltage between the bus bars shall be adjusted so “off” period shall be equal and shall each have a duration of 2
that it will not be necessary to make the ballast resistance in min.
series with the specimen greater than 20 % of the resistance of
NOTE 8—Various cycles have been tried varying from 10 min on and 5
the specimen.
min off to 30 s on and 30 s off, when it was found that the 2 min on and
2 min off cycle gave the shortest life for a given temperature. It appears
8. Temperature of Test
that sufficient cooling time has to be allowed to permit the sp
...


Questions, Comments and Discussion
Ask us and Technical Secretary will try to provide an answer. You can facilitate discussion about the standard in here.
Loading comments...