ASTM B106-96(2002)e1
(Test Method)Standard Test Methods for Flexivity of Thermostat Metals
Standard Test Methods for Flexivity of Thermostat Metals
SIGNIFICANCE AND USE
These test methods are used for determining response to temperature change or flexivity of thermostat metal. The flexivity is calculated from the temperatures, dimensions of specimen, and the relative movement of the specimen. The simple beam method is the method for certification. Any use of the spiral coil method (Method B) is to be mutually agreed upon between the user and supplier.
SCOPE
1.1 These test methods cover the determination of flexivity (a measure of thermal deflection rate or deflection temperature characteristics) of thermostat metals.
1.1.1 Test Method A—Tested in the form of flat strip 0.012 in. (0.30 mm) or over in thickness.
1.1.2 Test Method B—Tested in the form of spiral coils less than 0.012 in. in thickness.
1.2 The values stated in inch-pound units are to be regarded as the standard. The values given in parentheses are provided for information purposes only.
1.3 This standard does not purport to address all of the safety concerns, if any, associated with its use. It is the responsibility of the user of this standard to become familiar with all hazards including those identified in the appropriate Material Safety Data Sheet for this product/material as provided by the manufacturer, to establish appropriate safety and health practices, and determine the applicability of regulatory limitations prior to use.
General Information
Relations
Standards Content (Sample)
NOTICE: This standard has either been superseded and replaced by a new version or withdrawn.
Contact ASTM International (www.astm.org) for the latest information
e1
Designation:B106–96(Reapproved 2002)
Standard Test Methods for
Flexivity of Thermostat Metals
This standard is issued under the fixed designation B106; the number immediately following the designation indicates the year of
original adoption or, in the case of revision, the year of last revision.Anumber in parentheses indicates the year of last reapproval.A
superscript epsilon (e) indicates an editorial change since the last revision or reapproval.
e NOTE—Paragraph 1.3 was corrected editorially in June 2002.
1. Scope 3.1.2 flexivity (F)—the change of curvature of the longitu-
dinal center line of the specimen per unit temperature change
1.1 These test methods cover the determination of flexivity
for unit thickness, given by the following equation:
(a measure of thermal deflection rate or deflection temperature
characteristics) of thermostat metals.
~1/R ! 2 ~1/R !
2 1
F 5 t (1)
T 2 T
1.1.1 Test Method A—Tested in the form of flat strip 0.012
2 1
in. (0.30 mm) or over in thickness.
Todeterminetheflexivitybetweenanytwotemperatures, T
1.1.2 Test Method B—Tested in the form of spiral coils less
and T , it is necessary to measure the curvature 1/ R and 1/R
2 1 2
than 0.012 in. in thickness.
at temperature T and T , respectively. To find the curvature at
1 2
1.2 The values stated in inch-pound units are to be regarded
either temperature (Fig. 1 and Fig. 2), measure the distance D.
as the standard. The values given in parentheses are provided
The curvature is given by the following equation:
for information purposes only.
2 2
1/R 58 D/~Q 14Dt 14D ! (2)
1.3 This standard does not purport to address all of the
safety concerns, if any, associated with its use. It is the
where:
responsibility of the user of this standard to become familiar
R = radius of curvature of the longitudinal center line of
with all hazards including those identified in the appropriate
the specimen, in. (mm),
Material Safety Data Sheet for this product/material as pro-
t = thickness of test specimen, in. (mm),
vided by the manufacturer, to establish appropriate safety and
Q = distance between support points, in. (mm), and
health practices, and determine the applicability of regulatory
D = for point support (simply supported
limitations prior to use.
beam),=perpendicular distance between the longitu-
dinal center lines of the lower surface of the specimen
2. Referenced Documents
midway between the point supports and the straight
2.1 ASTM Standards:
line joining the support points, in. (mm).
B389 Test Method for Thermal Deflection Rate of Spiral
4. Significance and Use
and Helical Coils of Thermostat Metal
4.1 Thesetestmethodsareusedfordeterminingresponseto
3. Terminology
temperature change or flexivity of thermostat metal. The
3.1 Definitions:
flexivity is calculated from the temperatures, dimensions of
3.1.1 thermostat metal—acompositematerialintheformof
specimen, and the relative movement of the specimen. The
sheet or strip comprising two or more metallic layers of
simplebeammethodisthemethodforcertification.Anyuseof
differingcoefficientsofthermalexpansion,suchthattheradius
the spiral coil method (Method B) is to be mutually agreed
of curvature of the composite changes with temperature
upon between the user and supplier.
change.
TEST METHOD A—FLAT STRIPS
5. Apparatus
These test methods are under the jurisdiction of ASTM Committee B02 on
Nonferrous Metals and Alloys and is the direct responsibility of Subcommittee
5.1 Specimen Carrier, provided with two conical supports
B02.10 on Thermostat Metal and Electrical Resistance Heating Materials.
for locating the specimen. The test length (that is, the distance
Current edition approved Jan. 10, 1996. Published April 1996. Originally
between the point of contact of the specimen with one support
published as B106–84. Last previous edition B106–90.
Annual Book of ASTM Standards, Vol 02.04. andthepointofcontactofthespecimenwiththeothersupport)
Copyright © ASTM International, 100 Barr Harbor Drive, PO Box C700, West Conshohocken, PA 19428-2959, United States.
B106
5.5 Deflection Index—Means shall be provided for measur-
ing the deflection of the specimen at a point midway between
thepointsofsupportandalongtheverticallineintersectingthe
line joining the points of support. Such means may comprise a
fused-quartz transmission rod disposed with its axis vertical
and terminating in a point or knife-edge, which shall engage
the specimen midway between the points of contact with the
supports.
5.5.1 The transmission rod shall be mounted in such a
manner that it is free to move in the direction of its axis. The
rodshallbearatitsfreeendanindexsuitableformicroscopical
observation, or else an electrical contact with which a mi-
crometer will permit the changes of the deflection of specimen
to be accurately observed. Alternatively, the deflection of the
midpoint of the specimen may be directly observed by optical
means whose line of sight is horizontal and passes through the
FIG. 1 Test for Flexivity of Thermostat Metals
verticallinethroughthemidpointofthespecimen.Amicrome-
ter screw with extended spindle making direct contact with the
specimen may be used. In this case, electrical means shall be
provided that will indicate contact without significant distur-
bance of the specimen.The measurement of the position of the
midpointofthetestspecimenshallbeofsuchaccuracythatthe
individual positions at the test temperatures shall be known to
within 60.0002 in. (0.005 mm).
5.5.2 If a transmission rod is used, it and any attached parts
shallbeofsuchweightorsocounterweightedthattheywillnot
cause a deflection greater than 1% of the maximum to be
produced by the action of the thermostat metal alone. When
free, the thermostat metal assumed very nearly a circular
curvature. Concentrated loading at the center of the specimen
willcausethecurvaturetobeotherthancircularandmaycause
significant errors in the evaluation of flexivity. The location of
the line passing through the points of contact between speci-
menandsupportsshallbeknown,withreferencetothescaleof
the micrometer, to within 60.002 in. (0.05 mm).
5.6 All metallic components of the flexivity apparatus
FIG. 2 Typical Apparatus Design
should be made of very low coefficient of thermal expansion
components. The recommended material is invar.
shallbeknowntowithin 60.005in.(0.13mm),andthelineof
6. Test Specimens
plane passing through the points of contact shall be horizontal.
6.1 The test specimen shall be in the form of a strip that
The specimen carrier and supports shall hold the specimen
displays no apparent initial irregularity of curvature.
without constraint so that the curvature, due to its deflection,
6.2 The maximum thickness shall not be greater than the
willfollowaverticalplanepassingthroughthelinejoiningthe
minimum thickness by more than 1% of the latter.
points of contact between specimen and supports.
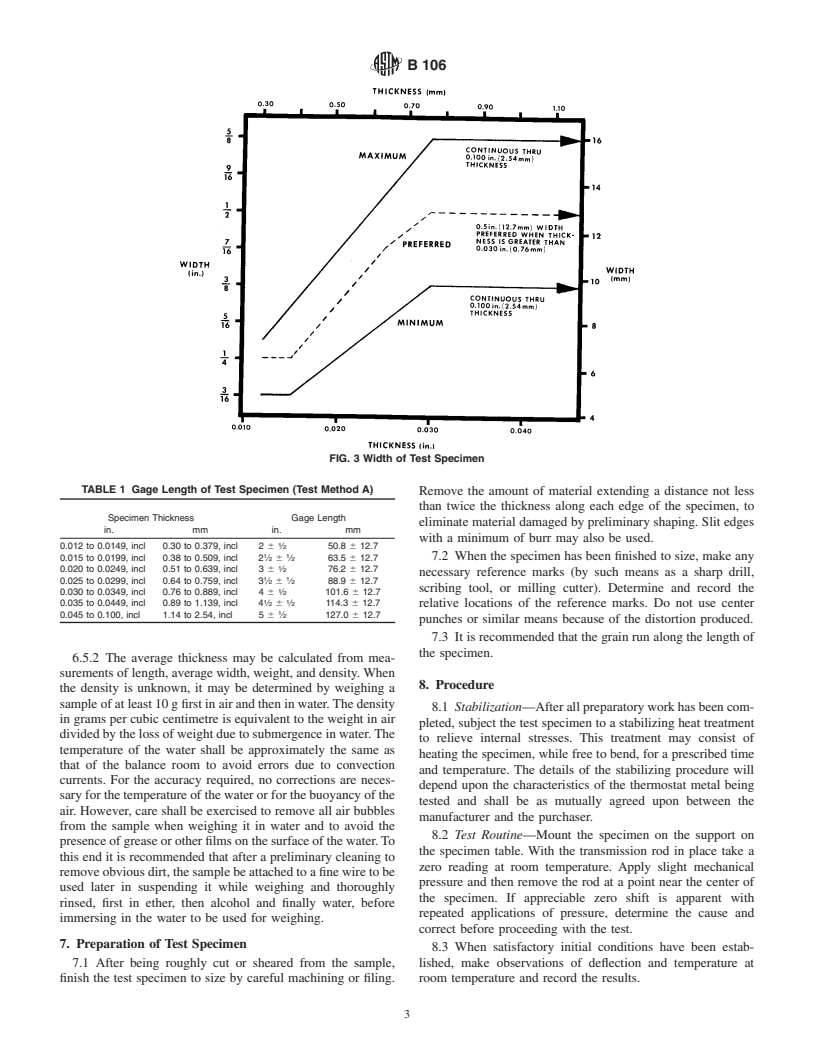
6.3 Thewidthshallberelatedtothethicknessinaccordance
5.2 Micrometer—traveling microscope, or equivalent de-
withFig.3.Preferredwidthsaretobeusedwheneverpossible.
vice, so connected to the specimen carrier that expansion
The maximum width shall not exceed the minimum width by
during heating of the carrier or connecting parts will not cause
more than 2% of the latter.
appreciable displacement of the measuring device with respect
6.4 The length shall be such as to allow a distance between
to the supports.
supports that bears the relation to the thickness in accordance
5.3 Bath—A stirred liquid bath or uniformly heated enclo-
with Table 1 and to allow a distance beyond the supports not
sure in which the specimen carrier, together with adjustable
less than the width.
electric heating source is placed. The specimen needs to be
6.5 The thickness of the specimen shall be determined
maintained at the desired temperatures, with a variation in
within 60.0001in.(0.002mm)bymeansofascrewmicrome-
temperature throughout the gage length of the specimen not to
ter or an equivalent method.
exceed 0.5% of the temperature range used in the test.
6.5.1 For specimens less than 0.050 in. (1.27 mm) in
5.4 Temperature Measuring Apparatus, of such accuracy thickness, special precautions are necessary, such as the use of
that the individual temperatures shall be known to within a micrometer reading directly to 0.0001 in. (0.002 mm).
60.5°F (0.3°C). Suitable optical methods may also be used.
B106
FIG. 3 Width of Test Specimen
TABLE 1 Gage Length of Test Specimen (Test Method A)
Remove the amount of material extending a distance not less
than twice the thickness along each edge of the specimen, to
Specimen Thickness Gage Length
eliminate material damaged by preliminary shaping. Slit edges
in. mm in. mm
with a minimum of burr may also be used.
0.012 to 0.0149, incl 0.30 to 0.379, incl 2 6 ⁄2 50.8 6 12.7
1 1
0.015 to 0.0199, incl 0.38 to 0.509, incl 2 ⁄2 6 ⁄2 63.5 6 12.7 7.2 When the specimen has been finished to size, make any
0.020 to 0.0249, incl 0.51 to 0.639, incl 3 6 ⁄2 76.2 6 12.7
necessary reference marks (by such means as a sharp drill,
1 1
0.025 to 0.0299, incl 0.64 to 0.759, incl 3 ⁄2 6 ⁄2 88.9 6 12.7
scribing tool, or milling cutter). Determine and record the
0.030 to 0.0349, incl 0.76 to 0.889, incl 4 6 ⁄2 101.6 6 12.7
1 1
0.035 to 0.0449, incl 0.89 to 1.139, incl 4 ⁄2 6 ⁄2 114.3 6 12.7
relative locations of the reference marks. Do not use center
0.045 to 0.100, incl 1.14 to 2.54, incl 5 6 ⁄2 127.0 6 12.7
punches or similar means because of the distortion produced.
7.3 It is recommended that the grain run along the length of
the specimen.
6.5.2 The average thickness may be calculated from mea-
surements of length, average width, weight, and density.When
8. Procedure
the density is unknown, it may be determined by weighing a
sampleofatleast10gfirstinairandtheninwater.Thedensity
8.1 Stabilization—Afterallpreparatoryworkhasbeencom-
in grams per cubic centimetre is equivalent to the weight in air
pleted, subject the test specimen to a stabilizing heat treatment
dividedbythelossofweightduetosubmergenceinwater.The
to relieve internal stresses. This treatment may consist of
temperature of the water shall be approximately the same as
heating the specimen, while free to bend, for a prescribed time
that of the balance room to avoid errors due to convection
and temperature. The details of the stabilizing procedure will
currents. For the accuracy required, no corrections are neces-
depend upon the characteristics of the thermostat metal being
saryforthetemperatureofthewaterorforthebuoyancyofthe
tested and shall be as mutually agreed upon between the
air. However, care shall be exercised to remove all air bubbles
manufacturer and the purchaser.
from the sample when weighing it in water and to avoid the
8.2 Test Routine—Mount the specimen on the support on
presenceofgreaseorotherfilmsonthesurfaceofthewater.To
the specimen table. With the transmission rod in place tak
...


Questions, Comments and Discussion
Ask us and Technical Secretary will try to provide an answer. You can facilitate discussion about the standard in here.