ASTM G99-05
(Test Method)Standard Test Method for Wear Testing with a Pin-on-Disk Apparatus
Standard Test Method for Wear Testing with a Pin-on-Disk Apparatus
SIGNIFICANCE AND USE
The amount of wear in any system will, in general, depend upon the number of system factors such as the applied load, machine characteristics, sliding speed, sliding distance, the environment, and the material properties. The value of any wear test method lies in predicting the relative ranking of material combinations. Since the pin-on-disk test method does not attempt to duplicate all the conditions that may be experienced in service (for example; lubrication, load, pressure, contact geometry, removal of wear debris, and presence of corrosive environment), there is no insurance that the test will predict the wear rate of a given material under conditions differing from those in the test.
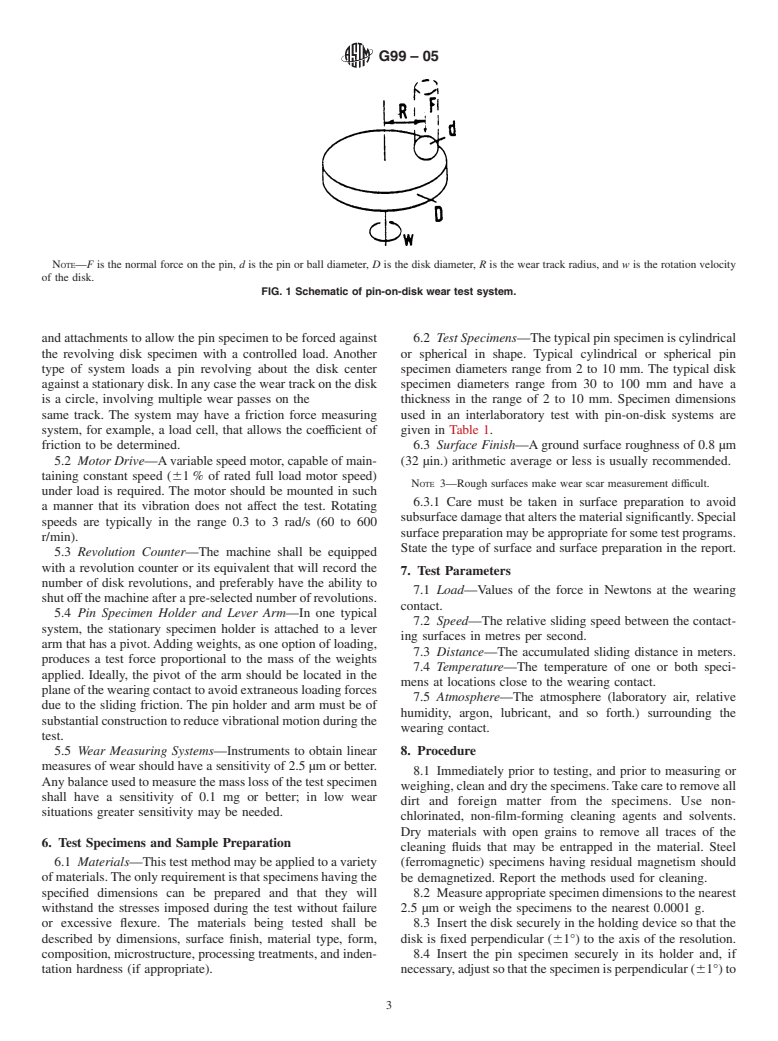
Note—F is the normal force on the pin, d is the pin or ball diameter, D is the disk diameter, R is the wear track radius, and w is the rotation velocity of the disk. FIG. 1 Schematic of pin-on-disk wear test system.
SCOPE
1.1 This test method covers a laboratory procedure for determining the wear of materials during sliding using a pin-on-disk apparatus. Materials are tested in pairs under nominally non-abrasive conditions. The principal areas of experimental attention in using this type of apparatus to measure wear are described. The coefficient of friction may also be determined.
1.2 The values stated in SI units are to be regarded as standard.
1.3 This standard does not purport to address all of the safety concerns, if any, associated with its use. It is the responsibility of the user of this standard to establish appropriate safety and health practices and determine the applicability of regulatory limitations prior to use.
General Information
Relations
Standards Content (Sample)
NOTICE: This standard has either been superseded and replaced by a new version or withdrawn.
Contact ASTM International (www.astm.org) for the latest information.
Designation:G99–05
Standard Test Method for
1
Wear Testing with a Pin-on-Disk Apparatus
ThisstandardisissuedunderthefixeddesignationG99;thenumberimmediatelyfollowingthedesignationindicatestheyearoforiginal
adoptionor,inthecaseofrevision,theyearoflastrevision.Anumberinparenthesesindicatestheyearoflastreapproval.Asuperscript
epsilon (´) indicates an editorial change since the last revision or reapproval.
1. Scope about the disk center. In either case, the sliding path is a circle
on the disk surface. The plane of the disk may be oriented
1.1 This test method covers a laboratory procedure for
either horizontally or vertically.
determining the wear of materials during sliding using a
pin-on-disk apparatus. Materials are tested in pairs under
NOTE 1—Wear results may differ for different orientations.
nominally non-abrasive conditions. The principal areas of
3.1.1 The pin specimen is pressed against the disk at a
experimental attention in using this type of apparatus to
specifiedloadusuallybymeansofanarmorleverandattached
measure wear are described. The coefficient of friction may
weights. Other loading methods have been used, such as
also be determined.
hydraulic or pneumatic.
1.2 The values stated in SI units are to be regarded as
NOTE 2—Wear results may differ for different loading methods.
standard.
1.3 This standard does not purport to address all of the
3.2 Wear results are reported as volume loss in cubic
safety concerns, if any, associated with its use. It is the
millimetres for the pin and the disk separately. When two
responsibility of the user of this standard to establish appro-
different materials are tested, it is recommended that each
priate safety and health practices and determine the applica-
material be tested in both the pin and disk positions.
bility of regulatory limitations prior to use.
3.3 The amount of wear is determined by measuring appro-
priatelineardimensionsofbothspecimensbeforeandafterthe
2. Referenced Documents
test,orbyweighingbothspecimensbeforeandafterthetest.If
2
2.1 ASTM Standards:
linear measures of wear are used, the length change or shape
E178 Practice for Dealing With Outlying Observations
change of the pin, and the depth or shape change of the disk
G40 Terminology Relating to Wear and Erosion
wear track (in millimetres) are determined by any suitable
G117 Guide for Calculating and Reporting Measures of
metrological technique, such as electronic distance gaging or
Precision Using Data from Interlaboratory Wear or Ero-
stylusprofiling.Linearmeasuresofwearareconvertedtowear
sion Tests
volume (in cubic millimetres) by using appropriate geometric
3
2.2 Other Standard:
relations. Linear measures of wear are used frequently in
DIN-50324 Testing of Friction and Wear
practicesincemasslossisoftentoosmalltomeasureprecisely.
Iflossofmassismeasured,themasslossvalueisconvertedto
3. Summary of Test Method
volume loss (in cubic millimetres) using an appropriate value
3.1 For the pin-on-disk wear test, two specimens are re-
for the specimen density.
quired. One, a pin with a radiused tip, is positioned perpen-
3.4 Wear results are usually obtained by conducting a test
dicular to the other, usually a flat circular disk. A ball, rigidly
for a selected sliding distance and for selected values of load
held, is often used as the pin specimen. The test machine
and speed. One set of test conditions that was used in an
causes either the disk specimen or the pin specimen to revolve
interlaboratory measurement series is given in Table 1 and
Table 2 as a guide. Other test conditions may be selected
1 depending on the purpose of the test.
This test method is under the jurisdiction of ASTM Committee G02 on Wear
and Erosion and is the direct responsibility of Subcommittee G02.40 on Non- 3.5 Wear results may in some cases be reported as plots of
Abrasive Wear.
wear volume versus sliding distance using different specimens
Current edition approved May 1, 2005. Published May 2005. Originally
for different distances. Such plots may display non-linear
approved in 1990. Last previous edition approved in 2004 as G99–04a. DOI:
relationships between wear volume and distance over certain
10.1520/G0099-05.
2
For referenced ASTM standards, visit the ASTM website, www.astm.org, or
portions of the total sliding distance, and linear relationships
contactASTM Customer Service at service@astm.org. ForAnnual Book ofASTM
over other portions. Causes for such differing relationships
Standards volume information, refer to the standard’s Document Summary page on
include initial “break-in” processes, transitions between re-
the ASTM website.
3
gions of different dominant wear mechanisms, and so forth.
Available from Beuth Verlag GmbH, Burggrafenstrasse 6, 1000 Berlin 30,
Germany.
Copyright © ASTM International, 100 Barr Harbor Drive, PO Box C700, West Conshohocken, PA
...


Questions, Comments and Discussion
Ask us and Technical Secretary will try to provide an answer. You can facilitate discussion about the standard in here.