ASTM D4821-07e1
(Guide)Standard Guide for Carbon BlackValidation of Test Method Precision and Bias
Standard Guide for Carbon Black<char: emdash>Validation of Test Method Precision and Bias
SIGNIFICANCE AND USE
One of the major causes of poor test precision is the lack of calibration or standardization of instruments, apparatus, reagents, and technique among laboratories. The sum of all sources of testing error is unique for an individual laboratory. A least-squares regression of a laboratory's actual test values for reference materials to the established mean values will result in a unique least-squares regression line (and equation) for that laboratory. Generally, there are two reasons for using the SRBs in testing: (1) to monitor testing performance (see Section 4) to ensure that no systematic error or bias is affecting the test results, or (2) to establish a statistical calibration (see Section 5) when the correction of assignable causes (see Section 6) does not yield in-control test results.
In addition to the calibration of a test method by physicochemical means, a statistical method for achieving calibration of a test method is presented.
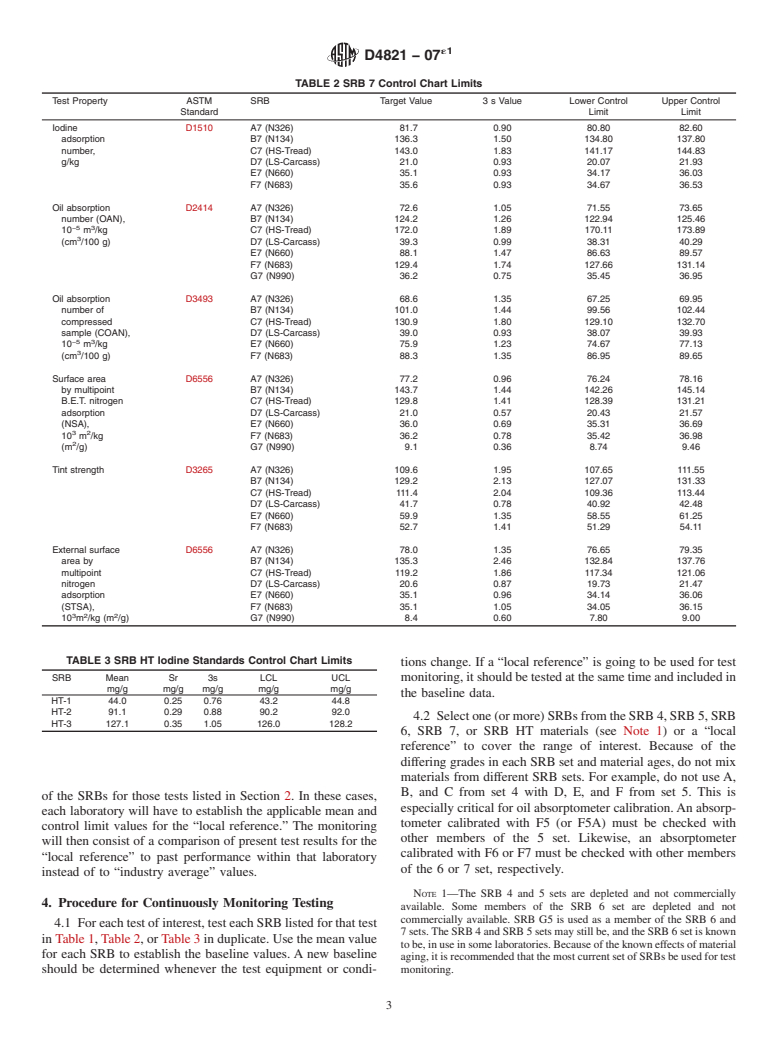
This guide outlines the use of control charts to graphically present calibration test data determined for the ASTM SRBs for those test methods given in Section 2. All laboratories are encouraged to utilize statistical control charts and the SRBs because this allows a comparison of testing precision within a laboratory to the “industry average” values found in Table 1, Table 2, or Table 3.
The techniques of this guide can be used to continuously monitor testing execution and precision for other tests that are not listed in Section 2 or for materials that fall outside the range of the SRBs for those tests listed in Section 2. In these cases, each laboratory will have to establish the applicable mean and control limit values for the “local reference.” The monitoring will then consist of a comparison of present test results for the “local reference” to past performance within that laboratory instead of to “industry average” values.
SCOPE
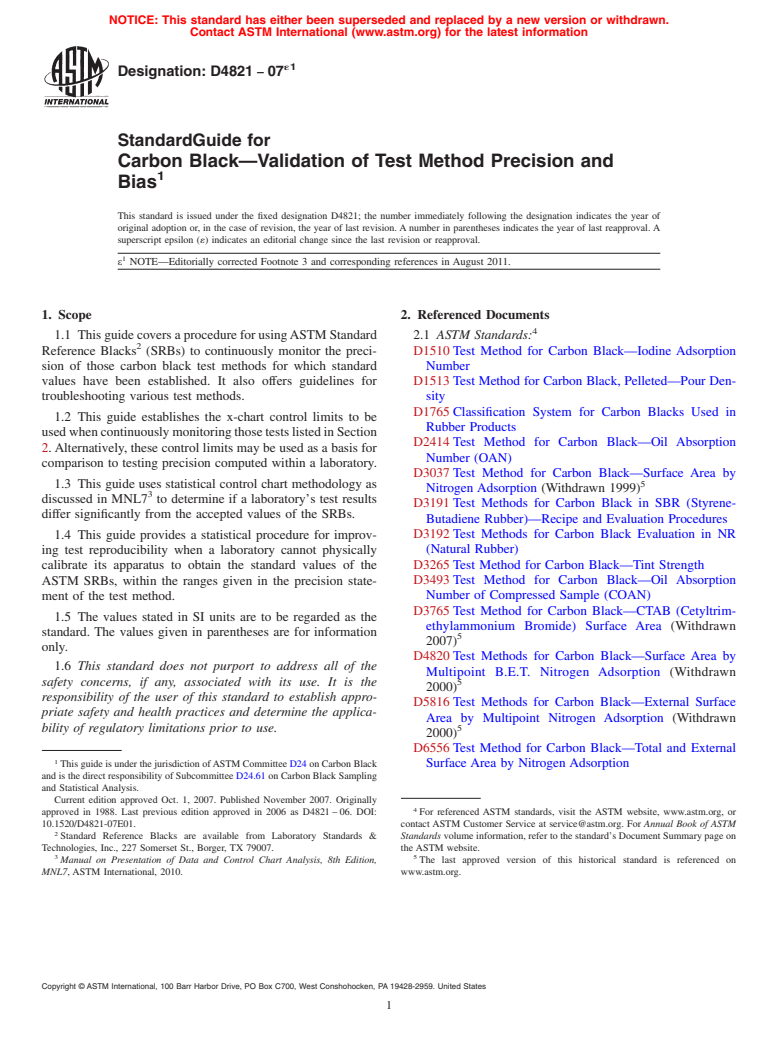
1.1 This guide covers a procedure for using ASTM Standard Reference Blacks (SRBs) to continuously monitor the precision of those carbon black test methods for which standard values have been established. It also offers guidelines for troubleshooting various test methods.
1.2 This guide establishes the x-chart control limits to be used when continuously monitoring those tests listed in Section 2. Alternatively, these control limits may be used as a basis for comparison to testing precision computed within a laboratory.
1.3 This guide uses statistical control chart methodology as discussed in MNL7 to determine if a laboratory's test results differ significantly from the accepted values of the SRBs.
1.4 This guide provides a statistical procedure for improving test reproducibility when a laboratory cannot physically calibrate its apparatus to obtain the standard values of the ASTM SRBs, within the ranges given in the precision statement of the test method.
1.5 The values stated in SI units are to be regarded as the standard. The values given in parentheses are for information only.
1.6 This standard does not purport to address all of the safety concerns, if any, associated with its use. It is the responsibility of the user of this standard to establish appropriate safety and health practices and determine the applicability of regulatory limitations prior to use.
General Information
Relations
Standards Content (Sample)
NOTICE: This standard has either been superseded and replaced by a new version or withdrawn.
Contact ASTM International (www.astm.org) for the latest information
´1
Designation: D4821 − 07
StandardGuide for
Carbon Black—Validation of Test Method Precision and
1
Bias
This standard is issued under the fixed designation D4821; the number immediately following the designation indicates the year of
original adoption or, in the case of revision, the year of last revision.Anumber in parentheses indicates the year of last reapproval.A
superscript epsilon (´) indicates an editorial change since the last revision or reapproval.
1
ε NOTE—Editorially corrected Footnote 3 and corresponding references in August 2011.
1. Scope 2. Referenced Documents
4
1.1 ThisguidecoversaprocedureforusingASTMStandard 2.1 ASTM Standards:
2
Reference Blacks (SRBs) to continuously monitor the preci- D1510Test Method for Carbon Black—Iodine Adsorption
sion of those carbon black test methods for which standard Number
values have been established. It also offers guidelines for D1513Test Method for Carbon Black, Pelleted—Pour Den-
troubleshooting various test methods. sity
D1765Classification System for Carbon Blacks Used in
1.2 This guide establishes the x-chart control limits to be
Rubber Products
usedwhencontinuouslymonitoringthosetestslistedinSection
D2414Test Method for Carbon Black—Oil Absorption
2.Alternatively, these control limits may be used as a basis for
Number (OAN)
comparison to testing precision computed within a laboratory.
D3037Test Method for Carbon Black—Surface Area by
5
1.3 This guide uses statistical control chart methodology as
Nitrogen Adsorption (Withdrawn 1999)
3
discussed in MNL7 to determine if a laboratory’s test results
D3191Test Methods for Carbon Black in SBR (Styrene-
differ significantly from the accepted values of the SRBs.
Butadiene Rubber)—Recipe and Evaluation Procedures
1.4 This guide provides a statistical procedure for improv- D3192Test Methods for Carbon Black Evaluation in NR
(Natural Rubber)
ing test reproducibility when a laboratory cannot physically
calibrate its apparatus to obtain the standard values of the D3265Test Method for Carbon Black—Tint Strength
ASTM SRBs, within the ranges given in the precision state- D3493Test Method for Carbon Black—Oil Absorption
Number of Compressed Sample (COAN)
ment of the test method.
D3765Test Method for Carbon Black—CTAB (Cetyltrim-
1.5 The values stated in SI units are to be regarded as the
ethylammonium Bromide) Surface Area (Withdrawn
standard. The values given in parentheses are for information
5
2007)
only.
D4820Test Methods for Carbon Black—Surface Area by
1.6 This standard does not purport to address all of the
Multipoint B.E.T. Nitrogen Adsorption (Withdrawn
safety concerns, if any, associated with its use. It is the 5
2000)
responsibility of the user of this standard to establish appro-
D5816Test Methods for Carbon Black—External Surface
priate safety and health practices and determine the applica-
Area by Multipoint Nitrogen Adsorption (Withdrawn
5
bility of regulatory limitations prior to use.
2000)
D6556Test Method for Carbon Black—Total and External
1
ThisguideisunderthejurisdictionofASTMCommitteeD24onCarbonBlack Surface Area by Nitrogen Adsorption
andisthedirectresponsibilityofSubcommitteeD24.61onCarbonBlackSampling
and Statistical Analysis.
Current edition approved Oct. 1, 2007. Published November 2007. Originally
4
approved in 1988. Last previous edition approved in 2006 as D4821–06. DOI: For referenced ASTM standards, visit the ASTM website, www.astm.org, or
10.1520/D4821-07E01. contact ASTM Customer Service at service@astm.org. For Annual Book of ASTM
2
Standard Reference Blacks are available from Laboratory Standards & Standards volume information, refer to the standard’s Document Summary page on
Technologies, Inc., 227 Somerset St., Borger, TX 79007. the ASTM website.
3 5
Manual on Presentation of Data and Control Chart Analysis, 8th Edition, The last approved version of this historical standard is referenced on
MNL7, ASTM International, 2010. www.astm.org.
Copyright © ASTM International, 100 Barr Harbor Drive, PO Box C700, West Conshohocken, PA 19428-2959. United States
1
---------------------- Page: 1 ----------------------
´1
D4821 − 07
TABLE 1 SRB 6 Control Chart Limits
NOTE 1—See Test Method D3765 for an algorithm to calculate CTAB values from the STSA values for the SRB 6 set.
Test Property ASTM Standard SRB Target Value 3 s Value Lower Control Limit Upper Control Limit
Iodine D1510 A6 (N134) 137.2 3.00 134.20 140.20
adsorption B6 (N220) 117.9 2.28 115.62 120.18
A
number, C6 (N326) 82.4 1.08 81.32 83.48
g/kg D6 (N762) 26.5 1.26 25.24 27.76
E6 (N660) 35.3 1.62 33.68 36.92
F6 (N683) 33.1 1.44 31.66 34.54
B
Oil absorption D2414 A6 (N134) 123.7 1.83 121.87 125.53
number, B6 (N220) 114.3 1.11 113.19 115.41
−5 3
10 m /kg C6 (N326) 70.3 1.05 69.25 71.35
3
(cm /100 g) D6 (N762) 67.4 1.50 65.90 68.90
E6 (N660) 88.2 1.80 86.40 90.00
F6 (N683)
...


Questions, Comments and Discussion
Ask us and Technical Secretary will try to provide an answer. You can facilitate discussion about the standard in here.