ASTM E2008-08(2014)e1
(Test Method)Standard Test Methods for Volatility Rate by Thermogravimetry
Standard Test Methods for Volatility Rate by Thermogravimetry
SIGNIFICANCE AND USE
5.1 Volatility of a material is not an equilibrium thermodynamic property but is a characteristic of a material related to a thermodynamic property that is vapor pressure. It is influenced by such factors as surface area, temperature, particle size, and purge gas flow rate; that is, it is diffusion controlled.
5.2 The extent of containment achieved for specimens in these test methods by means of a pinhole opening between 0.33 to 0.38 mm allows for measurement circumstances that are relatively insensitive to experimental variables other than temperature. Decreasing the extent of containment by use of pinholes larger than 0.38 mm will increase the magnitude of the observed rate of mass loss but will also reduce the measurement precision by increasing the sensitivity to variations in other experimental variables.
5.3 Results obtained by these test methods are not strictly equivalent to those experienced in processing or handling conditions but may be used to rank materials for their volatility in such circumstances. Therefore, the volatility rates determined by these test methods should be considered as index values only.
5.4 The volatility rate may be used to estimate such quantifiable values as drying interval or the extent of volatile release from a process.
SCOPE
1.1 These test methods cover procedures for assessing the volatility of solids and liquids at given temperatures using thermogravimetry under prescribed experimental conditions. Results of these test methods are obtained as volatility rates expressed as mass per unit time. Rates ≥ 5 μg/min are achievable with these test methods.
1.2 Temperatures typical for these test methods are within the range from 25°C to 500°C. This temperature range may differ depending upon the instrumentation used.
1.3 These test methods are intended to provide a value for the volatility rate of a sample using a thermogravimetric analysis measurement on a single representative specimen. It is the responsibility of the user of these test methods to determine the need for and the number of repetitive measurements on fresh specimens necessary to satisfy end use requirements.
1.4 The values stated in SI units are to be regarded as standard. No other units of measurement are included in this standard.
1.5 There is no ISO method equivalent to this standard.
1.6 This standard does not purport to address all of the safety concerns, if any, associated with its use. It is the responsibility of the user of these test methods to establish appropriate safety and health practices and determine the applicability of regulatory limitations prior to use.
General Information
Relations
Buy Standard
Standards Content (Sample)
NOTICE: This standard has either been superseded and replaced by a new version or withdrawn.
Contact ASTM International (www.astm.org) for the latest information
´1
Designation: E2008 − 08 (Reapproved 2014)
Standard Test Methods for
Volatility Rate by Thermogravimetry
This standard is issued under the fixed designation E2008; the number immediately following the designation indicates the year of
original adoption or, in the case of revision, the year of last revision. A number in parentheses indicates the year of last reapproval. A
superscript epsilon (´) indicates an editorial change since the last revision or reapproval.
ε NOTE—Warning notes were editorially updated throughout in March 2014.
1. Scope E473 Terminology Relating to Thermal Analysis and Rhe-
ology
1.1 These test methods cover procedures for assessing the
E691 Practice for Conducting an Interlaboratory Study to
volatility of solids and liquids at given temperatures using
Determine the Precision of a Test Method
thermogravimetry under prescribed experimental conditions.
E1142 Terminology Relating to Thermophysical Properties
Results of these test methods are obtained as volatility rates
E1582 Practice for Calibration of Temperature Scale for
expressed as mass per unit time. Rates ≥ 5 µg/min are
Thermogravimetry
achievable with these test methods.
E1860 Test Method for Elapsed Time Calibration of Ther-
1.2 Temperatures typical for these test methods are within
mal Analyzers
the range from 25°C to 500°C. This temperature range may
E2040 Test Method for Mass Scale Calibration of Thermo-
differ depending upon the instrumentation used.
gravimetric Analyzers
1.3 These test methods are intended to provide a value for
3. Terminology
the volatility rate of a sample using a thermogravimetric
analysismeasurementonasinglerepresentativespecimen.Itis 3.1 Definitions:
theresponsibilityoftheuserofthesetestmethodstodetermine
3.1.1 The following terms are applicable to these test
the need for and the number of repetitive measurements on methods and can be found in Terminologies E473 and E1142:
fresh specimens necessary to satisfy end use requirements. 3.1.1.1 thermogravimetric analysis (TGA),
3.1.1.2 thermogravimetry (TG),
1.4 The values stated in SI units are to be regarded as
3.1.1.3 volatility.
standard. No other units of measurement are included in this
standard. 3.2 Definitions of Terms Specific to This Standard:
3.2.1 volatility rate—the rate of conversion of a solid or
1.5 There is no ISO method equivalent to this standard.
liquid substance into the vapor state at a given temperature;
1.6 This standard does not purport to address all of the
mass per unit time.
safety concerns, if any, associated with its use. It is the
responsibility of the user of these test methods to establish
4. Summary of Test Method
appropriate safety and health practices and determine the
4.1 Asolid or liquid specimen is confined in an appropriate
applicability of regulatory limitations prior to use.
container with a pinhole opening between 0.33 and 0.38 mm.
The confined specimen is heated within a thermogravimetric
2. Referenced Documents
analyzer either to a temperature and held constant at that
2.1 ASTM Standards:
temperature for a fixed interval of time (Method A, Fig. 1)or
E177 Practice for Use of the Terms Precision and Bias in
at a slow constant heating rate between temperature limits
ASTM Test Methods
(Method B, Fig. 2). The mass of the specimen is measured
continuously and it or its rate of change is displayed as a
function of time or temperature. The volatility rate at any
These test methods are under the jurisdiction of ASTM Committee E37 on temperature is reported either as the average rate of mass loss
ThermalMeasurementsandarethedirectresponsibilityofSubcommitteeE37.01on
per unit time from Method A or as the instantaneous rate of
Calorimetry and Mass Loss.
mass loss (first derivative) per unit time from Method B.
Current edition approved March 15, 2014. Published April 2014. Originally
approved in 1999. Last previous edition approved in 2008 as E2008 – 08. DOI:
5. Significance and Use
10.1520/E2008-08R14E01.
For referenced ASTM standards, visit the ASTM website, www.astm.org, or
5.1 Volatility of a material is not an equilibrium thermody-
contact ASTM Customer Service at service@astm.org. For Annual Book of ASTM
namic property but is a characteristic of a material related to a
Standardsvolume information, refer to the standard’s Document Summary page on
the ASTM website. thermodynamic property that is vapor pressure. It is influenced
Copyright © ASTM International, 100 Barr Harbor Drive, PO Box C700, West Conshohocken, PA 19428-2959. United States
´1
E2008 − 08 (2014)
FIG. 1 Method A: R = Average Volatility Rate
v
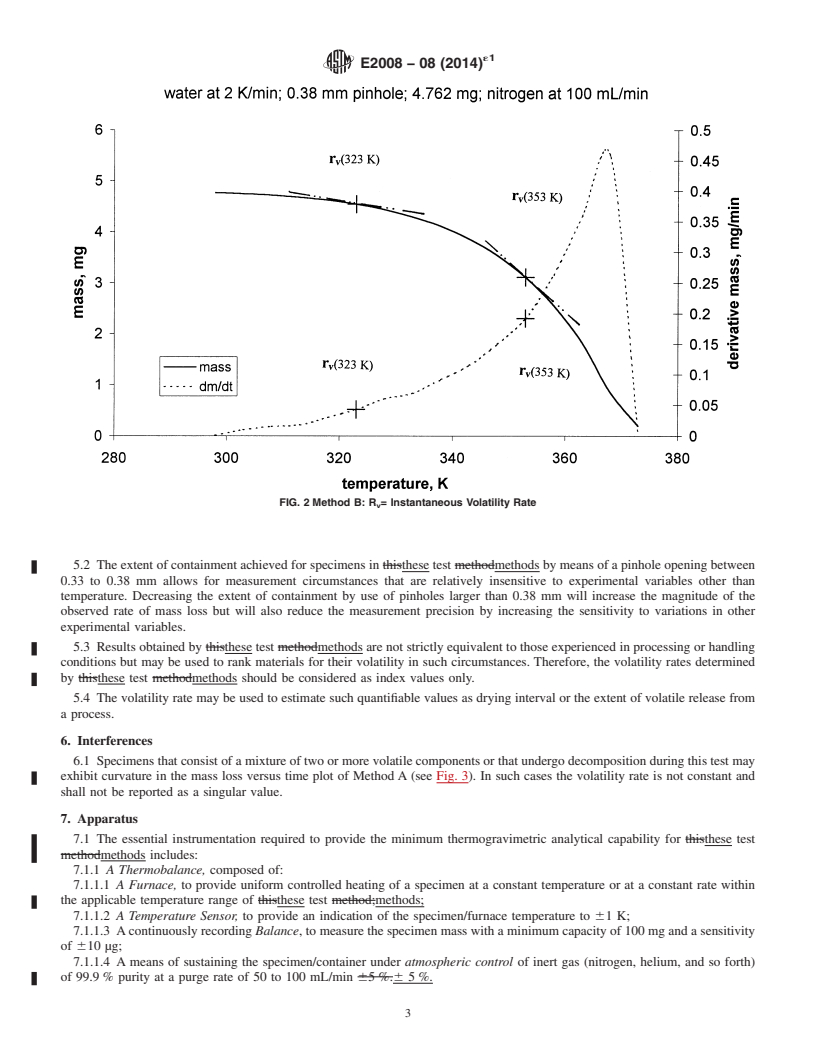
FIG. 2 Method B: R = Instantaneous Volatility Rate
v
by such factors as surface area, temperature, particle size, and purge gas flow rate; that is, it is diffusion controlled.
´1
E2008 − 08 (2014)
5.2 The extent of containment achieved for specimens in 7.1.1.1 A Furnace, to provide uniform controlled heating of
thesetestmethodsbymeansofapinholeopeningbetween0.33 a specimen at a constant temperature or at a constant rate
to 0.38 mm allows for measurement circumstances that are within the applicable temperature range of these test methods;
relatively insensitive to experimental variables other than 7.1.1.2 A Temperature Sensor, to provide an indication of
temperature. Decreasing the extent of containment by use of the specimen/furnace temperature to 61K;
pinholes larger than 0.38 mm will increase the magnitude of 7.1.1.3 A continuously recording Balance, to measure the
the observed rate of mass loss but will also reduce the specimen mass with a minimum capacity of 100 mg and a
measurement precision by increasing the sensitivity to varia- sensitivity of 610 µg;
tions in other experimental variables. 7.1.1.4 Ameans of sustaining the specimen/container under
atmospheric control of inert gas (nitrogen, helium, and so
5.3 Results obtained by these test methods are not strictly
forth) of 99.9 % purity at a purge rate of 50 to 100 mL/min 6
equivalent to those experienced in processing or handling
5%.
conditionsbutmaybeusedtorankmaterialsfortheirvolatility
7.1.2 A Temperature Controller, capable of executing a
in such circumstances. Therefore, the volatility rates deter-
specifictemperatureprogrambyoperatingthefurnacebetween
mined by these test methods should be considered as index
selected temperature limits at a rate of temperature change of
values only.
1 to 2 K/min constant to within 60.1 K/min or to rapidly heat
5.4 The volatility rate may be used to estimate such quan-
a specimen at a minimum of 50 K/min to an isothermal
tifiablevaluesasdryingintervalortheextentofvolatilerelease
temperature that is maintained constant to 61 K for a mini-
from a process.
mum of 30 min.
7.1.3 A Data Collection Device, to provide a means of
6. Interferences
acquiring, storing, and displaying measured or calculated
6.1 Specimens that consist of a mixture of two or more signals, or both. The minimum output signals required for
volatile components or that undergo decomposition during this
thermogravimetry are mass, temperature, and time.
test may exhibit curvature in the mass loss versus time plot of 7.1.4 Sealable Containers, (pans, crucibles, and so forth),
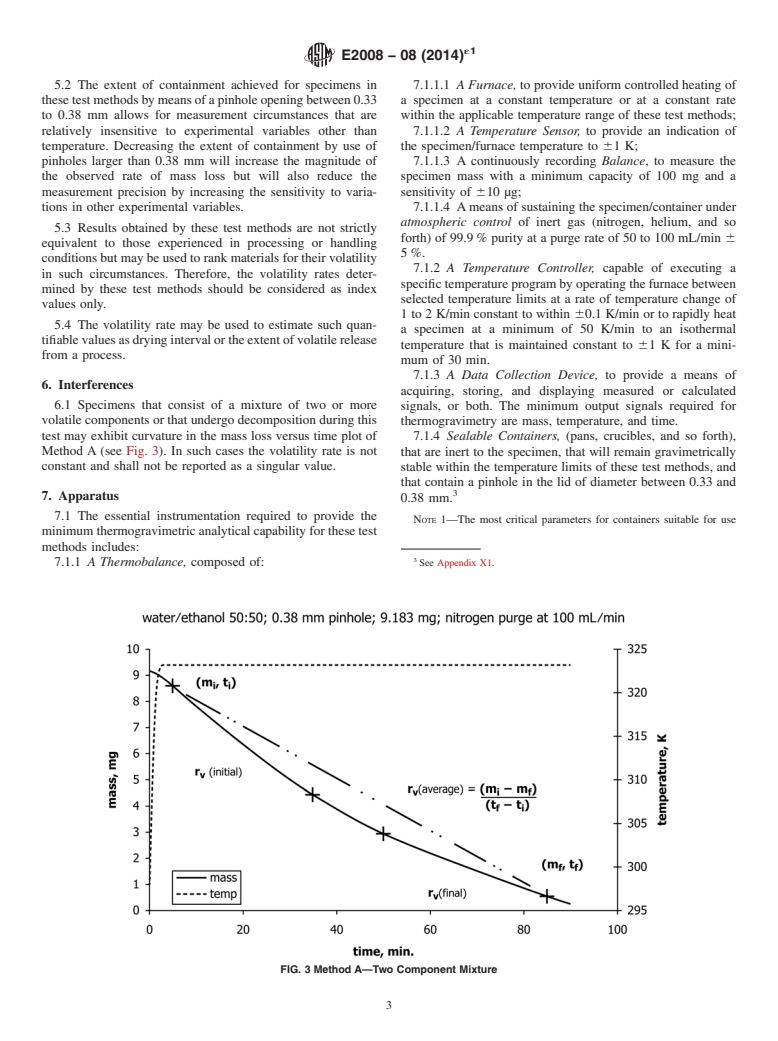
Method A (see Fig. 3). In such cases the volatility rate is not
that are inert to the specimen, that will remain gravimetrically
constant and shall not be reported as a singular value. stable within the temperature limits of these test methods, and
that contain a pinhole in the lid of diameter between 0.33 and
7. Apparatus
0.38 mm.
7.1 The essential instrumentation required to provide the
NOTE 1—The most critical parameters for containers suitable for use
minimumthermogravimetricanalyticalcapabilityforthesetest
methods includes:
7.1.1 A Thermobalance, composed of: See Appendix X1.
FIG. 3 Method A—Two Component Mixture
´1
E2008 − 08 (2014)
with these test methods are the pinhole diameter and the lid thickness. NOTE 3—For highly volatile substances, a significant mass fraction of
Sealable containers of volumes (25 to 50 µL) and wall thicknesses (80 to the specimen could be lost during this period of equilibration. Any large
150 µm) commercially available from Mettler-Toledo, Perkin Elmer discrepancy between the specimen mass as delivered and subsequently
Corporation, and TA Instruments, Inc., have been found suitable for this recorded by the thermobalance should be noted in the report.
purpose.
10.1.5 Heat the specimen rapidly at 50 K/min to the desired
7.2 Auxiliary equipment necessary or useful in conducting
isothermal temperature, and thereafter, maintain the isothermal
these test methods includes:
temperature to 61 K for 30 min. Record the specimen mass in
7.2.1 While not required, it is convenient to have a data
mg or µg continually during this heating program versus time.
analysis device that will continuously calculate and display the
The specimen temperature should be recorded during the
first derivative of mass with respect to time (in mass/min)
heating program
capable of detecting 0.05 µg/min.
NOTE 4—If the specimen is exhausted before 30 min have elapsed, it is
7.2.2 Device to encapsulate the specimen in sealable con-
recommended that the test be repeated with a larger specimen mass. If
tainers.
excessively large specimen mass is required to complete a 30-min test
7.2.3 Micropipette or syringe to deliver liquid specimens of
time, a shorter time interval or a lower isothermal temperature may be
used and shall be reported.
1 to 30 µL into the containers.
NOTE 5—The initial rapid heating to the desired isothermal temperature
8. Sampling may result in a momentary overshoot in the furnace temperature.
Overshoot in itself does not create a measurement question provided the
8.1 Samples are ordinarily measured as received. If a
data in 10.1.7 is taken only from the region where the isothermal
pretreatment is applied to any specimen,
...
This document is not an ASTM standard and is intended only to provide the user of an ASTM standard an indication of what changes have been made to the previous version. Because
it may not be technically possible to adequately depict all changes accurately, ASTM recommends that users consult prior editions as appropriate. In all cases only the current version
of the standard as published by ASTM is to be considered the official document.
´1
Designation: E2008 − 08 E2008 − 08 (Reapproved 2014)
Standard Test MethodMethods for
Volatility Rate by Thermogravimetry
This standard is issued under the fixed designation E2008; the number immediately following the designation indicates the year of
original adoption or, in the case of revision, the year of last revision. A number in parentheses indicates the year of last reapproval. A
superscript epsilon (´) indicates an editorial change since the last revision or reapproval.
ε NOTE—Warning notes were editorially updated throughout in March 2014.
1. Scope
1.1 ThisThese test method coversmethods cover procedures for assessing the volatility of solids and liquids at given
temperatures using thermogravimetry under prescribed experimental conditions. Results of thisthese test methodmethods are
obtained as volatility rates expressed as mass per unit time. Rates ≥ 5 μg/min are achievable with thisthese test method.methods.
1.2 Temperatures typical for thisthese test methodmethods are within the range from 25 °C to 500 °C. 25°C to 500°C. This
temperature range may differ depending upon the instrumentation used.
1.3 ThisThese test method ismethods are intended to provide a value for the volatility rate of a sample using a
thermogravimetric analysis measurement on a single representative specimen. It is the responsibility of the user of thisthese test
methodmethods to determine the need for and the number of repetitive measurements on fresh specimens necessary to satisfy end
use requirements.
1.4 The values stated in SI units are to be regarded as standard. No other units of measurement are included in this standard.
1.5 There is no ISO method equivalent to this standard.
1.6 This standard does not purport to address all of the safety concerns, if any, associated with its use. It is the responsibility
of the user of thisthese test methodmethods to establish appropriate safety and health practices and determine the applicability of
regulatory limitations prior to use.
2. Referenced Documents
2.1 ASTM Standards:
E177 Practice for Use of the Terms Precision and Bias in ASTM Test Methods
E473 Terminology Relating to Thermal Analysis and Rheology
E691 Practice for Conducting an Interlaboratory Study to Determine the Precision of a Test Method
E1142 Terminology Relating to Thermophysical Properties
E1582 Practice for Calibration of Temperature Scale for Thermogravimetry
E1860 Test Method for Elapsed Time Calibration of Thermal Analyzers
E2040 Test Method for Mass Scale Calibration of Thermogravimetric Analyzers
3. Terminology
3.1 Definitions:
3.1.1 The following terms are applicable to thisthese test methodmethods and can be found in Terminologies E473 and E1142:
3.1.1.1 thermogravimetric analysis (TGA),
3.1.1.2 thermogravimetry (TG),
3.1.1.3 volatility.
3.2 Definitions of Terms Specific to This Standard:
3.2.1 volatility rate—the rate of conversion of a solid or liquid substance into the vapor state at a given temperature; mass per
unit time.
ThisThese test method ismethods are under the jurisdiction of ASTM Committee E37 on Thermal Measurements and isare the direct responsibility of Subcommittee
E37.01 on Calorimetry and Mass Loss.
Current edition approved Sept. 1, 2008March 15, 2014. Published October 2008April 2014. Originally approved in 1999. Last previous edition approved in 20072008 as
E2008 – 07.E2008 – 08. DOI: 10.1520/E2008-08.10.1520/E2008-08R14E01.
For referenced ASTM standards, visit the ASTM website, www.astm.org, or contact ASTM Customer Service at service@astm.org. For Annual Book of ASTM
Standardsvolume information, refer to the standard’s Document Summary page on the ASTM website.
Copyright © ASTM International, 100 Barr Harbor Drive, PO Box C700, West Conshohocken, PA 19428-2959. United States
´1
E2008 − 08 (2014)
4. Summary of Test Method
4.1 A solid or liquid specimen is confined in an appropriate container with a pinhole opening between 0.33 and 0.38 mm. The
confined specimen is heated within a thermogravimetric analyzer either to a temperature and held constant at that temperature for
a fixed interval of time (Method A, Fig. 1) or at a slow constant heating rate between temperature limits (Method B, Fig. 2). The
mass of the specimen is measured continuously and it or its rate of change is displayed as a function of time or temperature. The
volatility rate at any temperature is reported either as the average rate of mass loss per unit time from Method A or as the
instantaneous rate of mass loss (first derivative) per unit time from Method B.
5. Significance and Use
5.1 Volatility of a material is not an equilibrium thermodynamic property but is a characteristic of a material related to a
thermodynamic property that is vapor pressure. It is influenced by such factors as surface area, temperature, particle size, and purge
gas flow rate; that is, it is diffusion controlled.
FIG. 1 Method A: R = Average Volatility Rate
v
´1
E2008 − 08 (2014)
FIG. 2 Method B: R = Instantaneous Volatility Rate
v
5.2 The extent of containment achieved for specimens in thisthese test methodmethods by means of a pinhole opening between
0.33 to 0.38 mm allows for measurement circumstances that are relatively insensitive to experimental variables other than
temperature. Decreasing the extent of containment by use of pinholes larger than 0.38 mm will increase the magnitude of the
observed rate of mass loss but will also reduce the measurement precision by increasing the sensitivity to variations in other
experimental variables.
5.3 Results obtained by thisthese test methodmethods are not strictly equivalent to those experienced in processing or handling
conditions but may be used to rank materials for their volatility in such circumstances. Therefore, the volatility rates determined
by thisthese test methodmethods should be considered as index values only.
5.4 The volatility rate may be used to estimate such quantifiable values as drying interval or the extent of volatile release from
a process.
6. Interferences
6.1 Specimens that consist of a mixture of two or more volatile components or that undergo decomposition during this test may
exhibit curvature in the mass loss versus time plot of Method A (see Fig. 3). In such cases the volatility rate is not constant and
shall not be reported as a singular value.
7. Apparatus
7.1 The essential instrumentation required to provide the minimum thermogravimetric analytical capability for thisthese test
methodmethods includes:
7.1.1 A Thermobalance, composed of:
7.1.1.1 A Furnace, to provide uniform controlled heating of a specimen at a constant temperature or at a constant rate within
the applicable temperature range of thisthese test method;methods;
7.1.1.2 A Temperature Sensor, to provide an indication of the specimen/furnace temperature to 61 K;
7.1.1.3 A continuously recording Balance, to measure the specimen mass with a minimum capacity of 100 mg and a sensitivity
of 610 μg;
7.1.1.4 A means of sustaining the specimen/container under atmospheric control of inert gas (nitrogen, helium, and so forth)
of 99.9 % purity at a purge rate of 50 to 100 mL/min 65 %.6 5 %.
´1
E2008 − 08 (2014)
FIG. 3 Method A- Two A—Two Component Mixture
7.1.2 A Temperature Controller, capable of executing a specific temperature program by operating the furnace between selected
temperature limits at a rate of temperature change of 1 to 2 K/min constant to within 60.1 K/min or to rapidly heat a specimen
at a minimum of 50 K/min to an isothermal temperature that is maintained constant to 61 K for a minimum of 30 min.
7.1.3 A Data Collection Device, to provide a means of acquiring, storing, and displaying measured or calculated signals, or both.
The minimum output signals required for thermogravimetry are mass, temperature, and time.
7.1.4 Sealable Containers, (pans, crucibles, and so forth), that are inert to the specimen, that will remain gravimetrically stable
within the temperature limits of thisthese test method,methods, and that contain a pinhole in the lid of diameter between 0.33 and
0.38 mm.
NOTE 1—The most critical parameters for containers suitable for use with thisthese test methodmethods are the pinhole diameter and the lid thickness.
Sealable containers of volumes (25 to 50 μL) and wall thicknesses (80 to 150 μm) commercially available from Mettler-Toledo, Perkin Elmer Corporation,
and TA Instruments, Inc.Inc., have been found suitable for this purpose.
7.2 Auxiliary equipment necessary or useful in conducting thisthese test methodmethods includes:
7.2.1 While not required, it is convenient to have a data analysis device that will continuously calculate and display the first
derivative of mass with respect to time (in mass/min) capable of detecting 0.05 μg/min.
7.2.2 Device to encapsulate the specimen in sealable containers.
7.2.3 Micropipette or syringe to deliver liquid specimens of 1 to 30 μL into the containers.
8. Sampling
8.1 Samples are ordinarily measured as received. If a pretreatment is applied to any specimen, this treatment shall be noted in
the report.
8.2 Since the applicable samples may be mixtures or blends, care shall be taken to ensure that the analyzed specimen is
representative of the sample from which it is taken. If the sample is liquid, mixing prior to taking the specimen is sufficient to
ensure this consideration. If the sample is solid, take several samplings from different areas and either combine into a single
specimen or run as a separate specimen with the final analysis representing an average of these determinations. Include the number
of determinations in the report.
9. Calibration
9.1 Perform temperature calibration in accordance with Practice E1582 using the same purge gas conditions and container type
to be used for the subsequent measurements at a heating rate of 2 K/min. Do not disturb the temperature sensor position after this
calibration.
See Appendix X1.
´1
E2008 − 08 (2014)
9.2 Perform mass calibration in accordance with Test Method E2040.
9.3 Perform time scale
...


Questions, Comments and Discussion
Ask us and Technical Secretary will try to provide an answer. You can facilitate discussion about the standard in here.