ASTM D2290-19a
(Test Method)Standard Test Method for Apparent Hoop Tensile Strength of Plastic or Reinforced Plastic Pipe
Standard Test Method for Apparent Hoop Tensile Strength of Plastic or Reinforced Plastic Pipe
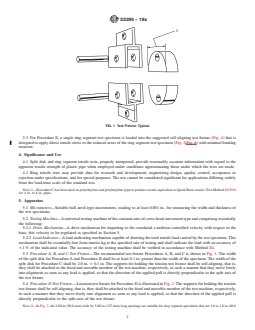
SIGNIFICANCE AND USE
4.1 Split disk and ring segment tensile tests, properly interpreted, provide reasonably accurate information with regard to the apparent tensile strength of plastic pipe when employed under conditions approximating those under which the tests are made.
4.2 Ring tensile tests may provide data for research and development, engineering design, quality control, acceptance or rejection under specifications, and for special purposes. The test cannot be considered significant for applications differing widely from the load-time scale of the standard test.
Note 1: Procedure C has been used on polyethylene and polybutylene pipe to produce results equivalent to Quick Burst results (Test Method D1599) for 4 in. to 8 in. pipes.
SCOPE
1.1 This test method covers the determination of the comparative apparent tensile strength of most plastic products utilizing a split disk or ring segment test fixture, when tested under defined conditions of pretreatment, temperature, humidity, and test machine speed. This test method is applicable to reinforced-thermosetting resin pipe regardless of fabrication method. This test method also is applicable to extruded and molded thermoplastic pipe.
Procedure A is used for reinforced-thermosetting resin pipe; Procedure B is used for thermoplastic pipe of any size; Procedure C is used for thermoplastic pipe with nominal diameter of 41/2 in. (110 mm) and greater. Procedure D is used for polyethylene pipe with a nominal diameter of 14 in. (350 mm) and greater and preferably having wall thickness 1 in. (25 mm) and greater. Procedure E is used for polyvinyl chloride (PVC) pipe with a nominal diameter of 14 in. (350 mm) and greater and having wall thickness 0.5 in. (12.7 mm) and greater.
1.2 The values stated in inch-pound units are to be regarded as standard. The values given in parentheses are mathematical conversions to SI units that are provided for information only and are not considered standard.
1.3 This standard does not purport to address all of the safety concerns, if any, associated with its use. It is the responsibility of the user of this standard to establish appropriate safety, health, and environmental practices and determine the applicability of regulatory limitations prior to use.
1.4 This international standard was developed in accordance with internationally recognized principles on standardization established in the Decision on Principles for the Development of International Standards, Guides and Recommendations issued by the World Trade Organization Technical Barriers to Trade (TBT) Committee.
General Information
- Status
- Published
- Publication Date
- 31-Jul-2019
- Technical Committee
- F17 - Plastic Piping Systems
- Drafting Committee
- F17.40 - Test Methods
Relations
- Effective Date
- 01-Aug-2019
- Effective Date
- 01-Sep-2018
- Effective Date
- 01-Jun-2014
- Effective Date
- 15-Apr-2014
- Effective Date
- 01-Apr-2011
- Effective Date
- 01-Jun-2010
- Effective Date
- 01-Nov-2009
- Effective Date
- 01-Apr-2009
- Effective Date
- 01-Dec-2008
- Effective Date
- 01-Nov-2008
- Effective Date
- 01-Jan-2007
- Effective Date
- 01-Nov-2005
- Effective Date
- 01-May-2005
- Effective Date
- 10-Aug-2003
- Effective Date
- 10-Nov-2002
Overview
ASTM D2290-19a: Standard Test Method for Apparent Hoop Tensile Strength of Plastic or Reinforced Plastic Pipe establishes procedures for determining the comparative apparent hoop tensile strength of plastic pipes through split disk or ring segment test fixtures. Issued by ASTM International, this standard is essential for evaluating the structural integrity and performance of plastic piping materials, including reinforced thermosetting resin pipes and thermoplastic pipes of various sizes. ASTM D2290-19a ensures that manufacturers, engineers, and quality control professionals can assess material properties under standardized testing conditions.
Key Topics
Scope and Applicability
- Applies to reinforced-thermosetting resin pipes (all fabrication methods), extruded and molded thermoplastic pipes, and pipes made from materials such as polyethylene, polybutylene, and PVC.
- Multiple test procedures address different pipe types and sizes.
- Provides comparative, not absolute, measures of tensile strength under the defined conditions.
Test Procedures
- Procedure A: For reinforced-thermosetting resin pipes.
- Procedure B: For thermoplastic pipes of any size.
- Procedure C: For thermoplastic pipes with nominal diameters of 4.5 in. (110 mm) and greater.
- Procedure D: For polyethylene pipes with nominal diameters of 14 in. (350 mm) and greater.
- Procedure E: For PVC pipes with nominal diameters of 14 in. (350 mm) and greater.
Testing Conditions
- Defined conditions of pretreatment, temperature, humidity, and testing machine speed.
- Conditioning generally at 73.4 ± 3.6°F (23 ± 2°C), with specific humidity requirements for some procedures.
Significance and Use
- Test results aid in research and development, engineering design, product acceptance or rejection, and quality control.
- Results are best interpreted for applications similar to test conditions.
Limitations
- The test is not considered significant for applications with load-time profiles differing notably from the standard.
Applications
ASTM D2290-19a is widely used in several areas:
- Product Development: Supports researchers and engineers in designing plastic pipes with optimal hoop tensile strength, critical for pressure applications.
- Quality Control: Provides standardized criteria for manufacturers to accept or reject production lots, ensuring consistent pipe performance.
- Engineering Design: Supplies data for specifying pipes in infrastructure projects, such as water transmission, gas distribution, and industrial piping systems.
- Regulatory Compliance: Ensures compliance with procurement specifications and industry regulations, especially for agencies like the U.S. Department of Defense.
- Material Comparison: Assists material scientists in comparative analysis of different formulas and manufacturing processes for plastic pipes.
Related Standards
Several ASTM standards are referenced or used in conjunction with ASTM D2290-19a:
- ASTM D618: Practice for Conditioning Plastics for Testing - outlines conditioning protocols for plastic specimens prior to testing.
- ASTM D1599: Test Method for Resistance to Short-Time Hydraulic Pressure of Plastic Pipe, Tubing, and Fittings - often used in related burst strength evaluations.
- ASTM E4: Practices for Force Verification of Testing Machines - sets the requirements for ensuring testing machine accuracy and calibration.
For organizations and professionals involved in plastic pipe manufacturing, distribution, or specification, adherence to ASTM D2290-19a supports robust quality assurance and material validation programs, promoting reliability and safety in piping systems. Using this internationally recognized method helps maintain competitiveness and compliance in the global marketplace.
Buy Documents
ASTM D2290-19a - Standard Test Method for Apparent Hoop Tensile Strength of Plastic or Reinforced Plastic Pipe
REDLINE ASTM D2290-19a - Standard Test Method for Apparent Hoop Tensile Strength of Plastic or Reinforced Plastic Pipe
Get Certified
Connect with accredited certification bodies for this standard

Smithers Quality Assessments
US management systems and product certification.

DIN CERTCO
DIN Group product certification.
Sponsored listings
Frequently Asked Questions
ASTM D2290-19a is a standard published by ASTM International. Its full title is "Standard Test Method for Apparent Hoop Tensile Strength of Plastic or Reinforced Plastic Pipe". This standard covers: SIGNIFICANCE AND USE 4.1 Split disk and ring segment tensile tests, properly interpreted, provide reasonably accurate information with regard to the apparent tensile strength of plastic pipe when employed under conditions approximating those under which the tests are made. 4.2 Ring tensile tests may provide data for research and development, engineering design, quality control, acceptance or rejection under specifications, and for special purposes. The test cannot be considered significant for applications differing widely from the load-time scale of the standard test. Note 1: Procedure C has been used on polyethylene and polybutylene pipe to produce results equivalent to Quick Burst results (Test Method D1599) for 4 in. to 8 in. pipes. SCOPE 1.1 This test method covers the determination of the comparative apparent tensile strength of most plastic products utilizing a split disk or ring segment test fixture, when tested under defined conditions of pretreatment, temperature, humidity, and test machine speed. This test method is applicable to reinforced-thermosetting resin pipe regardless of fabrication method. This test method also is applicable to extruded and molded thermoplastic pipe. Procedure A is used for reinforced-thermosetting resin pipe; Procedure B is used for thermoplastic pipe of any size; Procedure C is used for thermoplastic pipe with nominal diameter of 41/2 in. (110 mm) and greater. Procedure D is used for polyethylene pipe with a nominal diameter of 14 in. (350 mm) and greater and preferably having wall thickness 1 in. (25 mm) and greater. Procedure E is used for polyvinyl chloride (PVC) pipe with a nominal diameter of 14 in. (350 mm) and greater and having wall thickness 0.5 in. (12.7 mm) and greater. 1.2 The values stated in inch-pound units are to be regarded as standard. The values given in parentheses are mathematical conversions to SI units that are provided for information only and are not considered standard. 1.3 This standard does not purport to address all of the safety concerns, if any, associated with its use. It is the responsibility of the user of this standard to establish appropriate safety, health, and environmental practices and determine the applicability of regulatory limitations prior to use. 1.4 This international standard was developed in accordance with internationally recognized principles on standardization established in the Decision on Principles for the Development of International Standards, Guides and Recommendations issued by the World Trade Organization Technical Barriers to Trade (TBT) Committee.
SIGNIFICANCE AND USE 4.1 Split disk and ring segment tensile tests, properly interpreted, provide reasonably accurate information with regard to the apparent tensile strength of plastic pipe when employed under conditions approximating those under which the tests are made. 4.2 Ring tensile tests may provide data for research and development, engineering design, quality control, acceptance or rejection under specifications, and for special purposes. The test cannot be considered significant for applications differing widely from the load-time scale of the standard test. Note 1: Procedure C has been used on polyethylene and polybutylene pipe to produce results equivalent to Quick Burst results (Test Method D1599) for 4 in. to 8 in. pipes. SCOPE 1.1 This test method covers the determination of the comparative apparent tensile strength of most plastic products utilizing a split disk or ring segment test fixture, when tested under defined conditions of pretreatment, temperature, humidity, and test machine speed. This test method is applicable to reinforced-thermosetting resin pipe regardless of fabrication method. This test method also is applicable to extruded and molded thermoplastic pipe. Procedure A is used for reinforced-thermosetting resin pipe; Procedure B is used for thermoplastic pipe of any size; Procedure C is used for thermoplastic pipe with nominal diameter of 41/2 in. (110 mm) and greater. Procedure D is used for polyethylene pipe with a nominal diameter of 14 in. (350 mm) and greater and preferably having wall thickness 1 in. (25 mm) and greater. Procedure E is used for polyvinyl chloride (PVC) pipe with a nominal diameter of 14 in. (350 mm) and greater and having wall thickness 0.5 in. (12.7 mm) and greater. 1.2 The values stated in inch-pound units are to be regarded as standard. The values given in parentheses are mathematical conversions to SI units that are provided for information only and are not considered standard. 1.3 This standard does not purport to address all of the safety concerns, if any, associated with its use. It is the responsibility of the user of this standard to establish appropriate safety, health, and environmental practices and determine the applicability of regulatory limitations prior to use. 1.4 This international standard was developed in accordance with internationally recognized principles on standardization established in the Decision on Principles for the Development of International Standards, Guides and Recommendations issued by the World Trade Organization Technical Barriers to Trade (TBT) Committee.
ASTM D2290-19a is classified under the following ICS (International Classification for Standards) categories: 83.120 - Reinforced plastics. The ICS classification helps identify the subject area and facilitates finding related standards.
ASTM D2290-19a has the following relationships with other standards: It is inter standard links to ASTM D2290-19, ASTM D1599-18, ASTM E4-14, ASTM D1599-14, ASTM D1599-99(2011), ASTM E4-10, ASTM E4-09a, ASTM E4-09, ASTM E4-08, ASTM D618-08, ASTM E4-07, ASTM D618-05, ASTM D1599-99(2005), ASTM E4-03, ASTM E4-02. Understanding these relationships helps ensure you are using the most current and applicable version of the standard.
ASTM D2290-19a is available in PDF format for immediate download after purchase. The document can be added to your cart and obtained through the secure checkout process. Digital delivery ensures instant access to the complete standard document.
Standards Content (Sample)
This international standard was developed in accordance with internationally recognized principles on standardization established in the Decision on Principles for the
Development of International Standards, Guides and Recommendations issued by the World Trade Organization Technical Barriers to Trade (TBT) Committee.
Designation: D2290 − 19a
Standard Test Method for
Apparent Hoop Tensile Strength of Plastic or Reinforced
Plastic Pipe
This standard is issued under the fixed designation D2290; the number immediately following the designation indicates the year of
original adoption or, in the case of revision, the year of last revision. A number in parentheses indicates the year of last reapproval. A
superscript epsilon (´) indicates an editorial change since the last revision or reapproval.
This standard has been approved for use by agencies of the U.S. Department of Defense.
1. Scope* 2. Referenced Documents
1.1 This test method covers the determination of the com- 2.1 ASTM Standards:
parative apparent tensile strength of most plastic products D618 Practice for Conditioning Plastics for Testing
utilizing a split disk or ring segment test fixture, when tested D1599 Test Method for Resistance to Short-Time Hydraulic
under defined conditions of pretreatment, temperature, Pressure of Plastic Pipe, Tubing, and Fittings
humidity, and test machine speed. This test method is appli- E4 Practices for Force Verification of Testing Machines
cable to reinforced-thermosetting resin pipe regardless of
3. Summary of Test Method
fabrication method. This test method also is applicable to
3.1 For ProceduresA, B, and C, the test specimen is loaded
extruded and molded thermoplastic pipe.
through the suggested self-aligning split disk test fixture (Fig.
Procedure A is used for reinforced-thermosetting resin pipe;
1) which applies tensile stress to the test ring. An apparent
Procedure B is used for thermoplastic pipe of any size;
tensile strength rather than a true tensile strength is obtained in
Procedure C is used for thermoplastic pipe with nominal
this test because of a bending moment imposed during test at
diameter of 4 ⁄2 in. (110 mm) and greater. Procedure D is used
the split between the split disk test fixture. This moment is
for polyethylene pipe with a nominal diameter of 14 in. (350
induced by the change in contour of the ring between the two
mm) and greater and preferably having wall thickness 1 in. (25
disk sections as they separate. The test fixture is designed to
mm) and greater. Procedure E is used for polyvinyl chloride
minimize the effect of this bending moment.
(PVC) pipe with a nominal diameter of 14 in. (350 mm) and
greater and having wall thickness 0.5 in. (12.7 mm) and
3.2 For Procedure D, ring segment test specimen pairs are
greater.
loaded into the suggested self-aligning test fixtures (Fig. 2) that
are designed to apply direct tensile stress to the reduced areas
1.2 The values stated in inch-pound units are to be regarded
of the ring segment test specimens (Fig. 3) with minimal
as standard. The values given in parentheses are mathematical
bending moment.
conversions to SI units that are provided for information only
and are not considered standard.
3.3 For Procedure E, a single ring segment test specimen is
1.3 This standard does not purport to address all of the loaded into the suggested self-aligning test fixture (Fig. 4) that
safety concerns, if any, associated with its use. It is the is designed to apply direct tensile stress to the reduced areas of
responsibility of the user of this standard to establish appro- the ring segment test specimen (Fig. 5/Fig. 6) with minimal
priate safety, health, and environmental practices and deter- bending moment.
mine the applicability of regulatory limitations prior to use.
4. Significance and Use
1.4 This international standard was developed in accor-
4.1 Split disk and ring segment tensile tests, properly
dance with internationally recognized principles on standard-
interpreted, provide reasonably accurate information with re-
ization established in the Decision on Principles for the
gard to the apparent tensile strength of plastic pipe when
Development of International Standards, Guides and Recom-
employed under conditions approximating those under which
mendations issued by the World Trade Organization Technical
the tests are made.
Barriers to Trade (TBT) Committee.
4.2 Ring tensile tests may provide data for research and
development, engineering design, quality control, acceptance
This test method is under the jurisdiction of ASTM Committee F17 on Plastic
Piping Systems and is the direct responsibility of Subcommittee F17.40 on Test
Methods. For referenced ASTM standards, visit the ASTM website, www.astm.org, or
Current edition approved Aug. 1, 2019. Published September 2019. Originally contact ASTM Customer Service at service@astm.org. For Annual Book of ASTM
approved in 1964. Last previous edition approved in 2019 as D2290 – 19. DOI: Standards volume information, refer to the standard’s Document Summary page on
10.1520/D2290-19A the ASTM website.
*A Summary of Changes section appears at the end of this standard
Copyright © ASTM International, 100 Barr Harbor Drive, PO Box C700, West Conshohocken, PA 19428-2959. United States
D2290 − 19a
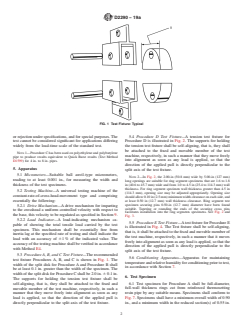
FIG. 1 Test Fixture: Typical
or rejection under specifications, and for special purposes. The 5.4 Procedure D Test Fixture—A tension test fixture for
test cannot be considered significant for applications differing Procedure D is illustrated in Fig. 2. The supports for holding
widely from the load-time scale of the standard test. the tension test fixture shall be self-aligning, that is, they shall
be attached to the fixed and movable member of the test
NOTE 1—Procedure C has been used on polyethylene and polybutylene
machine, respectively, in such a manner that they move freely
pipe to produce results equivalent to Quick Burst results (Test Method
into alignment as soon as any load is applied, so that the
D1599) for 4 in. to 8 in. pipes.
direction of the applied pull is directly perpendicular to the
5. Apparatus
split axis of the test fixture.
5.1 Micrometers—Suitable ball anvil-type micrometers,
NOTE 2—In Fig. 2, the 2.00-in (50.8 mm) wide by 5.00-in (127 mm)
reading to at least 0.001 in., for measuring the width and
long openings are suitable for ring segment specimens that are 1.6 to 1.8
thickness of the test specimens. in (40.6 to 45.7 mm) wide and from 1.0 to 4.5 in (25.4 to 114.3 mm) wall
thickness. For ring segment specimen wall thickness greater than 4.5 in
5.2 Testing Machine—A universal testing machine of the
(114.3 mm), opening size may be adjusted appropriately. Opening size
constant-rate-of-cross-head-movement type and comprising
shouldallow0.10in(2.5mm)minimumwidthclearanceoneachside,and
at least 0.50 in (12.7 mm) wall thickness clearance. Ring segment test
essentially the following:
specimen securing pins 0.50-in (12.7 mm) diameter have been found
5.2.1 Drive Mechanism—A drive mechanism for imparting
suitable. Tapering or rounding the ends of the securing cross pins
to the crosshead a uniform controlled velocity with respect to
facilitates installation into the ring segments specimens. See Fig. 2 and
the base, this velocity to be regulated as specified in Section 9.
Fig. 3.
5.2.2 Load Indicator—A load-indicating mechanism ca-
5.5 ProcedureETestFixture—Atest fixture for Procedure E
pable of showing the total tensile load carried by the test
is illustrated in Fig. 4. The Test fixture shall be self-aligning,
specimen. This mechanism shall be essentially free from
that is, it shall be attached to the fixed and movable member of
inertia lag at the specified rate of testing and shall indicate the
the test machine, respectively, in such a manner that it moves
load with an accuracy of 61 % of the indicated value. The
freely into alignment as soon as any load is applied, so that the
accuracy of the testing machine shall be verified in accordance
direction of the applied pull is directly perpendicular to the
with Method E4.
split axis of the test fixture.
5.3 Procedure A, B, and C Test Fixture—The recommended
5.6 Conditioning Apparatus—Apparatus for maintaining
test fixture Procedures A, B, and C is shown in Fig. 1. The
temperatureandrelativehumidityforconditioningpriortotest,
width of the split disk for Procedure A and Procedure B shall
in accordance with Section 7.
be at least 0.1 in. greater than the width of the specimen. The
width of the split disk for Procedure C shall be 2.0 in. 6 0.1 in.
6. Test Specimen
The supports for holding the tension test fixture shall be
self-aligning, that is, they shall be attached to the fixed and 6.1 Test specimen for Procedure A shall be full-diameter,
movable member of the test machine, respectively, in such a full-wall thickness rings cut from reinforced thermosetting
manner that they move freely into alignment as soon as any resin pipe by any suitable means. Specimens shall conform to
load is applied, so that the direction of the applied pull is Fig. 7. Specimens shall have a minimum overall width of 0.90
directly perpendicular to the split axis of the test fixture. in., and a minimum width in the reduced section(s) of 0.55 in.
D2290 − 19a
Fixture dimensions are for illustration only. See Note 2.
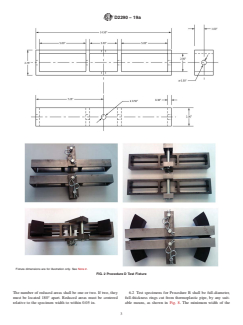
FIG. 2 Procedure D Test Fixture
The number of reduced areas shall be one or two. If two, they 6.2 Test specimens for Procedure B shall be full-diameter,
must be located 180° apart. Reduced areas must be centered full-thickness rings cut from thermoplastic pipe, by any suit-
relative to the specimen width to within 0.05 in. able means, as shown in Fig. 8. The minimum width of the
D2290 − 19a
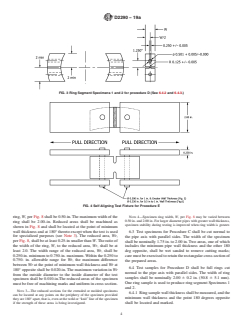
FIG. 3 Ring Segment Specimens 1 and 2 for procedure D (See 6.4.2 and 6.4.3.)
FIG. 4 Self Aligning Test Fixture for Procedure E
NOTE 4—Specimen ring width, W, per Fig. 8 may be varied between
ring, W, per Fig. 8 shall be 0.50-in. The maximum width of the
0.50 in. and 2.00 in. For larger diameter pipes with greater wall thickness,
ring shall be 2.00–in. Reduced areas shall be machined as
specimen stability during testing is improved when ring width is greater.
shown in Fig. 8 and shall be located at the point of minimum
wall thickness and at 180° thereto except when the test is used
6.3 Test specimens for Procedure C shall be cut normal to
for specialized purposes (see Note 3). The reduced area, Wr,
the pipe axis with parallel sides. The width of the specimen
per Fig. 8, shall be at least 0.25-in smaller than W. The ratio of
shall be nominally 1.75 in. to 2.00 in. Two areas, one of which
the width of the ring, W, to the reduced area, Wr, shall be at
includes the minimum pipe wall thickness and the other 180
least 2.0. The width range of the reduced area, Wr, shall be
deg opposite, shall be wet sanded to remove cutting marks;
0.250-in. minimum to 0.750-in. maximum. Within the 0.250 to
caremustbeexercisedtoretaintherectangularcross-sectionof
0.750- in. allowable range for Wr, the maximum difference
the prepared areas.
between Wr at the point of minimum wall thickness and Wr at
6.4 Test samples for Procedure D shall be full rings cut
180° opposite shall be 0.020-in. The maximum variation in Wr
normal to the pipe axis with parallel sides. The width of ring
from the outside diameter to the inside diameter of the test
samples shall be nominally 2.00 6 0.2 in. (50.8 6 5.1 mm).
specimen shall be 0.010-in.The reduced areas of the specimen
One ring sample is used to produce ring segment Specimens 1
must be free of machining marks and uniform in cross section.
and 2.
NOTE 3—The reduced sections for the extruded or molded specimens
6.4.1 Ring sample wall thickness shall be measured, and the
can be located at any points on the periphery of the specimen provided
minimum wall thickness and the point 180 degrees opposite
they are 180° apart, that is, even at the weld or “knit” line of the specimen
if the strength of these areas is being investigated. shall be located and marked.
D2290 − 19a
FIG. 5 Ring Segment Test Specimen for Procedure E for Wall Thickness 1 in. (25 mm) and Greater (See 6.5.1 and 6.5.2)
6.4.2 Ring segment Specimens 1 and 2 shall be cut from the samples shall be nominally 1.00 6 0.2 in. (25.4 6 5.1 mm).
ring sample. Ring segment specimen cuts shall be made not One ring sample shall be used to produce each specimen.
less than 2.0 in (50 mm) above and below the minimum wall
6.5.1 Ring segment test specimen shall be cut from the ring
thickness point (Specimen 1) and the point 180 degrees
sample. Ring segment test specimen shall be machined smooth
opp
...
This document is not an ASTM standard and is intended only to provide the user of an ASTM standard an indication of what changes have been made to the previous version. Because
it may not be technically possible to adequately depict all changes accurately, ASTM recommends that users consult prior editions as appropriate. In all cases only the current version
of the standard as published by ASTM is to be considered the official document.
Designation: D2290 − 19 D2290 − 19a
Standard Test Method for
Apparent Hoop Tensile Strength of Plastic or Reinforced
Plastic Pipe
This standard is issued under the fixed designation D2290; the number immediately following the designation indicates the year of
original adoption or, in the case of revision, the year of last revision. A number in parentheses indicates the year of last reapproval. A
superscript epsilon (´) indicates an editorial change since the last revision or reapproval.
This standard has been approved for use by agencies of the U.S. Department of Defense.
1. Scope*
1.1 This test method covers the determination of the comparative apparent tensile strength of most plastic products utilizing a
split disk or ring segment test fixture, when tested under defined conditions of pretreatment, temperature, humidity, and test
machine speed. This test method is applicable to reinforced-thermosetting resin pipe regardless of fabrication method. This test
method also is applicable to extruded and molded thermoplastic pipe.
Procedure A is used for reinforced-thermosetting resin pipe; Procedure B is used for thermoplastic pipe of any size; Procedure
C is used for thermoplastic pipe with nominal diameter of 4 ⁄2 in. (110 mm) and greater. Procedure D is used for polyethylene pipe
with a nominal diameter of 14 in. (350 mm) and greater and preferably having wall thickness 1 in. (25 mm) and greater. Procedure
E is used for polyvinyl chloride (PVC) pipe with a nominal diameter of 14 in. (350 mm) and greater and having wall thickness
10.5 in. (25(12.7 mm) and greater.
1.2 The values stated in inch-pound units are to be regarded as standard. The values given in parentheses are mathematical
conversions to SI units that are provided for information only and are not considered standard.
1.3 This standard does not purport to address all of the safety concerns, if any, associated with its use. It is the responsibility
of the user of this standard to establish appropriate safety, health, and environmental practices and determine the applicability of
regulatory limitations prior to use.
1.4 This international standard was developed in accordance with internationally recognized principles on standardization
established in the Decision on Principles for the Development of International Standards, Guides and Recommendations issued
by the World Trade Organization Technical Barriers to Trade (TBT) Committee.
2. Referenced Documents
2.1 ASTM Standards:
D618 Practice for Conditioning Plastics for Testing
D1599 Test Method for Resistance to Short-Time Hydraulic Pressure of Plastic Pipe, Tubing, and Fittings
E4 Practices for Force Verification of Testing Machines
3. Summary of Test Method
3.1 For Procedures A, B, and C, the test specimen is loaded through the suggested self-aligning split disk test fixture (Fig. 1)
which applies tensile stress to the test ring. An apparent tensile strength rather than a true tensile strength is obtained in this test
because of a bending moment imposed during test at the split between the split disk test fixture. This moment is induced by the
change in contour of the ring between the two disk sections as they separate. The test fixture is designed to minimize the effect
of this bending moment.
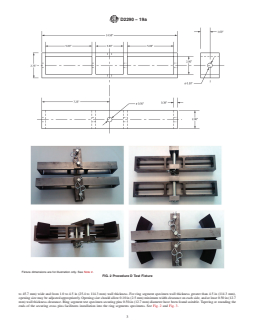
3.2 For Procedure D, ring segment test specimen pairs are loaded into the suggested self-aligning test fixtures (Fig. 2) that are
designed to apply direct tensile stress to the reduced areas of the ring segment test specimens (Fig. 3) with minimal bending
moment.
This test method is under the jurisdiction of ASTM Committee F17 on Plastic Piping Systems and is the direct responsibility of Subcommittee F17.40 on Test Methods.
Current edition approved Jan. 1, 2019Aug. 1, 2019. Published February 2019September 2019. Originally approved in 1964. Last previous edition approved in 20162019
as D2290 – 16.D2290 – 19. DOI: 10.1520/D2290-1910.1520/D2290-19A
For referenced ASTM standards, visit the ASTM website, www.astm.org, or contact ASTM Customer Service at service@astm.org. For Annual Book of ASTM Standards
volume information, refer to the standard’s Document Summary page on the ASTM website.
*A Summary of Changes section appears at the end of this standard
Copyright © ASTM International, 100 Barr Harbor Drive, PO Box C700, West Conshohocken, PA 19428-2959. United States
D2290 − 19a
FIG. 1 Test Fixture: Typical
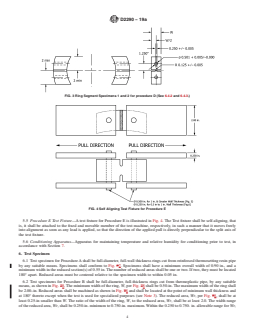
3.3 For Procedure E, a single ring segment test specimen is loaded into the suggested self-aligning test fixture (Fig. 4) that is
designed to apply direct tensile stress to the reduced areas of the ring segment test specimen (Fig. 5/Fig. 6) with minimal bending
moment.
4. Significance and Use
4.1 Split disk and ring segment tensile tests, properly interpreted, provide reasonably accurate information with regard to the
apparent tensile strength of plastic pipe when employed under conditions approximating those under which the tests are made.
4.2 Ring tensile tests may provide data for research and development, engineering design, quality control, acceptance or
rejection under specifications, and for special purposes. The test cannot be considered significant for applications differing widely
from the load-time scale of the standard test.
NOTE 1—Procedure C has been used on polyethylene and polybutylene pipe to produce results equivalent to Quick Burst results (Test Method D1599)
for 4 in. to 8 in. pipes.
5. Apparatus
5.1 Micrometers—Suitable ball anvil-type micrometers, reading to at least 0.001 in., for measuring the width and thickness of
the test specimens.
5.2 Testing Machine—A universal testing machine of the constant-rate-of-cross-head-movement type and comprising essentially
the following:
5.2.1 Drive Mechanism—A drive mechanism for imparting to the crosshead a uniform controlled velocity with respect to the
base, this velocity to be regulated as specified in Section 9.
5.2.2 Load Indicator—A load-indicating mechanism capable of showing the total tensile load carried by the test specimen. This
mechanism shall be essentially free from inertia lag at the specified rate of testing and shall indicate the load with an accuracy of
61 % of the indicated value. The accuracy of the testing machine shall be verified in accordance with Method E4.
5.3 Procedure A, B, and C Test Fixture—The recommended test fixture Procedures A, B, and C is shown in Fig. 1. The width
of the split disk for Procedure A and Procedure B shall be at least 0.1 in. greater than the width of the specimen. The width of the
split disk for Procedure C shall be 2.0 in. 6 0.1 in. The supports for holding the tension test fixture shall be self-aligning, that is,
they shall be attached to the fixed and movable member of the test machine, respectively, in such a manner that they move freely
into alignment as soon as any load is applied, so that the direction of the applied pull is directly perpendicular to the split axis of
the test fixture.
5.4 Procedure D Test Fixture—A tension test fixture for Procedure D is illustrated in Fig. 2. The supports for holding the tension
test fixture shall be self-aligning, that is, they shall be attached to the fixed and movable member of the test machine, respectively,
in such a manner that they move freely into alignment as soon as any load is applied, so that the direction of the applied pull is
directly perpendicular to the split axis of the test fixture.
NOTE 2—In Fig. 2, the 2.00-in (50.8 mm) wide by 5.00-in (127 mm) long openings are suitable for ring segment specimens that are 1.6 to 1.8 in (40.6
D2290 − 19a
Fixture dimensions are for illustration only. See Note 2.
FIG. 2 Procedure D Test Fixture
to 45.7 mm) wide and from 1.0 to 4.5 in (25.4 to 114.3 mm) wall thickness. For ring segment specimen wall thickness greater than 4.5 in (114.3 mm),
opening size may be adjusted appropriately. Opening size should allow 0.10 in (2.5 mm) minimum width clearance on each side, and at least 0.50 in (12.7
mm) wall thickness clearance. Ring segment test specimen securing pins 0.50-in (12.7 mm) diameter have been found suitable. Tapering or rounding the
ends of the securing cross pins facilitates installation into the ring segments specimens. See Fig. 2 and Fig. 3.
D2290 − 19a
FIG. 3 Ring Segment Specimens 1 and 2 for procedure D (See 6.4.2 and 6.4.3.)
FIG. 4 Self Aligning Test Fixture for Procedure E
5.5 Procedure E Test Fixture—A test fixture for Procedure E is illustrated in Fig. 4. The Test fixture shall be self-aligning, that
is, it shall be attached to the fixed and movable member of the test machine, respectively, in such a manner that it moves freely
into alignment as soon as any load is applied, so that the direction of the applied pull is directly perpendicular to the split axis of
the test fixture.
5.6 Conditioning Apparatus—Apparatus for maintaining temperature and relative humidity for conditioning prior to test, in
accordance with Section 7.
6. Test Specimen
6.1 Test specimen for Procedure A shall be full-diameter, full-wall thickness rings cut from reinforced thermosetting resin pipe
by any suitable means. Specimens shall conform to Fig. 67. Specimens shall have a minimum overall width of 0.90 in., and a
minimum width in the reduced section(s) of 0.55 in. The number of reduced areas shall be one or two. If two, they must be located
180° apart. Reduced areas must be centered relative to the specimen width to within 0.05 in.
6.2 Test specimens for Procedure B shall be full-diameter, full-thickness rings cut from thermoplastic pipe, by any suitable
means, as shown in Fig. 78. The minimum width of the ring, W, per Fig. 78 shall be 0.50-in. The maximum width of the ring shall
be 2.00–in. Reduced areas shall be machined as shown in Fig. 78 and shall be located at the point of minimum wall thickness and
at 180° thereto except when the test is used for specialized purposes (see Note 3). The reduced area, Wr, per Fig. 78, shall be at
least 0.25-in smaller than W. The ratio of the width of the ring, W, to the reduced area, Wr, shall be at least 2.0. The width range
of the reduced area, Wr, shall be 0.250-in. minimum to 0.750-in. maximum. Within the 0.250 to 0.750- in. allowable range for Wr,
D2290 − 19a
FIG. 5 Ring Segment Test Specimen for Procedure E for Wall Thickness 1 in. (25 mm) and Greater (See 6.5.1 and 6.5.2)
the maximum difference between Wr at the point of minimum wall thickness and Wr at 180° opposite shall be 0.020-in. The
maximum variation in Wr from the outside diameter to the inside diameter of the test specimen shall be 0.010-in.The reduced areas
of the specimen must be free of machining marks and uniform in cross section.
NOTE 3—The reduced sections for the extruded or molded specimens can be located at any points on the periphery of the specimen provided they are
180° apart, that is, even at the weld or “knit” line of the specimen if the strength of these areas is being investigated.
NOTE 4—Specimen ring width, W, per Fig. 78 may be varied between 0.50 in. and 2.00 in. For larger diameter pipes with greater wall thickness,
specimen stability during testing is improved when ring width is greater.
6.3 Test specimens for Procedure C shall be cut normal to the pipe axis with parallel sides. The width of the specimen shall be
nominally 1.75 in. to 2.00 in. Two areas, one of which includes the minimum pipe wall thickness and the other 180 deg opposite,
shall be wet sanded to remove cutting marks; care must be exercised to retain the rectangular cross-section of the prepared areas.
6.4 Test samples for Procedure D shall be full rings cut normal to the pipe axis with parallel sides. The width of ring samples
shall be nominally 2.00 6 0.2 in. (50.8 6 5.1 mm). One ring sample is used to produce ring segment Specimens 1 and 2.
6.4.1 Ring sample wall thickness shall be measured, and the minimum wall thickness and the point 180 degrees opposite shall
be located and marked.
6.4.2 Ring segment Specimens 1 and 2 shall be cut from the ring sample. Ring segment specimen cuts shall be made not less
than 2.0 in (50 mm) above and below the minimum wall thickness point (Specimen 1) and the point 180 degrees opposite
(Specimen 2). Ring segment Specimens 1 and 2 shall be machined smooth on both sides to width W (1.70 6 0.10 in (43.2 6 2.5
D2290 − 19a
FIG. 6 Ring Segment Test Specimen for Proc
...
Questions, Comments and Discussion
Ask us and Technical Secretary will try to provide an answer. You can facilitate discussion about the standard in here.
Loading comments...