ASTM A255-20a
(Test Method)Standard Test Methods for Determining Hardenability of Steel
Standard Test Methods for Determining Hardenability of Steel
SIGNIFICANCE AND USE
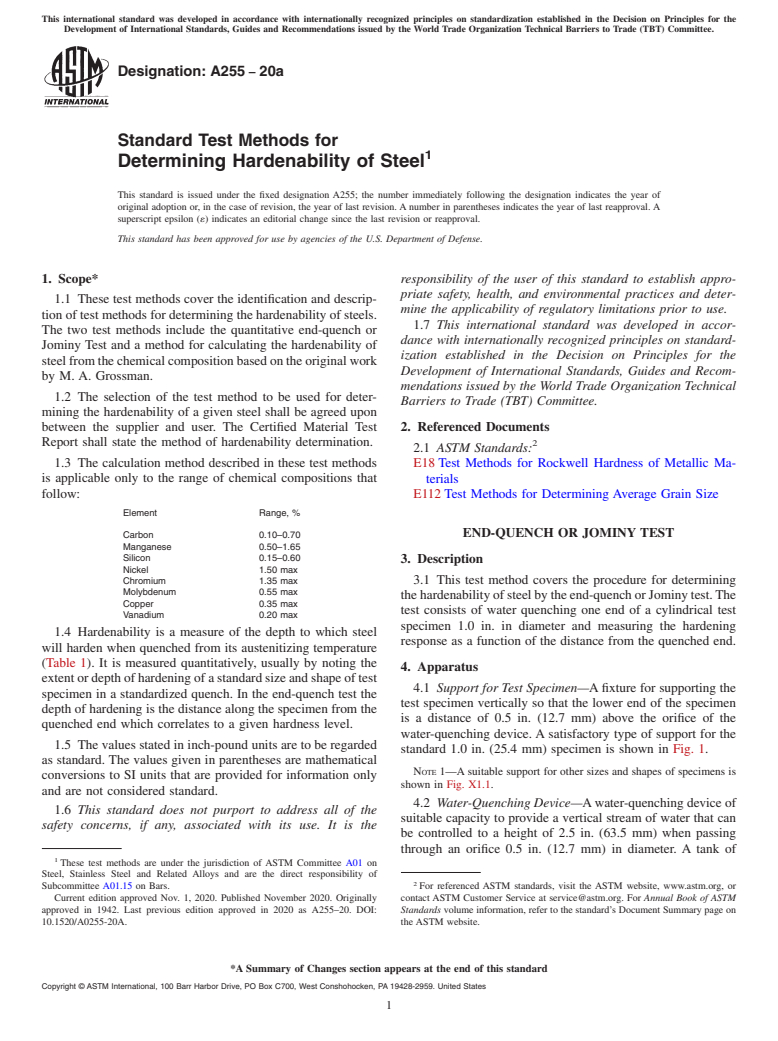
3.1 This test method covers the procedure for determining the hardenability of steel by the end-quench or Jominy test. The test consists of water quenching one end of a cylindrical test specimen 1.0 in. in diameter and measuring the hardening response as a function of the distance from the quenched end.
SCOPE
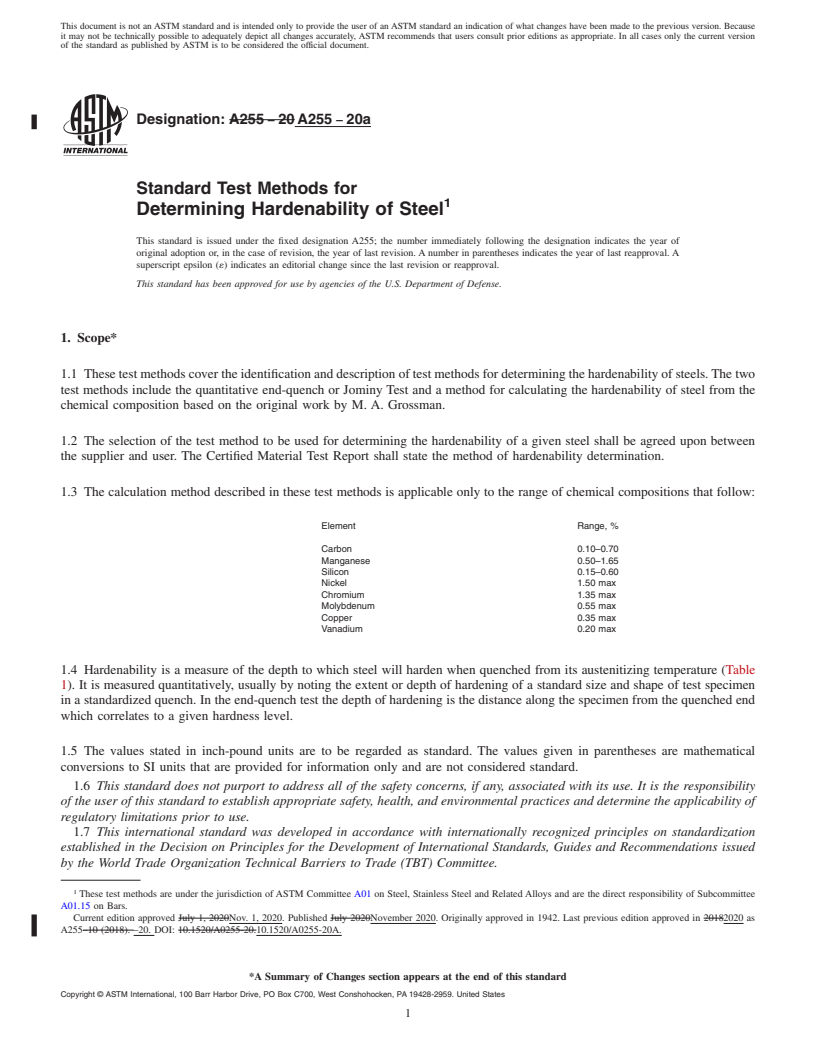
1.1 These test methods cover the identification and description of test methods for determining the hardenability of steels. The two test methods include the quantitative end-quench or Jominy Test and a method for calculating the hardenability of steel from the chemical composition based on the original work by M. A. Grossman.
1.2 The selection of the test method to be used for determining the hardenability of a given steel shall be agreed upon between the supplier and user. The Certified Material Test Report shall state the method of hardenability determination.
1.3 The calculation method described in these test methods is applicable only to the range of chemical compositions that follow:
Element
Range, %
Carbon
0.10–0.70
Manganese
0.50–1.65
Silicon
0.15–0.60
Nickel
1.50 max
Chromium
1.35 max
Molybdenum
0.55 max
Copper
0.35 max
Vanadium
0.20 max
1.4 Hardenability is a measure of the depth to which steel will harden when quenched from its austenitizing temperature (Table 1). It is measured quantitatively, usually by noting the extent or depth of hardening of a standard size and shape of test specimen in a standardized quench. In the end-quench test the depth of hardening is the distance along the specimen from the quenched end which correlates to a given hardness level.
1.5 The values stated in inch-pound units are to be regarded as standard. The values given in parentheses are mathematical conversions to SI units that are provided for information only and are not considered standard.
1.6 This standard does not purport to address all of the safety concerns, if any, associated with its use. It is the responsibility of the user of this standard to establish appropriate safety, health, and environmental practices and determine the applicability of regulatory limitations prior to use.
1.7 This international standard was developed in accordance with internationally recognized principles on standardization established in the Decision on Principles for the Development of International Standards, Guides and Recommendations issued by the World Trade Organization Technical Barriers to Trade (TBT) Committee.
General Information
Buy Standard
Standards Content (Sample)
This international standard was developed in accordance with internationally recognized principles on standardization established in the Decision on Principles for the
Development of International Standards, Guides and Recommendations issued by the World Trade Organization Technical Barriers to Trade (TBT) Committee.
Designation: A255 − 20a
Standard Test Methods for
1
Determining Hardenability of Steel
This standard is issued under the fixed designation A255; the number immediately following the designation indicates the year of
original adoption or, in the case of revision, the year of last revision.Anumber in parentheses indicates the year of last reapproval.A
superscript epsilon (´) indicates an editorial change since the last revision or reapproval.
This standard has been approved for use by agencies of the U.S. Department of Defense.
1. Scope* responsibility of the user of this standard to establish appro-
priate safety, health, and environmental practices and deter-
1.1 These test methods cover the identification and descrip-
mine the applicability of regulatory limitations prior to use.
tionoftestmethodsfordeterminingthehardenabilityofsteels.
1.7 This international standard was developed in accor-
The two test methods include the quantitative end-quench or
dance with internationally recognized principles on standard-
Jominy Test and a method for calculating the hardenability of
ization established in the Decision on Principles for the
steelfromthechemicalcompositionbasedontheoriginalwork
Development of International Standards, Guides and Recom-
by M. A. Grossman.
mendations issued by the World Trade Organization Technical
1.2 The selection of the test method to be used for deter-
Barriers to Trade (TBT) Committee.
mining the hardenability of a given steel shall be agreed upon
between the supplier and user. The Certified Material Test 2. Referenced Documents
Report shall state the method of hardenability determination. 2
2.1 ASTM Standards:
1.3 The calculation method described in these test methods E18Test Methods for Rockwell Hardness of Metallic Ma-
is applicable only to the range of chemical compositions that terials
follow: E112Test Methods for Determining Average Grain Size
Element Range, %
END-QUENCH OR JOMINY TEST
Carbon 0.10–0.70
Manganese 0.50–1.65
Silicon 0.15–0.60
3. Description
Nickel 1.50 max
Chromium 1.35 max 3.1 This test method covers the procedure for determining
Molybdenum 0.55 max
thehardenabilityofsteelbytheend-quenchorJominytest.The
Copper 0.35 max
test consists of water quenching one end of a cylindrical test
Vanadium 0.20 max
specimen 1.0 in. in diameter and measuring the hardening
1.4 Hardenability is a measure of the depth to which steel
response as a function of the distance from the quenched end.
will harden when quenched from its austenitizing temperature
(Table 1). It is measured quantitatively, usually by noting the
4. Apparatus
extentordepthofhardeningofastandardsizeandshapeoftest
4.1 Support for Test Specimen—Afixture for supporting the
specimen in a standardized quench. In the end-quench test the
test specimen vertically so that the lower end of the specimen
depthofhardeningisthedistancealongthespecimenfromthe
is a distance of 0.5 in. (12.7 mm) above the orifice of the
quenched end which correlates to a given hardness level.
water-quenching device.Asatisfactory type of support for the
1.5 Thevaluesstatedininch-poundunitsaretoberegarded
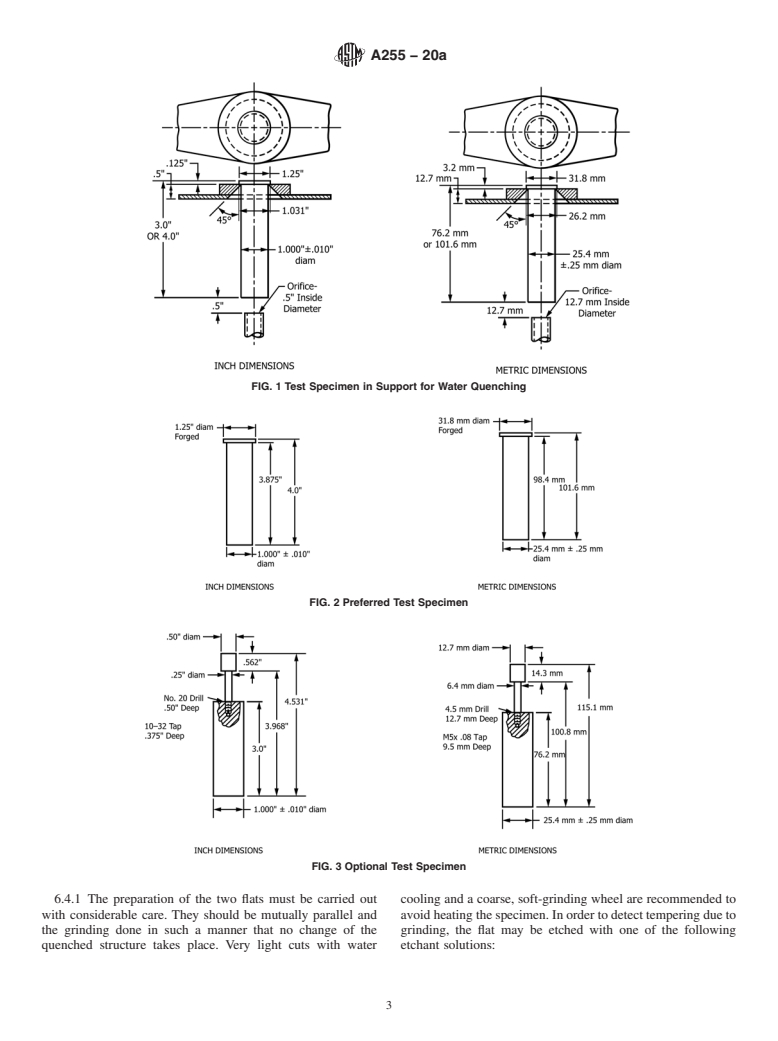
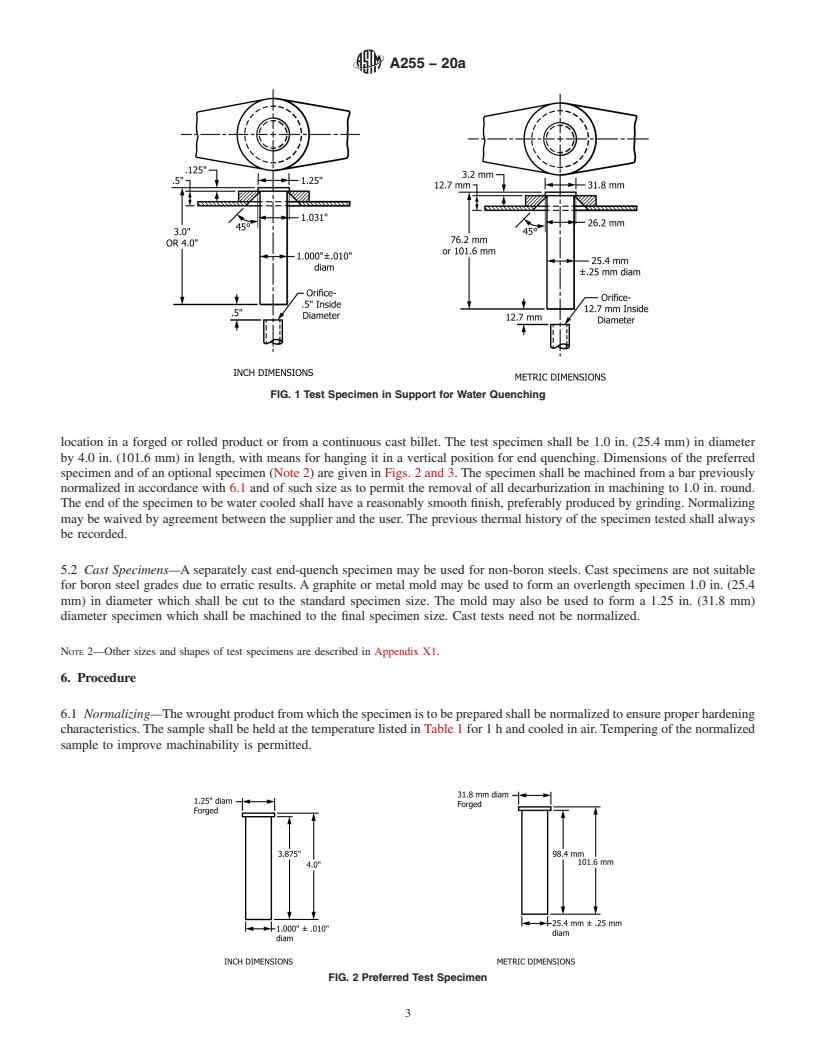
standard 1.0 in. (25.4 mm) specimen is shown in Fig. 1.
as standard. The values given in parentheses are mathematical
NOTE 1—Asuitable support for other sizes and shapes of specimens is
conversions to SI units that are provided for information only
shown in Fig. X1.1.
and are not considered standard.
4.2 Water-QuenchingDevice—Awater-quenchingdeviceof
1.6 This standard does not purport to address all of the
suitable capacity to provide a vertical stream of water that can
safety concerns, if any, associated with its use. It is the
be controlled to a height of 2.5 in. (63.5 mm) when passing
through an orifice 0.5 in. (12.7 mm) in diameter. A tank of
1
These test methods are under the jurisdiction of ASTM Committee A01 on
Steel, Stainless Steel and Related Alloys and are the direct responsibility of
2
Subcommittee A01.15 on Bars. For referenced ASTM standards, visit the ASTM website, www.astm.org, or
Current edition approved Nov. 1, 2020. Published November 2020. Originally contact ASTM Customer Service at service@astm.org. For Annual Book of ASTM
approved in 1942. Last previous edition approved in 2020 as A255–20. DOI: Standards volume information, refer to the standard’s Document Summary page on
10.1520/A0255-20A. the ASTM website.
*A Summary of Changes section appears at the end of this standard
Copyright © ASTM International, 100 Barr Harbor Drive, PO Box C700, West Conshohocken, PA 19428-2959. United States
1
---------------------- Page: 1 ----------------------
A255 − 20a
A
TABLE 1 Normalizing and Austenitizing Temperatures NOTE 2—Other
...
This document is not an ASTM standard and is intended only to provide the user of an ASTM standard an indication of what changes have been made to the previous version. Because
it may not be technically possible to adequately depict all changes accurately, ASTM recommends that users consult prior editions as appropriate. In all cases only the current version
of the standard as published by ASTM is to be considered the official document.
Designation: A255 − 20 A255 − 20a
Standard Test Methods for
1
Determining Hardenability of Steel
This standard is issued under the fixed designation A255; the number immediately following the designation indicates the year of
original adoption or, in the case of revision, the year of last revision. A number in parentheses indicates the year of last reapproval. A
superscript epsilon (´) indicates an editorial change since the last revision or reapproval.
This standard has been approved for use by agencies of the U.S. Department of Defense.
1. Scope*
1.1 These test methods cover the identification and description of test methods for determining the hardenability of steels. The two
test methods include the quantitative end-quench or Jominy Test and a method for calculating the hardenability of steel from the
chemical composition based on the original work by M. A. Grossman.
1.2 The selection of the test method to be used for determining the hardenability of a given steel shall be agreed upon between
the supplier and user. The Certified Material Test Report shall state the method of hardenability determination.
1.3 The calculation method described in these test methods is applicable only to the range of chemical compositions that follow:
Element Range, %
Carbon 0.10–0.70
Manganese 0.50–1.65
Silicon 0.15–0.60
Nickel 1.50 max
Chromium 1.35 max
Molybdenum 0.55 max
Copper 0.35 max
Vanadium 0.20 max
1.4 Hardenability is a measure of the depth to which steel will harden when quenched from its austenitizing temperature (Table
1). It is measured quantitatively, usually by noting the extent or depth of hardening of a standard size and shape of test specimen
in a standardized quench. In the end-quench test the depth of hardening is the distance along the specimen from the quenched end
which correlates to a given hardness level.
1.5 The values stated in inch-pound units are to be regarded as standard. The values given in parentheses are mathematical
conversions to SI units that are provided for information only and are not considered standard.
1.6 This standard does not purport to address all of the safety concerns, if any, associated with its use. It is the responsibility
of the user of this standard to establish appropriate safety, health, and environmental practices and determine the applicability of
regulatory limitations prior to use.
1.7 This international standard was developed in accordance with internationally recognized principles on standardization
established in the Decision on Principles for the Development of International Standards, Guides and Recommendations issued
by the World Trade Organization Technical Barriers to Trade (TBT) Committee.
1
These test methods are under the jurisdiction of ASTM Committee A01 on Steel, Stainless Steel and Related Alloys and are the direct responsibility of Subcommittee
A01.15 on Bars.
Current edition approved July 1, 2020Nov. 1, 2020. Published July 2020November 2020. Originally approved in 1942. Last previous edition approved in 20182020 as
A255–10 (2018). –20. DOI: 10.1520/A0255-20.10.1520/A0255-20A.
*A Summary of Changes section appears at the end of this standard
Copyright © ASTM International, 100 Barr Harbor Drive, PO Box C700, West Conshohocken, PA 19428-2959. United States
1
---------------------- Page: 1 ----------------------
A255 − 20a
A
TABLE 1 Normalizing and Austenitizing Temperatures
Normalizing Austenitizing
Steel Series Ordered Carbon Temperature, Temperature,
Content, max, % °F (°C) °F (°C)
1000, 1300, 1500, 0.25 and under 1700 (925) 1700 (925)
3100, 4000, 4100
4300, 4400, 4500, 0.26 to 0.36, incl 1650 (900) 1600 (870)
4600, 4700, 5000,
B
5100, 6100, 8100,
5
8600, 8700, 8800,
0.37 and over 1600 (870) 1550 (845)
9400, 9700, 9800
0.25 and under 1700 (925) 1550 (845)
2300, 2500, 3300,
0.26 to 0.36, incl 1650 (900) 1500 (815)
4800, 9300
0.37 and over 1600 (870) 1475 (800)
5
9200 0.50 and over 1650 (900) 1600 (870)
A
A variation of ±10 °F (6 °C) from the temperatures in this table is permissible.
B
Normalizing and austenitizing temperatures are 50 °F (30 °C) higher for the 6100
series.
2. Referenced Documents
2
2.1 ASTM Standards:
E18 Test Methods for Rockwell Hardness of Metallic Materials
E112 Test Methods for Determining Average Grain Size
2.2 ASTM Adjunct:
3
ASTM Hardenability Chart
END-QUENCH OR JOMINY TEST
3. Description
3.1 This test method covers the procedure for determining the hardenability of steel by the end-quench or Jominy test. The test
consists of water quenching one end of a cylindrical test specimen 1.0 in.
...


Questions, Comments and Discussion
Ask us and Technical Secretary will try to provide an answer. You can facilitate discussion about the standard in here.