ASTM E2775-16
(Practice)Standard Practice for Guided Wave Testing of Above Ground Steel Pipework Using Piezoelectric Effect Transduction
Standard Practice for Guided Wave Testing of Above Ground Steel Pipework Using Piezoelectric Effect Transduction
SIGNIFICANCE AND USE
5.1 The purpose of this practice is to outline a procedure for using GWT to locate areas in metal pipes in which wall loss has occurred due to corrosion or erosion.
5.2 GWT does not provide a direct measurement of wall thickness, but is sensitive to a combination of the CSC and circumferential extent and axial extent of any metal loss. Based on this information, a classification of the severity can be assigned.
5.3 The GWT method provides a screening tool to quickly identify any discontinuity along the pipe. Where a possible defect is found, follow-up inspection of suspected areas with ultrasonic testing or other NDT methods is normally required to obtain detailed thickness information, nature, and extent of damage.
5.4 GWT also provides some information on the axial length of a discontinuity, provided that the axial length is longer than roughly a quarter of the wavelength of the excitation signal.
5.5 The identification and severity assessment of any possible defects is qualitative only. An interpretation process to differentiate between relevant and non-relevant signals is necessary.
5.6 This practice only covers the application specified in the scope. The GWT method has the capability and can be used for applications where the pipe is insulated, buried, in road crossings, and where access is limited.
5.7 GWT shall be performed by qualified and certified personnel, as specified in the contract or purchase order. Qualifications shall include training specific to the use of the equipment employed, interpretation of the test results and guided wave technology.
5.8 A documented program that includes training, examination and experience for the GWT personnel certification shall be maintained by the supplying party.
SCOPE
1.1 This practice provides a procedure for the use of guided wave testing (GWT), also previously known as long range ultrasonic testing (LRUT) or guided wave ultrasonic testing (GWUT).
1.2 GWT utilizes ultrasonic guided waves, sent in the axial direction of the pipe, to non-destructively test pipes for defects or other features by detecting changes in the cross-section and/or stiffness of the pipe.
1.3 GWT is a screening tool. The method does not provide a direct measurement of wall thickness or the exact dimensions of defects/defected area; an estimate of the defect severity however can be provided.
1.4 This practice is intended for use with tubular carbon steel or low-alloy steel products having Nominal Pipe size (NPS) 2 to 48 corresponding to 60.3 to 1219.2 mm (2.375 to 48 in.) outer diameter, and wall thickness between 3.81 and 25.4 mm (0.15 and 1 in.).
1.5 This practice covers GWT using piezoelectric transduction technology.
1.6 This practice only applies to GWT of basic pipe configuration. This includes pipes that are straight, constructed of a single pipe size and schedules, fully accessible at the test location, jointed by girth welds, supported by simple contact supports and free of internal, or external coatings, or both; the pipe may be insulated or painted.
1.7 This practice provides a general procedure for performing the examination and identifying various aspects of particular importance to ensure valid results, but actual interpretation of the data is excluded.
1.8 This practice does not establish an acceptance criterion. Specific acceptance criteria shall be specified in the contractual agreement by the responsible system user or engineering entity.
1.9 Units—The values stated in SI units are to be regarded as standard. The values given in parentheses are mathematical conversions to SI units that are provided for information only and are not considered standard.
1.10 This standard does not purport to address all of the safety concerns, if any, associated with its use. It is the responsibility of the user of this standard to establish appropriate safety and health practices and determine the applicability of regula...
General Information
Relations
Buy Standard
Standards Content (Sample)
This international standard was developed in accordance with internationally recognized principles on standardization established in the Decision on Principles for the
Development of International Standards, Guides and Recommendations issued by the World Trade Organization Technical Barriers to Trade (TBT) Committee.
Designation: E2775 − 16
Standard Practice for
Guided Wave Testing of Above Ground Steel Pipework
1
Using Piezoelectric Effect Transduction
This standard is issued under the fixed designation E2775; the number immediately following the designation indicates the year of
original adoption or, in the case of revision, the year of last revision. A number in parentheses indicates the year of last reapproval. A
superscript epsilon (´) indicates an editorial change since the last revision or reapproval.
1. Scope 1.9 Units—The values stated in SI units are to be regarded
as standard. The values given in parentheses are mathematical
1.1 This practice provides a procedure for the use of guided
conversions to SI units that are provided for information only
wave testing (GWT), also previously known as long range
and are not considered standard.
ultrasonic testing (LRUT) or guided wave ultrasonic testing
1.10 This standard does not purport to address all of the
(GWUT).
safety concerns, if any, associated with its use. It is the
1.2 GWT utilizes ultrasonic guided waves, sent in the axial
responsibility of the user of this standard to establish appro-
direction of the pipe, to non-destructively test pipes for defects
priate safety and health practices and determine the applica-
or other features by detecting changes in the cross-section
bility of regulatory limitations prior to use.
and/or stiffness of the pipe.
2. Referenced Documents
1.3 GWT is a screening tool. The method does not provide
2
a direct measurement of wall thickness or the exact dimensions
2.1 ASTM Standards:
of defects/defected area; an estimate of the defect severity
E543 Specification for Agencies Performing Nondestructive
however can be provided.
Testing
E1065 Practice for Evaluating Characteristics of Ultrasonic
1.4 This practice is intended for use with tubular carbon
Search Units
steel or low-alloy steel products having Nominal Pipe size
E1316 Terminology for Nondestructive Examinations
(NPS) 2 to 48 corresponding to 60.3 to 1219.2 mm (2.375 to 48
E1324 Guide for Measuring Some Electronic Characteristics
in.) outer diameter, and wall thickness between 3.81 and
of Ultrasonic Testing Instruments
25.4 mm (0.15 and 1 in.).
2.2 Equipment Manufacturer’s User’s Manual
1.5 This practice covers GWT using piezoelectric transduc-
tion technology.
3. Terminology
1.6 This practice only applies to GWT of basic pipe
3.1 Definitions of Terms Specific to This Standard:
configuration. This includes pipes that are straight, constructed
3.1.1 circumferential extent—the length of a pipe feature in
of a single pipe size and schedules, fully accessible at the test
the circumferential direction, usually given as a percentage of
location, jointed by girth welds, supported by simple contact
the pipe circumference.
supports and free of internal, or external coatings, or both; the
3.1.2 coherent noise—indications caused by real disconti-
pipe may be insulated or painted.
nuities causing a background noise, which exponentially de-
1.7 This practice provides a general procedure for perform-
cays with distance.
ing the examination and identifying various aspects of particu-
3.1.3 Cross-Sectional Area Change (CSC)—the CSC is
lar importance to ensure valid results, but actual interpretation
calculated assuming that a reflection is purely caused by a
of the data is excluded.
change in cross-section. It is given as a percentage of the total
1.8 This practice does not establish an acceptance criterion.
cross-section. However it is commonly used to report the
Specific acceptance criteria shall be specified in the contractual
relative amplitude of any signal regardless of its source.
agreement by the responsible system user or engineering entity.
3.1.4 Distance Amplitude Correction (DAC) curve—a refer-
ence curve plotted using reference reflections (for example,
weld reflections) at different distances from the test position.
1
This practice is under the jurisdiction of ASTM Committee E07 on Nonde-
structive Testing and is the direct responsibility of Subcommittee E07.10 on
2
Specialized NDT Methods. For referenced ASTM standards, visit the ASTM website, www.astm.org, or
Current edition approved Dec. 1, 2016. Published January 2017. Originally contact ASTM Customer Service at service@astm.org. For Annual Book of ASTM
approved in 2011. last previous edition approved in 2011 as E2775–11. Standards volume information, refer to the standard’s Document Summary page on
DOI:10.1520/E2775-16. the ASTM website.
Copyright © ASTM International, 100 Barr Harbor Drive, PO Box C700, West Conshohocken, PA 19428-2959. United States
1
---------------------- Page: 1 ----------------------
E2775 −
...
This document is not an ASTM standard and is intended only to provide the user of an ASTM standard an indication of what changes have been made to the previous version. Because
it may not be technically possible to adequately depict all changes accurately, ASTM recommends that users consult prior editions as appropriate. In all cases only the current version
of the standard as published by ASTM is to be considered the official document.
Designation: E2775 − 11 E2775 − 16
Standard Practice for
Guided Wave Testing of Above Ground Steel Pipework
1
Using Piezoelectric Effect Transduction
This standard is issued under the fixed designation E2775; the number immediately following the designation indicates the year of
original adoption or, in the case of revision, the year of last revision. A number in parentheses indicates the year of last reapproval. A
superscript epsilon (´) indicates an editorial change since the last revision or reapproval.
1. Scope
1.1 This practice provides a procedure for the use of guided wave testing (GWT), also previously known as long range
ultrasonic testing (LRUT) or guided wave ultrasonic testing (GWUT).
1.2 GWT utilizes ultrasonic guided waves, sent in the axial direction of the pipe, to non-destructively test pipes for defects or
other features by detecting changes in the cross-section and/or stiffness of the pipe.
1.3 GWT is a screening tool. The method does not provide a direct measurement of wall thickness or the exact dimensions of
defects/defected area; an estimate of the defect severity however can be provided.
1.4 This practice is intended for use with tubular carbon steel or low-alloy steel products having Nominal Pipe size (NPS) 2
to 48 corresponding to 60.3 to 1219.2 mm (2.375 to 48 in.) outer diameter, and wall thickness between 3.81 and 25.4 mm 25.4 mm
(0.15 and 1 in.).
1.5 This practice covers GWT using piezoelectric transduction technology.
1.6 This practice only applies to GWT of basic pipe configuration. This includes pipes that are straight, constructed of a single
pipe size and schedules, fully accessible at the test location, jointed by girth welds, supported by simple contact supports and free
of internal, or external coatings, or both; the pipe may be insulated or painted.
1.7 This practice provides a general procedure for performing the examination and identifying various aspects of particular
importance to ensure valid results, but actual interpretation of the data is excluded.
1.8 This practice does not establish an acceptance criterion. Specific acceptance criteria shall be specified in the contractual
agreement by the responsible system user or engineering entity.
1.9 Units—The values stated in SI units are to be regarded as standard. The values given in parentheses are mathematical
conversions to SI units that are provided for information only and are not considered standard.
1.10 This standard does not purport to address all of the safety concerns, if any, associated with its use. It is the responsibility
of the user of this standard to establish appropriate safety and health practices and determine the applicability of regulatory
limitations prior to use.
2. Referenced Documents
2
2.1 ASTM Standards:
E543 Specification for Agencies Performing Nondestructive Testing
E1065 Practice for Evaluating Characteristics of Ultrasonic Search Units
E1316 Terminology for Nondestructive Examinations
E1324 Guide for Measuring Some Electronic Characteristics of Ultrasonic Testing Instruments
2.2 Equipment Manufacturer’s User’s Manual
3. Terminology
3.1 Definitions of Terms Specific to This Standard:
1
This practice is under the jurisdiction of ASTM Committee E07 on Nondestructive Testing and is the direct responsibility of Subcommittee E07.10 on Specialized NDT
Methods.
Current edition approved July 15, 2011Dec. 1, 2016. Published July 2011January 2017. DOI:10.1520/E2775-11.Originally approved in 2011. last previous edition approved
in 2011 as E2775–11. DOI:10.1520/E2775-16.
2
For referenced ASTM standards, visit the ASTM website, www.astm.org, or contact ASTM Customer Service at service@astm.org. For Annual Book of ASTM Standards
volume information, refer to the standard’s Document Summary page on the ASTM website.
Copyright © ASTM International, 100 Barr Harbor Drive, PO Box C700, West Conshohocken, PA 19428-2959. United States
1
---------------------- Page: 1 ----------------------
E2775 − 16
3.1.1 circumferential extent—the length of a pipe feature in the circumferential direction, usually given as a percentage of the
pipe circumference.
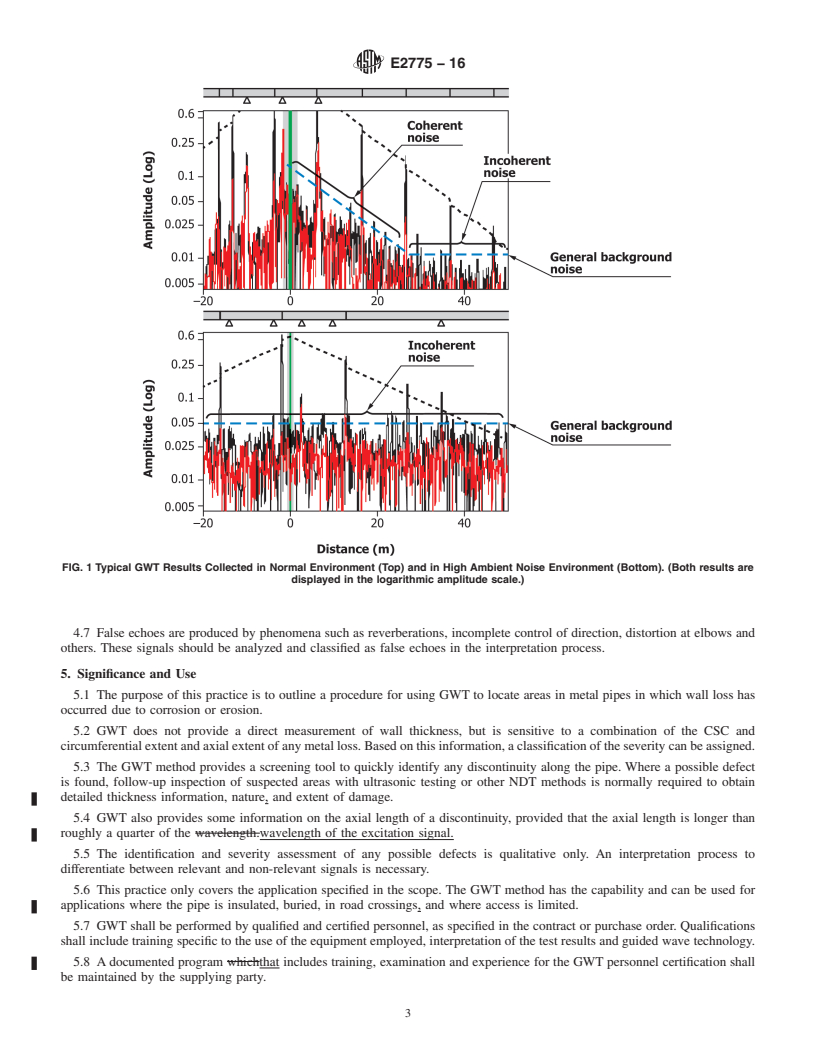
3.1.2 coherent noise—indications caused by real discontinuities causing a background noise, which exponentially decays with
distance.
3.1.3 Cross-Sectional Area Change (CSC)—the CSC is calculated assuming that a reflection is purely caused by a change in
cross-section. It is given as a percentage of the total cross-section. However it is commonly used to report the relative amplitude
of any signal regardless of its source.
3.1.4 Dist
...


Questions, Comments and Discussion
Ask us and Technical Secretary will try to provide an answer. You can facilitate discussion about the standard in here.