ASTM D2670-95(1999)
(Test Method)Standard Test Method for Measuring Wear Properties of Fluid Lubricants (Falex Pin and Vee Block Method)
Standard Test Method for Measuring Wear Properties of Fluid Lubricants (Falex Pin and Vee Block Method)
SCOPE
1.1 This test method covers a procedure for making a preliminary evaluation of the wear properties of fluid lubricants by means of the Falex Pin and Vee Block Lubricant Test Machine. Note 1-Certain fluid lubricants may require different test parameters depending upon their performance characteristics.
1.2 The values stated in either inch-pound units or SI (metric) units are to be regarded separately as standard. Within the text the SI units are shown in brackets. The val- ues stated in each system are not exact equivalents, there- fore each system must be used independently of the other. Combining values of the two systems may result in nonconformance with the specification.
1.3 This standard does not purport to address all of the safety concerns, if any, associated with its use. It is the responsibility of the user of this standard to establish appropriate safety and health practices and determine the applicability of regulatory limitations prior to use.
General Information
Relations
Standards Content (Sample)
NOTICE: This standard has either been superseded and replaced by a new version or withdrawn.
Contact ASTM International (www.astm.org) for the latest information
An American National Standard
Designation:D2670–95 (Reapproved 1999)
Standard Test Method for
Measuring Wear Properties of Fluid Lubricants (Falex Pin
and Vee Block Method)
This standard is issued under the fixed designation D2670; the number immediately following the designation indicates the year of
original adoption or, in the case of revision, the year of last revision.Anumber in parentheses indicates the year of last reapproval.A
superscript epsilon (e) indicates an editorial change since the last revision or reapproval.
This standard has been approved for use by agencies of the Department of Defense.
1. Scope 3.1.1 actual gage load, n—thevalueobtainedfromthegage
while running the test and before any corrections are made.
1.1 This test method covers a procedure for making a
3.1.1.1 Discussion—The gage reading is irrespective of the
preliminaryevaluationofthewearpropertiesoffluidlubricants
particular gage used, and corrections are made by comparison
by means of the Falex Pin and Vee Block Lubricant Test
to a standard reference.
Machine.
3.1.2 direct load, n—the load that is applied linearly,
NOTE 1—Certain fluid lubricants may require different test parameters
bisecting the angle of the vee block corrected to either the 800
depending upon their performance characteristics.
lbf or 3000 lbf gage reference.
1.2 The values stated in either inch-pound units or SI
3.1.2.1 Discussion—This load is equivalent to the true load
(metric) units are to be regarded separately as standard.Within
times the cos 42°.
thetexttheSIunitsareshowninbrackets.Thevaluesstatedin
3.1.3 true load, n—the sum of the applied forces normal to
each system are not exact equivalents, therefore each system
the tangents of contact between the faces of one vee block and
must be used independently of the other. Combining values of
the journal pin corrected to the 4500 lbf gage reference line.
the two systems may result in nonconformance with the
3.1.4 wear teeth, n—a measurement of wear, which in this
specification.
test, is based on the number of ratchet wheel teeth advanced
1.3 This standard does not purport to address all of the
during the test while maintaining load.
safety concerns, if any, associated with its use. It is the
3.1.4.1 Discussion—The number of teeth is directly related
responsibility of the user of this standard to establish appro-
to the total wear (inches).
priate safety and health practices and determine the applica-
4. Summary of Test Method
bility of regulatory limitations prior to use.
4.1 The test consists of running a rotating steel journal
2. Referenced Documents
againsttwostationarysteelV-blocksimmersedinthelubricant
2.1 ASTM Standards:
sample. Load is applied to the V-blocks and maintained by a
B16 Specification for Free-Cutting Brass Rod, Bar, and
ratchet mechanism. Wear is determined and recorded as the
Shapes for Use in Screw Machines
numberofteethoftheratchetmechanismadvancedtomaintain
load constant during the prescribed testing time.
3. Terminology
5. Significance and Use
3.1 Definitions of Terms Specific to This Standard:
5.1 This test method may be used to determine wear
obtained with fluid lubricants under the prescribed test condi-
This test method is under the jurisdiction of Committee D-2 on Petroleum
tions. The user of this test method should determine to his or
Products and Lubricants and is the direct responsibility of Subcommittee D02.Lon
her own satisfaction whether results of this test procedure
Industrial Lubricants.
This test method was prepared under the joint sponsorship of the American
correlate with field performance or other bench test machines.
Society of Lubrication Engineers.
Ifthetestconditionsarechanged,wearvaluesmaychangeand
Accepted by ASLE in May 1967.
relative ratings of fluids may be different.
Current edition approved Dec. 10, 1995. Published February 1996. Originally
published as D2670–67. Last previous edition D2670–94.
Annual Book of ASTM Standards, Vol 02.01.
Copyright © ASTM International, 100 Barr Harbor Drive, PO Box C700, West Conshohocken, PA 19428-2959, United States.
D2670
6. Apparatus
6.1 Falex Pin and Vee Block Lubricant Test Machine ,
illustrated in Figs. 1-3.
7. Reagents and Materials
7.1 Required for Calibration of Load Gage:
7.1.1 Allen Screw, with attached 10-mm Brinell ball.
7.1.2 Back-Up Plug.
7.1.3 Standard Test Coupon, soft, annealed copper, HB 37
to 39.
7.1.4 Brinell Microscope, or equivalent,
7.1.5 Timer, graduated in seconds and minutes, and
7.1.6 Rule, steel, 6-in. (approximately 150-mm) long.
7.2 Required for Test:
7.2.1 Standard Coined V-Blocks, 96 6 1° angle, AISI
C-1137 steel HRC 20 to 24, surface finish 5 to 10 µin.
−
7 −7 FIG. 2 Falex Digital Pin and Vee Block Test Machine
(1.3 310 to 2.5 310 m), rms,
7.2.2 Standard Test Journals, ⁄4-in. (6.35-mm) outside
diameterby1 ⁄4-in.(31.75-mm)long,AISI3135steel,HRB87
to 91 on a ground flat surface, surface finish 5 to 10 µin.,
−
7 −7
(1.3 310 to 2.5 310 m), rms,
7.2.3 Locking Pins, ⁄2 H brass, conforming to Specifica-
tion B16.
7.2.4 Timer, graduated in seconds and minutes.
7.2.5 Solvent, safe, nonfilming, nonchlorinated.
NOTE 2—Petroleumdistillateandbenzene,formerlyusedassolventsin
this test method, have been eliminated due to possible toxic effects. Each
user should select a solvent that can meet applicable safety standards and
still thoroughly clean the parts.
8. Calibration of Load Gages
8.1 Apparatus with 800-lb or 3000-lb Gage:
FIG. 3 Exploded View of V-Blocks and Journal Arrangement,
Falex Pin and Vee Block Lubricant Test Machine
The Falex Pin and Vee Block Test Machine available from Falex Corp., 1020
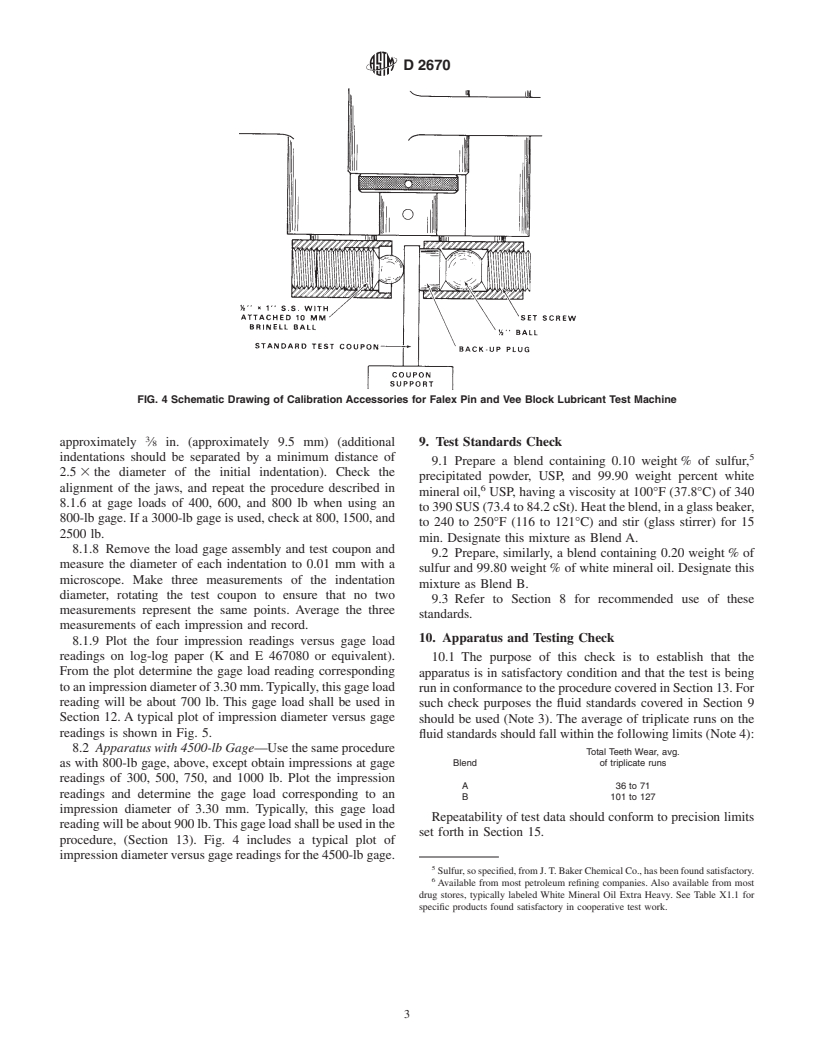
8.1.1 RemovetheAllensetscrewand ⁄2in.(12.70-mm)ball
Airpark Dr., Sugar Grove, IL60554 has been found satisfactory for this purpose.A
from the left jaw socket (Fig. 4).
new model of this machine has been available since 1983. Certain operating
8.1.2 InsertthespecialAllenscrewwiththeattached10-mm
procedures are different for this new model. Consult the instruction manual of
machine for this information. Brinell ball into the working face of the left jaw.Adjust so that
Available from Falex Corp., 1020 Airpark Dr., Sugar Grove, IL 60554.
ballprojectsabout ⁄32(approximately4mm)fromfaceofjaw.
8.1.3 Insert the back-up plug in the counterbore of the
right-hand jaw. Adjust so that the plug projects about ⁄32 in.
(approximately 0.8 mm) from the face.
8.1.4 Support the standard test coupon so that the upper
edge of the coupon is about ⁄32in. (approximately 2.5 mm)
below the upper surface of the jaws. Place a steel rule across
the face of the jaws. Adjust the Allen screw with the attached
10-mm ball until the face of the jaws are parallel to the steel
rule with the test coupon in position for indentation.
8.1.5 With the test coupon in position for the first impres-
sion, place the load gage assembly on the lever arms.
8.1.6 Placetheloadingarmontheratchetwheelandactuate
the motor.Allow the motor to run until the load gage indicates
a load of 200 lb. A slight takeup on the ratchet wheel is
required to hold the load due to the ball sinking into the test
coupon.After a 200-lb load is obtained, hold for 1 min for the
indentation to form.
8.1.7 Turn off the machine and back off the load until the
FIG. 1 Falex Pin and Vee Block Test Machine test coupon is free from the jaws. Advance the test coupon
D2670
FIG. 4 Schematic Drawing of Calibration Accessories for Falex Pin and Vee Block Lubricant Test Machine
approximately ⁄8 in. (approximately 9.5 mm) (additional 9. Test Standards Check
indentations should be separated by a minimum distance of 5
9.1 Prepare a blend containing 0.10 weight% of sulfur,
2.5 3the diameter of the initial indentation). Check the
precipitated powder, USP, and 99.90 weight percent white
alignment of the jaws, and repeat the procedure described in 6
mineral oil, USP, having a viscosity at 100°F (37.8°C) of 340
8.1.6 at gage loads of 400, 600, and 800 lb when using an
to390SUS(73.4to84.2cSt).Heattheblend,inaglassbeaker,
800-lbgage.Ifa3000-lbgageisused,checkat800,1500,and
to 240 to 250°F (116 to 121°C) and stir (glass stirrer) for 15
2500 lb.
min. Designate this mixture as Blend A.
8.1.8 Remove the load gage assembly and test coupon and
9.2 Prepare, similarly, a blend containing 0.20 weight% of
measure the diameter of each indentation to 0.01 mm with a
sulfur and 99.80 weight% of white mineral oil. Designate this
microscope. Make three measurements of the indentation
mixture as Blend B.
diameter, rotating the test coupon to ensure that no two
9.3 Refer to Section 8 for recommended use of these
measurements represent the same points. Average the three
standards.
measurements of each impression and record.
10. Apparatus and Testing Check
8.1.9 Plot the four impression readings versus gage load
readings on log-log paper (K and E 467080 or equivalent).
10.1 The purpose of this check is to establish that the
From the plot determine the gage load reading corresponding
apparatus is in satisfactory condition and that the test is being
toanimpressiondiameterof3.30mm.Typically,thisgageload
runinconformancetotheprocedurecoveredinSection13.For
reading will be about 700 lb. This gage load shall be used in
such check purposes the fluid standards covered in Section 9
Section 12. A typical plot of impression diameter versus gage
should be used (Note 3). The average of triplicate runs on the
readings is shown in Fig. 5.
fluidstandardsshouldfallwithinthefollowinglimits(Note4):
8.2 Apparatus with 4500-lb Gage—Usethesameprocedure
Total Teeth Wear, avg.
Blend of triplicate runs
as with 800-lb gage, above, except obtain impressions at gage
readings of 300, 500, 750, and 1000 lb. Plot the impression
A 36to71
readings and determine the gage load corresponding to an
B 101 to 127
impression diameter of 3.30 mm. Typically, this gage load
Repeatability of test data should conform to precision limits
readingwillbeabout900lb.Thisgageloadshallbeusedinthe
set forth in Section 15.
procedure, (Section 13). Fig. 4 includes a typical plot of
impressiondiameterversusgagereadingsforthe4500-lbgage.
Sulfur,sospecified,fromJ.T.BakerChemicalCo.,hasbeenfoundsatisfactory.
Available from most petroleum refining companies. Also available from most
drug stores, typically labeled White Mineral Oil Extra Heavy. See Table X1.1 for
specific products found satisfactory in cooperative test work.
D2670
FIG. 5 Typical Curves of Gage Load Readings versus Impression Diameter, Using 800, 3000 and 4500-lb Gages and BHN 37 to 39
Standard Test Coupons
NOTE 3—Three commercial cutting oils were initially chosen as refer-
12. Preparation of Apparatus
encefluidstandards.Thesewerereplacedbythespecifiedwhiteoil-sulfur
12.1 Thoroughly clean the V-blocks, test journals, lubricant
blends because of greater availability, uniformity,
...


Questions, Comments and Discussion
Ask us and Technical Secretary will try to provide an answer. You can facilitate discussion about the standard in here.