ASTM C749-13
(Test Method)Standard Test Method for Tensile Stress-Strain of Carbon and Graphite
Standard Test Method for Tensile Stress-Strain of Carbon and Graphite
SIGNIFICANCE AND USE
5.1 The round robin testing on which the precision and bias for this test method have been determined employed a range of graphites (see Table 2) whose grain sizes were of the order of 1 mil to 1/4 in. (0.0254 to 6.4 mm) and larger. This wide range of carbons and graphites can be tested with uniform gauge diameters with minimum parasitic stresses to provide quality data for use in engineering applications rather than simply for quality control. This test method can be easily adapted to elevated temperature testing of carbons and graphites without changing the specimen size or configuration by simply utilizing elevated temperature materials for the load train. This test method has been utilized for temperatures as high as 4352°F (2400°C). The design of the fixtures (Figs. 2-9 and Table 1) and description of the procedures are intended to bring about, on the average, parasitic stresses of less than 5 %. The specimens for the different graphites have been designed to ensure fracture within the gauge section commensurate with experienced variability in machining and testing care at different facilities. The constant gauge diameter permits rigorous analytical treatment.
5.2 Carbon and graphite materials exhibit significant physical property differences within parent materials. Exact sampling patterns and grain orientations must be specified in order to make meaningful tensile strength comparisons. See also Test Methods C565.
SCOPE
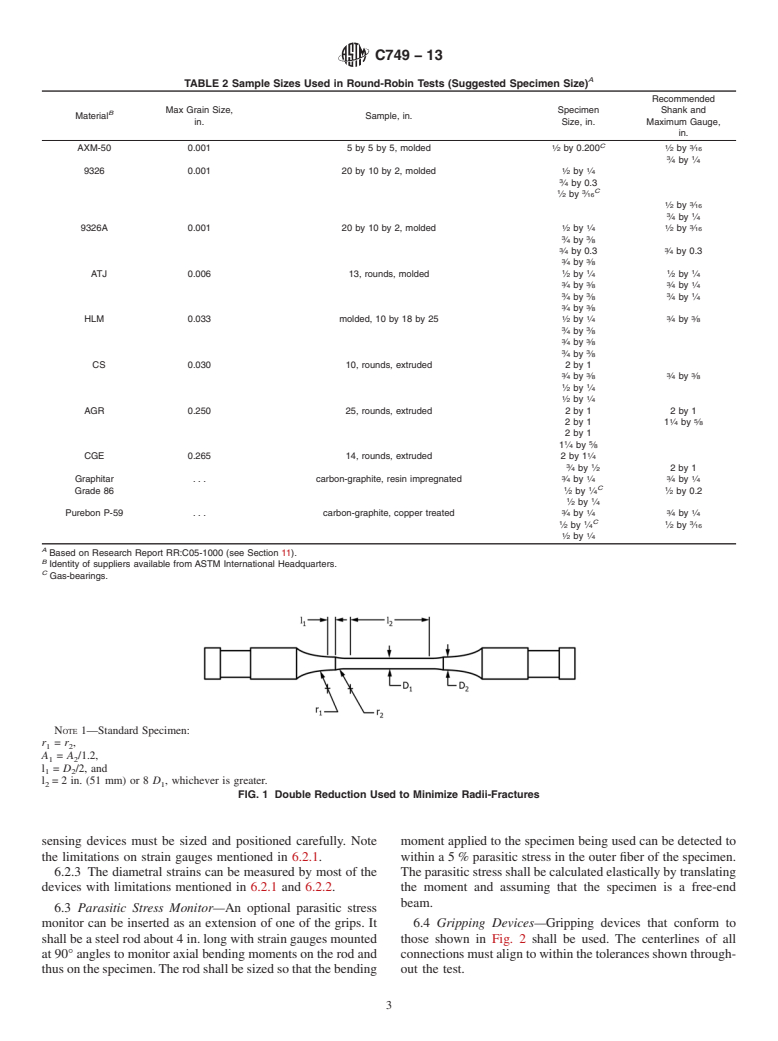
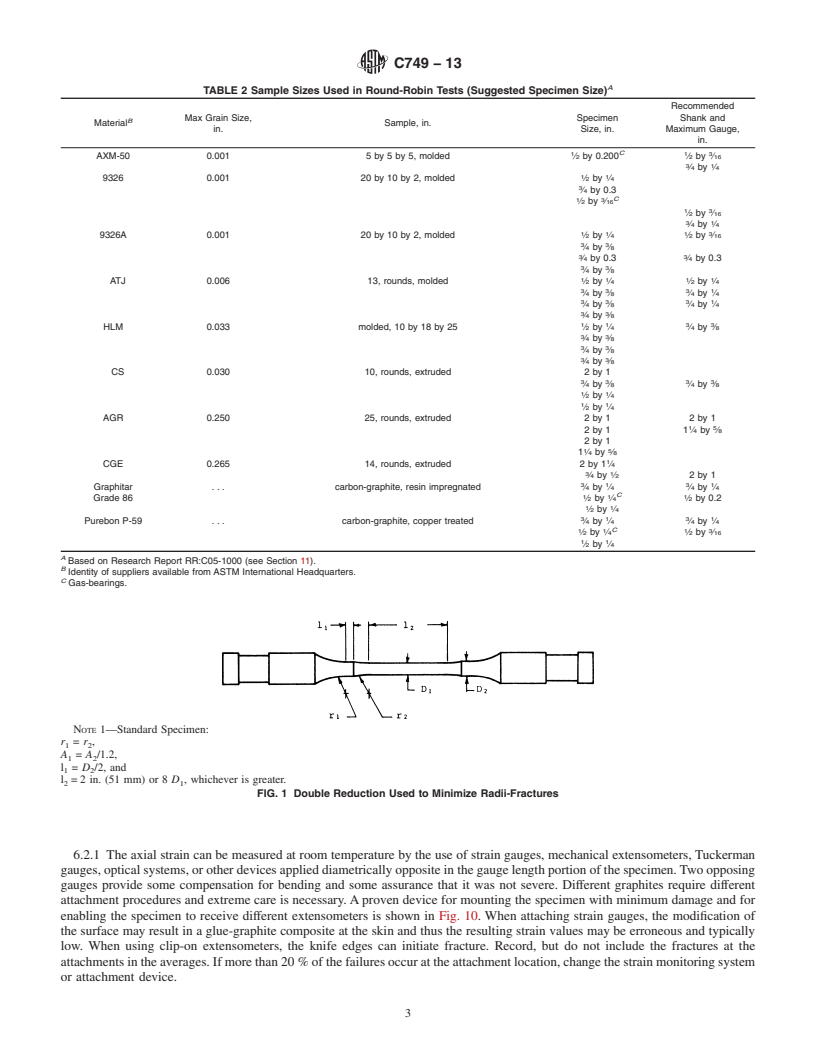
1.1 This test method covers the testing of carbon and graphite in tension to obtain the tensile stress-strain behavior, to failure, from which the ultimate strength, the strain to failure, and the elastic moduli may be calculated as may be required for engineering applications. Table 2 lists suggested sizes of specimens that can be used in the tests.TABLE 1 List of Materials Shown in Fig. 2
Assembly
Item
Quantity
Name, Description, Material
1A
101
2
Crosshead attachment yoke—1 dia x 4 long—416 or 440 S.S.
1/2 in. A grips B,C
102
2
Chain—3/16 dia, 700 pound tensile limit, 10 links long—Carbon Steel
103
4
Chain journal—9/16 dia x 1/2 long—416 or 440 S.S.D
104
4
Pin—3/16 dia x 1—Std Dowel
105
2
Grip attachment yoke—1 dia x 25/8 long—416 or 440 S.S.D
106
2
Pin—1/4 shank dia with 1/2 dia x 3/4 long knurled head, total length
21/2 , taper first half inch at 10°—416 or 440 S.S.D
107
2
Grip sleeve—11/2 dia x 25/16 long—416 or 440 S.S.D
108
2
Split sleeve—1 dia x 1 long—416 or 440 S.S.D
109
1
Specimen—0.510 dia x 43/4 long—Carbon
110
Not Used
1B
. . .
2
Item 101—Crosshead attachment yoke
3/4 in. A grips
. . .
2
Item 102—Chain
. . .
4
Item 103—Chain journal
. . .
4
Item 104—Pin
. . .
2
Item 105—Grip attachment yoke
. . .
2
Item 106—Pin
111
2
Grip sleeve—11/2 dia x 25/16 long—416 or 440 S.S.D
112
2
Split sleeve—1 dia x 1 long—416 or 440 S.S.D
113
1
Specimen—0.760 dia x 43/4 long—Carbon
114
Not Used
1C
115
2
Crosshead attachment yoke—11/2 dia x 4 long—416 or 440 S.S.D
11/4 in. A grips
116
2
Chain—3/8 dia, 5100 pound tensile limit, 10 links long—Carbon Steel
117
4
Chain journal—5/8 dia x 5/8 long—416 or 440 S.S.D
118
4
Pin—3/8 dia x 11/2 long—Std Dowel
119
2
Grip attachment yoke—11/2 dia x 25/8 long—416 or 440 S.S.D
120
2
Pin—1/2 shank dia with 3/4 dia x 3/4 long knurled head, total length
41/4 , taper first half inch at 10°—416 or 440 S.S.D
121
2
Grip sleeve—17/8 dia x 35/8 long—416 or 440 S.S.D
122
2
Split sleeve—11/2 dia x 21/4 long—416 or 440 S.S.D
123
1
Specimen—11/4 dia x 93/4 long—Carbon
...
General Information
Relations
Buy Standard
Standards Content (Sample)
NOTICE: This standard has either been superseded and replaced by a new version or withdrawn.
Contact ASTM International (www.astm.org) for the latest information
Designation: C749 − 13 AnAmerican National Standard
Standard Test Method for
1
Tensile Stress-Strain of Carbon and Graphite
This standard is issued under the fixed designation C749; the number immediately following the designation indicates the year of
original adoption or, in the case of revision, the year of last revision. A number in parentheses indicates the year of last reapproval. A
superscript epsilon (´) indicates an editorial change since the last revision or reapproval.
1. Scope* ASTM Test Methods
E691 Practice for Conducting an Interlaboratory Study to
1.1 This test method covers the testing of carbon and
Determine the Precision of a Test Method
graphite in tension to obtain the tensile stress-strain behavior,
to failure, from which the ultimate strength, the strain to
3. Terminology
failure, and the elastic moduli may be calculated as may be
required for engineering applications. Table 2 lists suggested 3.1 Definitions—The terms as related to tension testing as
sizes of specimens that can be used in the tests. given inTerminology E6 shall be considered as applying to the
terms used in this test method. See also Terminology C709.
NOTE 1—The results of about 400 tests, on file at ASTM as a research
report, show the ranges of materials that have been tested, the ranges of
4. Summary of Test Method
specimen configurations, and the agreement between the testers. See
Section 11.
4.1 Atensile specimen (Fig. 1) is placed within a load train
NOTE 2—For safety considerations, it is recommended that the chains
assembly made up of precision chains and other machined
be surrounded by suitable members so that at failure all parts of the load
train behave predictably and do not constitute a hazard for the operator. parts (Fig. 2).Aload is applied to the specimen provided with
means of measuring strain until it is caused to fracture. This
1.2 The values stated in inch-pound units are to be regarded
test yields the tensile strength, elastic constants, and strain to
as standard. The values given in parentheses are mathematical
failure of carbons and graphites.
conversions to SI units that are provided for information only
and are not considered standard. Conversions are not provided
5. Significance and Use
in the tables and figures.
5.1 The round robin testing on which the precision and bias
1.3 This standard does not purport to address all of the
for this test method have been determined employed a range of
safety concerns, if any, associated with its use. It is the
graphites (see Table 2) whose grain sizes were of the order of
responsibility of the user of this standard to establish appro-
1
1 mil to ⁄4 in. (0.0254 to 6.4 mm) and larger. This wide range
priate safety and health practices and determine the applica-
of carbons and graphites can be tested with uniform gauge
bility of regulatory limitations prior to use.
diameters with minimum parasitic stresses to provide quality
2. Referenced Documents data for use in engineering applications rather than simply for
quality control. This test method can be easily adapted to
2
2.1 ASTM Standards:
elevated temperature testing of carbons and graphites without
C565 Test Methods for Tension Testing of Carbon and
changingthespecimensizeorconfigurationbysimplyutilizing
Graphite Mechanical Materials
elevated temperature materials for the load train. This test
C709 Terminology Relating to Manufactured Carbon and
method has been utilized for temperatures as high as 4352°F
Graphite
(2400°C).Thedesignofthefixtures(Figs.2-9andTable1)and
E4 Practices for Force Verification of Testing Machines
description of the procedures are intended to bring about, on
E6 Terminology Relating to Methods of Mechanical Testing
the average, parasitic stresses of less than 5 %. The specimens
E177 Practice for Use of the Terms Precision and Bias in
for the different graphites have been designed to ensure
fracture within the gauge section commensurate with experi-
enced variability in machining and testing care at different
1
This test method is under the jurisdiction of ASTM Committee D02 on
facilities. The constant gauge diameter permits rigorous ana-
Petroleum Products, Liquid Fuels, and Lubricants and is the direct responsibility of
Subcommittee D02.F0 on Manufactured Carbon and Graphite Products.
lytical treatment.
Current edition approved Oct. 1, 2013. Published November 2013. Originally
ε1
5.2 Carbon and graphite materials exhibit significant physi-
approved in 1973. Last previous edition approved in 2010 as C749 – 08 (2010) .
DOI: 10.1520/C0749-13.
cal property differences within parent materials. Exact sam-
2
For referenced ASTM standards, visit the ASTM website, www.astm.org, or
pling patterns and grain orientations must be specified in order
contact ASTM Customer Service at service@astm.org. For Annual Book of ASTM
tomakemeaningfultensiles
...
This document is not an ASTM standard and is intended only to provide the user of an ASTM standard an indication of what changes have been made to the previous version. Because
it may not be technically possible to adequately depict all changes accurately, ASTM recommends that users consult prior editions as appropriate. In all cases only the current version
of the standard as published by ASTM is to be considered the official document.
´1
Designation: C749 − 08 (Reapproved 2010) C749 − 13 An American National Standard
Standard Test Method for
1
Tensile Stress-Strain of Carbon and Graphite
This standard is issued under the fixed designation C749; the number immediately following the designation indicates the year of
original adoption or, in the case of revision, the year of last revision. A number in parentheses indicates the year of last reapproval. A
superscript epsilon (´) indicates an editorial change since the last revision or reapproval.
1
ε NOTE—Updated units scope statement and Table 1 editorially in May 2010.
1. Scope Scope*
1.1 This test method covers the testing of carbon and graphite in tension to obtain the tensile stress-strain behavior, to failure,
from which the ultimate strength, the strain to failure, and the elastic moduli may be calculated as may be required for engineering
applications. Table 2 lists suggested sizes of specimens that can be used in the tests.
NOTE 1—The results of about 400 tests, on file at ASTM as a research report, show the ranges of materials that have been tested, the ranges of specimen
configurations, and the agreement between the testers. See Section 11.
NOTE 2—For safety considerations, it is recommended that the chains be surrounded by suitable members so that at failure all parts of the load train
behave predictably and do not constitute a hazard for the operator.
1.2 The values stated in inch-pound units are to be regarded as standard. The values given in parentheses are mathematical
conversions to SI units that are provided for information only and are not considered standard. Conversions are not provided in
the tables and figures.
1.3 This standard does not purport to address all of the safety concerns, if any, associated with its use. It is the responsibility
of the user of this standard to establish appropriate safety and health practices and determine the applicability of regulatory
limitations prior to use.
2. Referenced Documents
2
2.1 ASTM Standards:
C565 Test Methods for Tension Testing of Carbon and Graphite Mechanical Materials
C709 Terminology Relating to Manufactured Carbon and Graphite
E4 Practices for Force Verification of Testing Machines
E6 Terminology Relating to Methods of Mechanical Testing
E177 Practice for Use of the Terms Precision and Bias in ASTM Test Methods
E691 Practice for Conducting an Interlaboratory Study to Determine the Precision of a Test Method
3. Terminology
3.1 Definitions—The terms as related to tension testing as given in Terminology E6 shall be considered as applying to the terms
used in this test method. See also Terminology C709.
4. Summary of Test Method
4.1 A tensile specimen (Fig. 1) is placed within a load train assembly made up of precision chains and other machined parts
(Fig. 2). A load is applied to the specimen provided with means of measuring strain until it is caused to fracture. This test yields
the tensile strength, elastic constants, and strain to failure of carbons and graphites.
5. Significance and Use
5.1 The round robin testing on which the precision and bias for this test method have been determined employed a range of
1
graphites (see Table 2) whose grain sizes were of the order of 1 mil to ⁄4 in. (0.0254 to 6.4 mm) and larger. This wide range of
1
This test method is under the jurisdiction of ASTM Committee D02 on Petroleum Products Products, Liquid Fuels, and Lubricants and is the direct responsibility of
Subcommittee D02.F0 on Manufactured Carbon and Graphite Products.
Current edition approved May 1, 2010Oct. 1, 2013. Published May 2010November 2013. Originally approved in 1973. Last previous edition approved in 20082010 as
ε1
C749 – 08. 08 (2010) . DOI: 10.1520/C0749-08R10E01.10.1520/C0749-13.
2
For referenced ASTM standards, visit the ASTM website, www.astm.org, or contact ASTM Customer Service at service@astm.org. For Annual Book of ASTM Standards
volume information, refer to the standard’s Document Summary page on the ASTM website.
*A Summary of Changes section appears at the end of this standard
Copyright © ASTM International, 100 Barr Harbor Drive, PO Box C700, West Conshohocken, PA 19428-2959. United States
1
---------------------- Page: 1 ----------------------
C749 − 13
TABLE 1 List of Materials Shown in Fig. 2
Assembly Item Quantity Name, Description, Material
1A 101 2 Crosshead attachment yoke—1 dia x 4 long—416 or 440 S.S.
A B,C
1 3
⁄2 in. grips 102 2 Chain— ⁄16 dia, 700 pound tensile limit, 10 links long—Carbon
Steel
D
9 1
103 4 Chain journal— ⁄16 dia x ⁄2 long—416 or 440 S.S.
3
104
...


Questions, Comments and Discussion
Ask us and Technical Secretary will try to provide an answer. You can facilitate discussion about the standard in here.