ASTM E898-88(1993)
(Test Method)Standard Method of Testing Top-Loading, Direct-Reading Laboratory Scales and Balances
Standard Method of Testing Top-Loading, Direct-Reading Laboratory Scales and Balances
SCOPE
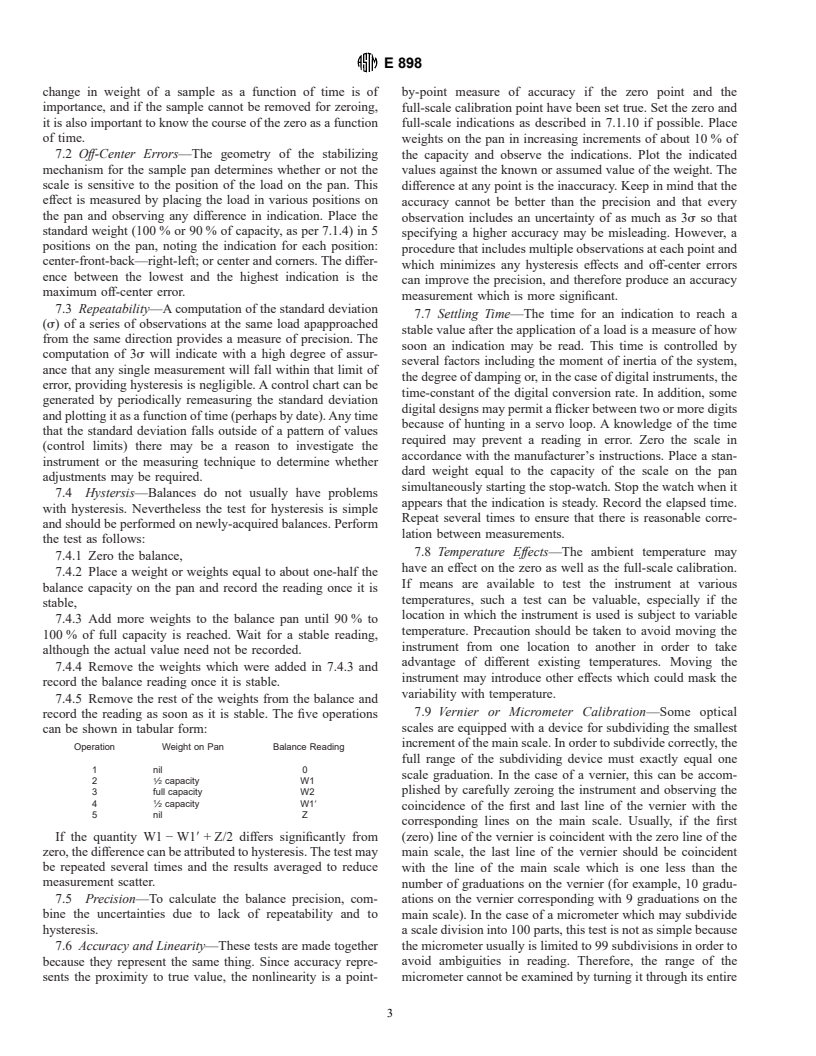
1.1 This method covers the determination of characteristics of top-loading, direct-reading laboratory scales and balances. Laboratory scales of the top-loading type may have capacities from a few grams up to several kilograms. Resolution may be from 1/1000 of capacity to 1/1 000 000 or more. This method can be used for any of these instruments and will serve to measure the most important characteristics that are of interest to the user. The characteristics to be measured include the following:
1.1.1 warm-up,
1.1.2 off center errors,
1.1.3 repeatability, reproducibility, and precision,
1.1.4 accuracy and linearity,
1.1.5 hysteresis,
1.1.6 settling time,
1.1.7 temperature effects,
1.1.8 vernier or micrometer calibration, and
1.1.9 resistance to external disturbances.
1.2 The types of scales that can be tested by this method are of stabilized pan design wherein the sample pan does not tilt out of a horizontal plane when the sample is placed anywhere on the pan surface. The pan is located generally above the measuring mechanism with no vertical obstruction, except for draft shields. Readings of weight may be obtained from an optical scale, from a digital display, or from a mechanical dial. Weighing mechanisms may be of the deflecting type, using gravity or a spring as the transducer, or may be a force-balance system wherein an electromagnetic, pneumatic, hydraulic, or other force is used to counterbalance the weight of the sample. Other force-measuring devices may be tested by this method as long as a sample placed on a receiving platform produces an indication that is substantially a linear function of the weight of the sample.
1.3 This standard does not purport to address all of the safety concerns, if any, associated with its use. It is the responsibility of the user of this standard to establish appropriate safety and health practices and determine the applicability of regulatory limitations prior to use.
General Information
Relations
Standards Content (Sample)
NOTICE: This standard has either been superseded and replaced by a new version or discontinued.
Contact ASTM International (www.astm.org) for the latest information.
Designation: E 898 – 88 (Reapproved 1993)
AMERICAN SOCIETY FOR TESTING AND MATERIALS
100 Barr Harbor Dr., West Conshohocken, PA 19428
Reprinted from the Annual Book of ASTM Standards. Copyright ASTM
Standard Method of Testing
Top-Loading, Direct-Reading Laboratory Scales and
Balances
This standard is issued under the fixed designation E 898; the number immediately following the designation indicates the year of
original adoption or, in the case of revision, the year of last revision. A number in parentheses indicates the year of last reapproval. A
superscript epsilon (e) indicates an editorial change since the last revision or reapproval.
INTRODUCTION
This method is designed to test commonly used laboratory scales that read the entire range of weight
up to the capacity without manual operation. In essence, the entire reading range is on-scale and no
manipulation of weights, riders, or dials is required; except some scales with optical reading devices
may require the operation of a micrometer dial to interpolate the final one or two significant figures.
1. Scope indication that is substantially a linear function of the weight of
the sample.
1.1 This method covers the determination of characteristics
1.3 This standard does not purport to address all of the
of top-loading, direct-reading laboratory scales and balances.
safety concerns, if any, associated with its use. It is the
Laboratory scales of the top-loading type may have capacities
responsibility of the user of this standard to establish appro-
from a few grams up to several kilograms. Resolution may be
priate safety and health practices and determine the applica-
from 1/1000 of capacity to 1/1 000 000 or more. This method
bility of regulatory limitations prior to use.
can be used for any of these instruments and will serve to
measure the most important characteristics that are of interest
2. Summary of Method
to the user. The characteristics to be measured include the
2.1 Throughout this method, the instrument is used in the
following:
manner for which it is intended. One or more weights are used
1.1.1 warm-up,
to test each of the characteristics, and the results are expressed
1.1.2 off center errors,
in terms of the least count or ultimate readability of the display.
1.1.3 repeatability, reproducibility, and precision,
1.1.4 accuracy and linearity,
3. Terminology
1.1.5 hysteresis,
3.1 Definitions of Terms Specific to This Standard:
1.1.6 settling time,
3.1.1 accuracy—the degree of agreement of the measure-
1.1.7 temperature effects,
ment with the true value of the quantity measured.
1.1.8 vernier or micrometer calibration, and
3.1.2 capacity—the maximum weight load specified by the
1.1.9 resistance to external disturbances.
manufacturer. In most instruments, the maximum possible
1.2 The types of scales that can be tested by this method are
reading will exceed the capacity by a small amount.
of stabilized pan design wherein the sample pan does not tilt
3.1.3 full-scale calibration—the indicated reading when a
out of a horizontal plane when the sample is placed anywhere
standard weight equal to the full scale indication of the scale is
on the pan surface. The pan is located generally above the
placed on the sample pan after the device has been correctly
measuring mechanism with no vertical obstruction, except for
zeroed. Usually some means is provided by the manufacturer
draft shields. Readings of weight may be obtained from an
to adjust the full scale indication to match the weight of the
optical scale, from a digital display, or from a mechanical dial.
standard.
Weighing mechanisms may be of the deflecting type, using
3.1.4 linearity—the degree to which a graph of weight
gravity or a spring as the transducer, or may be a force-balance
values indicated by a scale vs. the true values of the respective
system wherein an electromagnetic, pneumatic, hydraulic, or
test weights approximates a straight line. For a quantitative
other force is used to counterbalance the weight of the sample.
statement of linearity errors, the concept of terminal-based
Other force-measuring devices may be tested by this method as
non-linearity is recommended, such as, the maximum deviation
long as a sample placed on a receiving platform produces an
of the calibration curve (average of the readings at increasing
and decreasing test load, respectively) from a straight line
This method is under the jurisdiction of ASTM Committee E-41 on Laboratory
Apparatus and is the direct responsibility of Subcommittee E41.06 on Weighing
Devices.
Current edition approved Sept. 30, 1988. Published November 1988. Originally ANSI/ISA S51.1 “Process Instrumentation Technology”. Available from
published as E 898 - 82. Last previous edition E 898 – 88. American National Standards Institute, 1430 Broadway, NY NY 10018.
E 898
drawn through the upper and lower endpoints of the calibration 6. Preparation
curve.
6.1 Make sure that the scale and weights are clean.
3.1.5 off-center errors—differences in indicated weight
6.2 Place the standard weights near the instrument.
when a sample weight is shifted to various positions on the
6.3 Place the thermometer on the bench in such a position
weighing area of the sample pan.
that it can be read without being touched.
3.1.6 hysteresis—difference in weight values indicated at a
6.4 Allow the instrument and the weights to sit undisturbed
given test load depending on whether the test load was arrived
for at least 2 h with the balance turned off. Monitor the
at by an increase or a decrease from the previous load on the
temperature during this time to make sure that there is no more
scale.
than approximately 2°C variation over the last hour before
3.1.7 repeatability—closeness of agreement of the indicated
beginning the test.
values for successive weighings of the same load, under
6.5 Read the manufacturer’s instructions carefully. During
essentially the same conditions, approaching from the same
each step of the test procedure, the instrument should be used
direction (such as, disregarding hysteresis).
in the manner recommended by the manufacturer. Know the
3.1.8 reproducibility—closeness of agreement of the indi-
location of any switches, dials, or buttons as well as their
cated values when weighings of the same load are made over
functions.
a period of time under essentially the same conditions but not
7. Test Procedure
limited to the same direction of approach (such as, hysteresis
errors are included).
7.1 Warm-up Test:
3.1.9 precision—the smallest amount of weight difference
7.1.1 If it is required in the normal operation of the scale to
between closely similar loads that a balance is capable of
turn it “on” as an operation separate from weighing, perform
detecting. The limiting factor is either the size of the digital
that operation simultaneously with the starting of the stop-
step of the indicator readout or the repeatability of the indicated
watch.
values.
7.1.2 If a zeroing operation is required, do it promptly.
3.1.10 standard deviation—used as a quantitative figure of
Record the temperature.
merit when making statements on the repeatability, reproduc-
7.1.3 At the end of 1 min, read and record the indication
ibility or precision of a balance.
with the pan empty.
3.1.11 readability—the value of the smallest unit of weight
7.1.4 At the center of the sample pan place a standard
that can be read without estimation. In the case of digital
weight nearly equal to but not exceeding 98 % of the capacity
instruments, the readability is the smallest increment of the
of the scale. If the scale allows no weight readings above the
least significant digit (for example, 1, 2 or 5). Optical scales
stated nominal capacity, then this test should be performed
may have a vernier or micrometer for subdividing the smallest
with standard weights equal to 90 % of capacity. When the
scale division. In that case, the smallest graduation of the
indication is steady, record the indication and remove the
vernier or micrometer represents the readability.
weight from the pan.
3.1.12 standard weight—any weight whose mass is given.
7.1.5 At the end of 5 min, repeat steps 7.1.3 and 7.1.4
Since weights are not always available with documented
without rezeroing.
corrections, weights defined by class may be used if the class
7.1.6 At the end of 30 min, repeat again.
chosen has sufficiently small limits and there is an understand-
7.1.7 At the end of 1 h, repeat again. Record the tempera-
ing that errors perceived as being instrumental in nature could
ture.
be attributed to incorrectly adjusted weights.
7.1.8 Compute for each measurement as follows:
k 5 W/~I 2 I ! (1)
t w o
4. Significance and Use
4.1 This method will enable the user to develop information
where:
concerning the precision and accuracy of weighing instru-
I 5 indication with the standard weight on the pan,
w
ments. In addition, results obtained using this method will I 5 indication with pan empty,
o
W 5 known or assumed value of the standard weight, and
permit the most advantageous use of the instrument. Weak-
k 5 calibration factor for time t.
nesses as well as strengths of the instrument should become
t
7.1.9 Plot the values of k against the time (1 min, 5 min, 30
apparent. It is not the intent of this method to compare similar
t
min, and 60 min). The time at which k apparently no longer
instruments of different manufacture, but to enable the user to
t
choose a suitable instrument. drifts in one direction can be assumed to be the warm-up time
required.
5. Apparatus
7.1.10 If there is a user-adjustable full-scale calibration
5.1 Manufacturer’s Manual. procedure recommended by the manufacturer, this adjustment
5.2 Standard Weights—A set of weights up to the capacity should be made after the warm-up time determined in 7.1.9.
of the scale with sufficient
...


Questions, Comments and Discussion
Ask us and Technical Secretary will try to provide an answer. You can facilitate discussion about the standard in here.