ASTM D2464-99
(Specification)Standard Specification for Threaded Poly(Vinyl Chloride) (PVC) Plastic Pipe Fittings, Schedule 80
Standard Specification for Threaded Poly(Vinyl Chloride) (PVC) Plastic Pipe Fittings, Schedule 80
SCOPE
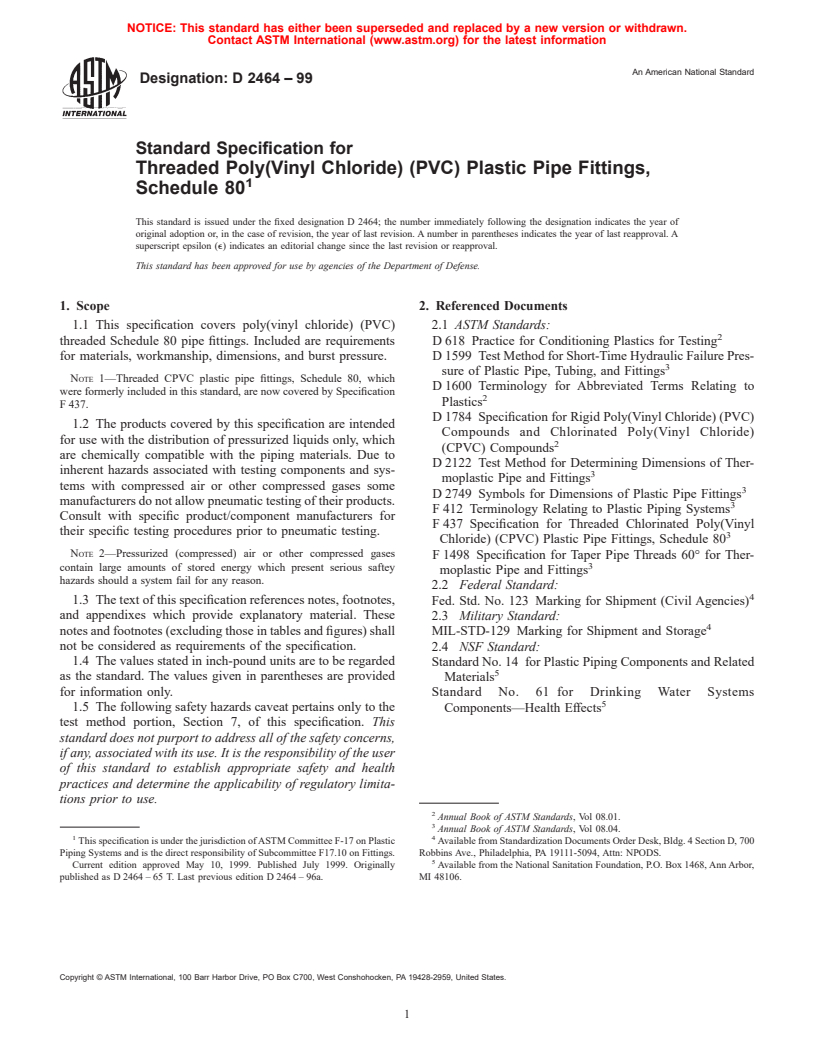
1.1 This specification covers poly(vinyl chloride) (PVC) threaded Schedule 80 pipe fittings. Included are requirements for materials, workmanship, dimensions, and burst pressure. Note 1-Threaded CPVC plastic pipe fittings, Schedule 80, which were formerly included in this standard, are now covered by Specification F437.
1.2 The text of this specification references notes, footnotes, and appendixes which provide explanatory material. These notes and footnotes (excluding those in tables and figures) shall not be considered as requirements of the specification.
1.3 The values stated in inch-pound units are to be regarded as the standard. The values given in parentheses are provided for information only.
1.4 The following safety hazards caveat pertains only to the test method portion, Section 7, of this specification. This standard does not purport to address all of the safety concerns, if any, associated with its use. It is the responsibility of the user of this standard to establish appropriate safety and health practices and determine the applicability of regulatory limitations prior to use.
General Information
Relations
Standards Content (Sample)
NOTICE: This standard has either been superseded and replaced by a new version or withdrawn.
Contact ASTM International (www.astm.org) for the latest information
An American National Standard
Designation: D 2464 – 99
Standard Specification for
Threaded Poly(Vinyl Chloride) (PVC) Plastic Pipe Fittings,
Schedule 80
This standard is issued under the fixed designation D 2464; the number immediately following the designation indicates the year of
original adoption or, in the case of revision, the year of last revision. A number in parentheses indicates the year of last reapproval. A
superscript epsilon (e) indicates an editorial change since the last revision or reapproval.
This standard has been approved for use by agencies of the Department of Defense.
1. Scope 2. Referenced Documents
1.1 This specification covers poly(vinyl chloride) (PVC) 2.1 ASTM Standards:
threaded Schedule 80 pipe fittings. Included are requirements D 618 Practice for Conditioning Plastics for Testing
for materials, workmanship, dimensions, and burst pressure. D 1599 Test Method for Short-Time Hydraulic Failure Pres-
sure of Plastic Pipe, Tubing, and Fittings
NOTE 1—Threaded CPVC plastic pipe fittings, Schedule 80, which
D 1600 Terminology for Abbreviated Terms Relating to
were formerly included in this standard, are now covered by Specification
Plastics
F 437.
D 1784 Specification for Rigid Poly(Vinyl Chloride) (PVC)
1.2 The products covered by this specification are intended
Compounds and Chlorinated Poly(Vinyl Chloride)
for use with the distribution of pressurized liquids only, which
(CPVC) Compounds
are chemically compatible with the piping materials. Due to
D 2122 Test Method for Determining Dimensions of Ther-
inherent hazards associated with testing components and sys-
moplastic Pipe and Fittings
tems with compressed air or other compressed gases some
D 2749 Symbols for Dimensions of Plastic Pipe Fittings
manufacturers do not allow pneumatic testing of their products.
F 412 Terminology Relating to Plastic Piping Systems
Consult with specific product/component manufacturers for
F 437 Specification for Threaded Chlorinated Poly(Vinyl
their specific testing procedures prior to pneumatic testing.
Chloride) (CPVC) Plastic Pipe Fittings, Schedule 80
NOTE 2—Pressurized (compressed) air or other compressed gases
F 1498 Specification for Taper Pipe Threads 60° for Ther-
contain large amounts of stored energy which present serious saftey
moplastic Pipe and Fittings
hazards should a system fail for any reason.
2.2 Federal Standard:
1.3 The text of this specification references notes, footnotes,
Fed. Std. No. 123 Marking for Shipment (Civil Agencies)
and appendixes which provide explanatory material. These 2.3 Military Standard:
notes and footnotes (excluding those in tables and figures) shall
MIL-STD-129 Marking for Shipment and Storage
not be considered as requirements of the specification. 2.4 NSF Standard:
1.4 The values stated in inch-pound units are to be regarded
Standard No. 14 for Plastic Piping Components and Related
as the standard. The values given in parentheses are provided Materials
for information only.
Standard No. 61 for Drinking Water Systems
1.5 The following safety hazards caveat pertains only to the Components—Health Effects
test method portion, Section 7, of this specification. This
standard does not purport to address all of the safety concerns,
if any, associated with its use. It is the responsibility of the user
of this standard to establish appropriate safety and health
practices and determine the applicability of regulatory limita-
tions prior to use.
Annual Book of ASTM Standards, Vol 08.01.
Annual Book of ASTM Standards, Vol 08.04.
1 4
This specification is under the jurisdiction of ASTM Committee F-17 on Plastic Available from Standardization Documents Order Desk, Bldg. 4 Section D, 700
Piping Systems and is the direct responsibility of Subcommittee F17.10 on Fittings. Robbins Ave., Philadelphia, PA 19111-5094, Attn: NPODS.
Current edition approved May 10, 1999. Published July 1999. Originally Available from the National Sanitation Foundation, P.O. Box 1468, Ann Arbor,
published as D 2464 – 65 T. Last previous edition D 2464 – 96a. MI 48106.
Copyright © ASTM International, 100 Barr Harbor Drive, PO Box C700, West Conshohocken, PA 19428-2959, United States.
D 2464 – 99
3. Terminology 6.1.1 The dimensions and tolerances of the fittings shall be
as shown in Table 1 and Table 2 when measured in accordance
3.1 General—Definitions are in accordance with Terminol-
with Test Method D 2122. Minimum dimensions have zero
ogy F 412, and abbreviations are in accordance with Terminol-
negative tolerances. Bushings shall have thread lengths appli-
ogy D 1600, unless otherwise indicated. The abbreviation for
cable to the corresponding sizes. Counterbore is optional, is not
poly(vinyl chloride) plastic is PVC.
shown in Table 1, and is not included in the center-to-end or
4. Classification
end-to-end dimensions.
4.1 General—This specification covers threaded Schedule
6.1.2 The maximum angular variation of any opening shall
80 PVC pipe fittings, made from four PVC plastic compounds be not more than ⁄2° off the true centerline axis.
and intended for use with threaded Iron Pipe Size (IPS)
6.1.3 Fittings Not Illustrated—All fittings, whether illus-
outside-diameter plastic pipe.
trated in Table 1 and Table 2 or not, shall have wall thicknesses
4.1.1 Fittings covered by this specification are normally
and thread dimensions conforming to 6.1 and 6.2.
molded. In-line fittings, such as couplings, unions, bushings,
6.2 Threads—For all fittings having taper pipe threads,
caps, nipples, etc., shall be molded or machined from extruded
threads shall conform to Specification F 1498 and be gaged in
stock.
accordance with 8.4.
4.1.2 Fittings fabricated by back welding or butt fusion are
6.3 Burst Pressure:
not included in this specification.
6.3.1 The burst strength of the fittings shall be not less than
5. Materials and Manufacture
that calculated for the size and wall thickness of the pipe with
which it is to be used, when calculated from the following
5.1 This specification covers PVC pipe fittings made from
equation:
five PVC plastics as classified in Specification D 1784. These
are PVC 12454-B, 12454-C, 13354-C, 11443-B, and 14333-D.
S 5 P~D t!/2t (1)
O
NOTE 3—Mechanical strength, heat resistance, flammability, and
chemical resistance requirements are covered in Specification D 1784.
where:
5.2 Rework Material—The manufacturers shall use only S = hoop stress, psi (or MPa),
P = internal pressure, psi (or MPa),
their own clean rework fitting material and the fittings pro-
D = average outside diameter, in. (or mm), and
duced shall meet all the requirements of this specification.
O
t = minimum wall thickness, in. (or mm).
6. Requirements
Fittings tested in accordance with 8.4 shall withstand the
6.1 Dimensions and Tolerances: minimum burst pressure shown in Table 3.
A
TABLE 1 Dimensions of 90° Ells, Tees, Crosses, 45° Elbows and Couplings (Straight Sizes), in. (mm)
Center to Thread
Length of Center to Thread Thread End to
Nominal End, 90° Elbows, Inside Diameter Nominal Wall Outside Diameter
B
Thread, T, End, 45° Elbow, K, Thread End of
B
Pipe Size Tees, Crosses, H, of Fitting, D, min Thickness, F, min of Band, M, min
min min Coupling, L, min
min
! 0.688 (17.48) 0.38 (9.65) 0.625 (15.88) 0.171 (4.34) 0.108 (2.74) 0.645 (16.40) 0.813 (20.65)
¼ 0.812 (20.63) 0.50 (12.70) 0.688 (17.48) 0.258 (6.55) 0.135 (3.43) 0.840 (21.30) 1.063 (27.00)
" 0.938 (23.83) 0.50 (12.70) 0.750 (19.05) 0.379 (9.63) 0.144 (3.66) 1.000 (25.40) 1.063 (27.00)
½ 1.125 (28.58) 0.64 (16.26) 0.750 (19.05) 0.502 (12.75) 0.198 (5.03) 1.280 (32.50) 1.344 (34.14)
[n|]P 1.250 (31.75) 0.65 (16.51) 1.000 (25.40) 0.698 (17.73) 0.207 (5.26) 1.500 (38.10) 1.500 (38.10)
1 1.500 (38.10) 0.81 (20.57) 1.125 (28.58) 0.911 (23.14) 0.225 (5.72) 1.810 (45.97) 1.688 (42.88)
1¼ 1.750 (44.45) 0.85 (21.59) 1.313 (33.35) 1.227 (31.17) 0.261 (6.63) 2.200 (55.88) 1.750 (44.45)
1½ 1.938 (49.23) 0.85 (21.54) 1.438 (36.53) 1.446 (36.73) 0.270 (6.86) 2.500 (63.50) 2.000 (50.80)
2 2.250 (57.15) 0.90 (22.86) 1.625 (41.28) 1.881 (47.78) 0.297 (7.54) 3.000 (76.20) 2.063 (52.40)
2½ 2.688 (68.28) 1.21 (30.73) 1.938 (49.23) 2.250 (57.15) 0.315 (8.00) 3.580 (90.42) 2.625 (66.68)
3 3.063 (77.80) 1.30 (33.02) 2.125 (53.48) 2.820 (71.65) 0.405 (10.29) 4.300 (104.22) 2.750 (69.85)
4 3.625 (92.08) 1.38 (35.05) 2.625 (66.68) 3.737 (94.92) 0.450 (11.43) 5.430 (137.92) 3.000 (76.20)
6 5.125 (130.18) 1.50 (38.10) 3.250 (82.55) 5.646 (143.41) 0.504 (12.80) 7.625 (193.68) 3.250 (82.55)
A
The sketches and designs of fittings shown are illustrative only.
B
This dimension locates the end of the fitting.
D 2464 – 99
A
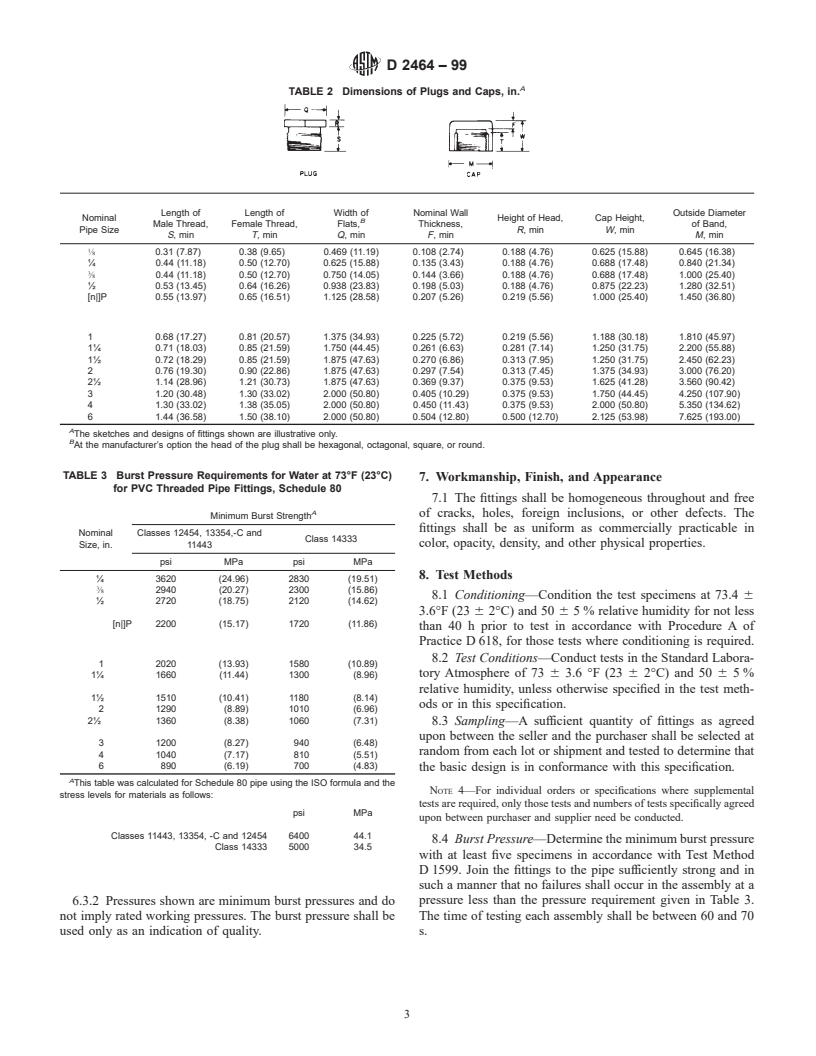
TABLE 2 Dimensions of Plugs and Caps, in.
Length of Length of Width of Nominal Wall Outside Diameter
Nominal Height of Head, Cap Height,
B
Male Thread, Female Thread, Flats, Thickness, of Band,
Pipe Size R, min W, min
S, min T, min Q, min F, min M, min
! 0.31 (7.87) 0.38 (9.65) 0.469 (11.19) 0.108 (2.74) 0.188 (4.76) 0.625 (15.88) 0.645 (16.38)
¼ 0.44 (11.18) 0.50
...


Questions, Comments and Discussion
Ask us and Technical Secretary will try to provide an answer. You can facilitate discussion about the standard in here.