ASTM D1474-98(2008)
(Test Method)Standard Test Methods for Indentation Hardness of Organic Coatings
Standard Test Methods for Indentation Hardness of Organic Coatings
SIGNIFICANCE AND USE
Indentation hardness measurements have proven to be useful in rating coatings on rigid substrates for their resistance to mechanical abuse, such as that produced by blows, gouging, and scratching. These measurements do not necessarily characterize the resistance to mechanical abuse of coatings that are required to remain intact when deformed.
SCOPE
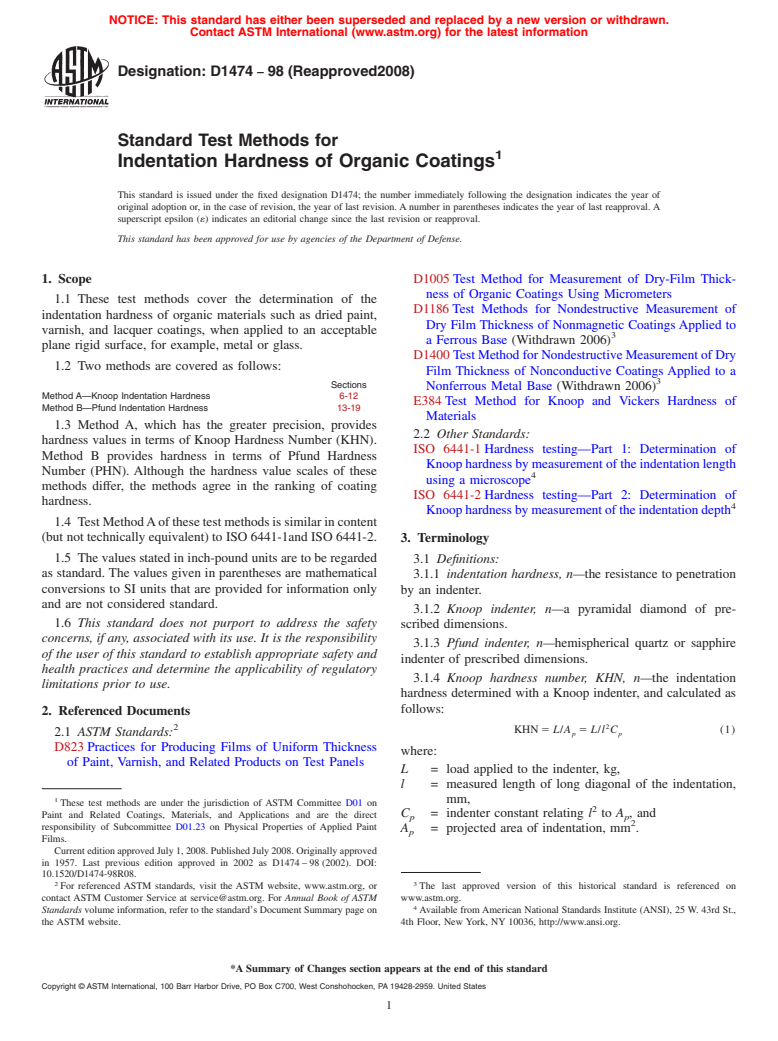
1.1 These test methods cover the determination of the indentation hardness of organic materials such as dried paint, varnish, and lacquer coatings, when applied to an acceptable plane rigid surface, for example, metal or glass.
1.2 Two methods are covered as follows:
Sections Method A—Knoop Indentation Hardness6-12 Method B—Pfund Indentation Hardness13-19
1.3 Method A, which has the greater precision, provides hardness values in terms of Knoop Hardness Number (KHN). Method B provides hardness in terms of Pfund Hardness Number (PHN). Although the hardness value scales of these methods differ, the methods agree in the ranking of coating hardness.
1.4 Test Method A of these test methods is similar in content (but not technically equivalent) to ISO 6441-1and ISO 6441-2.
1.5 The values stated in inch-pound units are to be regarded as standard. The values given in parentheses are mathematical conversions to SI units that are provided for information only and are not considered standard.
1.6 This standard does not purport to address the safety concerns, if any, associated with its use. It is the responsibility of the user of this standard to establish appropriate safety and health practices and determine the applicability of regulatory limitations prior to use.
General Information
Relations
Standards Content (Sample)
NOTICE: This standard has either been superseded and replaced by a new version or withdrawn.
Contact ASTM International (www.astm.org) for the latest information
Designation: D1474 − 98 (Reapproved2008)
Standard Test Methods for
Indentation Hardness of Organic Coatings
This standard is issued under the fixed designation D1474; the number immediately following the designation indicates the year of
original adoption or, in the case of revision, the year of last revision.Anumber in parentheses indicates the year of last reapproval.A
superscript epsilon (´) indicates an editorial change since the last revision or reapproval.
This standard has been approved for use by agencies of the Department of Defense.
1. Scope D1005Test Method for Measurement of Dry-Film Thick-
ness of Organic Coatings Using Micrometers
1.1 These test methods cover the determination of the
D1186Test Methods for Nondestructive Measurement of
indentation hardness of organic materials such as dried paint,
Dry Film Thickness of Nonmagnetic CoatingsApplied to
varnish, and lacquer coatings, when applied to an acceptable
a Ferrous Base (Withdrawn 2006)
plane rigid surface, for example, metal or glass.
D1400TestMethodforNondestructiveMeasurementofDry
1.2 Two methods are covered as follows:
Film Thickness of Nonconductive Coatings Applied to a
Sections
Nonferrous Metal Base (Withdrawn 2006)
Method A—Knoop Indentation Hardness 6-12
E384Test Method for Knoop and Vickers Hardness of
Method B—Pfund Indentation Hardness 13-19
Materials
1.3 Method A, which has the greater precision, provides
2.2 Other Standards:
hardness values in terms of Knoop Hardness Number (KHN).
ISO 6441-1Hardness testing—Part 1: Determination of
Method B provides hardness in terms of Pfund Hardness
Knoophardnessbymeasurementoftheindentationlength
Number (PHN). Although the hardness value scales of these
using a microscope
methods differ, the methods agree in the ranking of coating
ISO 6441-2Hardness testing—Part 2: Determination of
hardness.
Knoophardnessbymeasurementoftheindentationdepth
1.4 TestMethodAofthesetestmethodsissimilarincontent
(butnottechnicallyequivalent)toISO6441-1andISO6441-2.
3. Terminology
1.5 Thevaluesstatedininch-poundunitsaretoberegarded
3.1 Definitions:
as standard. The values given in parentheses are mathematical
3.1.1 indentation hardness, n—the resistance to penetration
conversions to SI units that are provided for information only
by an indenter.
and are not considered standard.
3.1.2 Knoop indenter, n—a pyramidal diamond of pre-
1.6 This standard does not purport to address the safety
scribed dimensions.
concerns, if any, associated with its use. It is the responsibility
3.1.3 Pfund indenter, n—hemispherical quartz or sapphire
of the user of this standard to establish appropriate safety and
indenter of prescribed dimensions.
health practices and determine the applicability of regulatory
3.1.4 Knoop hardness number, KHN, n—the indentation
limitations prior to use.
hardness determined with a Knoop indenter, and calculated as
follows:
2. Referenced Documents
KHN 5 L/A 5 L/l C (1)
2.1 ASTM Standards: p p
D823Practices for Producing Films of Uniform Thickness
where:
of Paint, Varnish, and Related Products on Test Panels
L = load applied to the indenter, kg,
l = measured length of long diagonal of the indentation,
1 mm,
These test methods are under the jurisdiction of ASTM Committee D01 on
Paint and Related Coatings, Materials, and Applications and are the direct C = indenter constant relating l to A , and
p p
responsibility of Subcommittee D01.23 on Physical Properties of Applied Paint
A = projected area of indentation, mm .
p
Films.
CurrenteditionapprovedJuly1,2008.PublishedJuly2008.Originallyapproved
in 1957. Last previous edition approved in 2002 as D1474–98(2002). DOI:
10.1520/D1474-98R08.
2 3
For referenced ASTM standards, visit the ASTM website, www.astm.org, or The last approved version of this historical standard is referenced on
contact ASTM Customer Service at service@astm.org. For Annual Book of ASTM www.astm.org.
Standards volume information, refer to the standard’s Document Summary page on Available fromAmerican National Standards Institute (ANSI), 25 W. 43rd St.,
the ASTM website. 4th Floor, New York, NY 10036, http://www.ansi.org.
*A Summary of Changes section appears at the end of this standard
Copyright © ASTM International, 100 Barr Harbor Drive, PO Box C700, West Conshohocken, PA 19428-2959. United States
D1474 − 98 (2008)
3.1.5 Pfund hardness number, PHN, n—the indentation 7.2 Knoop Indenter—The Knoop indenter is a pyramidal
hardness determined with a Pfund indenter, and calculated as diamond with included longitudinal angles of 172° 30' and
follows: included transverse angle of 130° 0'.
2 2
PHN 5 L/A 54L/πd 51.27 L/d (2)
~ !
NOTE 1—The ratio of the long to the short diagonal of the impression
is approximately 7:1; the ratio of the long diagonal to the depth of
where:
penetration is approximately 30:1.
L = load/kg applied to the indenter, kg,
7.3 Microscope—Themicroscopeshallhaveafilarmicrom-
A = area of projected indentation, mm , and
eter eyepiece and sufficient objectives to permit the measure-
d = diameter of projected indentation, mm.
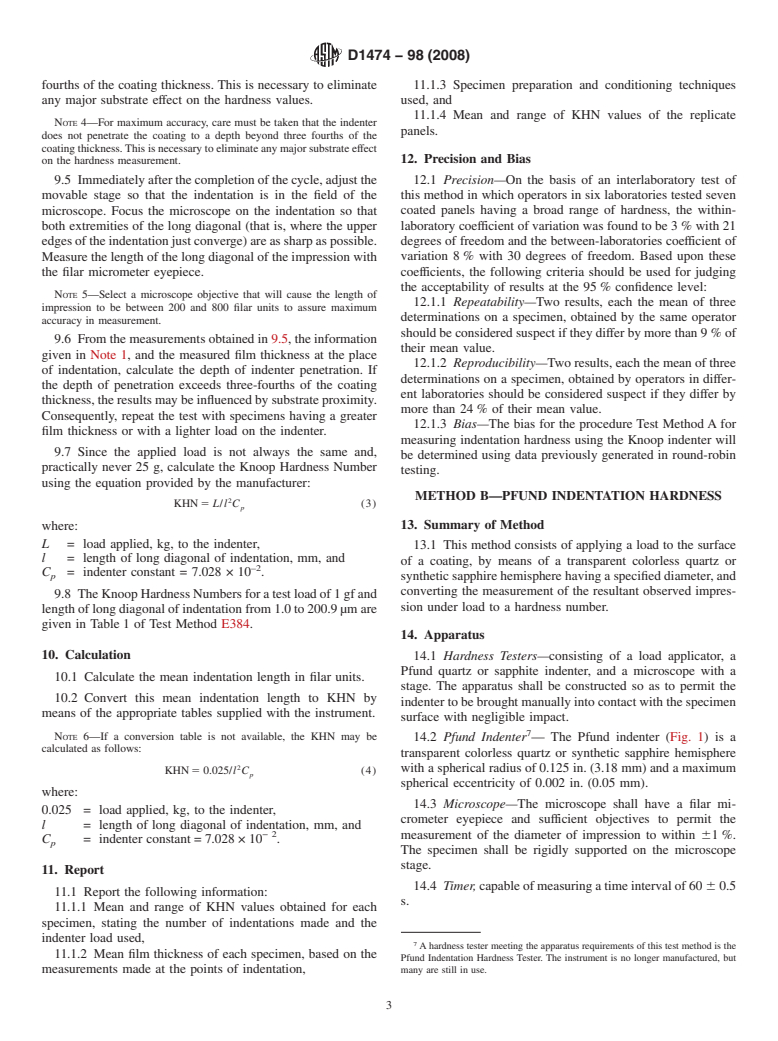
ment of the length of impression to within 61%. The
specimen shall be firmly supported on a movable micrometer
4. Significance and Use
stage attached to the microscope.
4.1 Indentation hardness measurements have proven to be
8. Calibration
useful in rating coatings on rigid substrates for their resistance
tomechanicalabuse,suchasthatproducedbyblows,gouging,
8.1 Adjust the illumination in the microscope to give
and scratching. These measurements do not necessarily char-
maximum contrast when viewing an indentation.
acterize the resistance to mechanical abuse of coatings that are
8.2 By means of a calibrated scale, determine the factor for
required to remain intact when deformed.
each microscope objective that converts the filar scale units of
the eyepiece to millimetres.
5. Test Specimens
8.3 With a 25-g load on the indenter, determine the KHN of
5.1 The substrate for the coating shall be an acceptable
a calibrated standard (Note 2) with an assigned value not
plane rigid surface such as glass or metal.
greater than 50 KHN. If the obtained value is within 65%of
5.2 Thecoatingthicknessonanyonepanelshallbeuniform
the assigned value, the instrument is considered to be in
within 0.1 mil (3 µm). Coatings to be compared shall be of
calibration.
equalthicknesswithin0.2mil(5µm).Formaximumaccuracy,
NOTE 2—A suitable source of standard reference materials in this
the minimum permissible coating thickness shall be such that
hardness range is available from the U.S. National Institute for Standards
the depth of indentation does not exceed three fourths of the
and Technology. By agreement of the parties concerned, a stable
coating thickness, to minimize the effect of the substrate.
specimen (such as an aged coating or a baked enamel applied to a flat
substrate) could be used to calibrate the participating hardness testers.
5.3 At least three replicate specimens shall be tested for
each coating to be evaluated.
9. Procedure
5.4 CoatingsshouldbeappliedinaccordancewithPractices
9.1 Unless otherwise specified, make the hardness determi-
D823 and their dry film thickness should be measured in
nations at 73.5 6 3.50°F (23 6 2°C) and 50 6 5% relative
accordance with Test Methods D1005, D1186,or D1400.
humidity after equilibrating the specimens under these condi-
tions for at least 24 h.
5.5 From precoated sheets cut at least three specimens. Use
only plane (flat) sheets and round the edges slightly. The
9.2 Rigidlyattachthespecimentothemovablestagesothat
coating shall be free of oil and other foreign matter. Measure
the surface to be measured is normal to the direction of
the film thickness as in 5.4.
indentation. Mount the panel so that is cannot move with
respect to the stage in any direction during the test.
METHOD A—KNOOP INDENTATION HARDNESS
9.3 Usethemicroscopetoselectanareaofthetestspecimen
6. Summary of Method that is free of surface irregularities and imperfections. Place
this area under the indenter by means of the movable microm-
6.1 Thismethodconsistsofapplyingaloadtothesurfaceof
eter stage.
a coating by means of a pyramidal shaped diamond having
specified face angles, and converting the measurements of the NOTE 3—If good impressions cannot be obtained because of the
roughness of the surface of the specimen, gently polish the surface with
resultant permanent impression to a hardness number.
No.400carborundumandfinishoffwithjewelersrougebeforemakingthe
impression.
7. Apparatus
9.4 Present the apparatus to apply a load that permits the
7.1 Hardness Tester, consisting of a load applicator, a
length of identification to read accurately but does not cause
Knoop indenter, and a microscope fitted with a movable
thedepthofindentationtoexceedthree-quartersofthecoating
micrometer stage. The apparatus shall mechanically bring the
film thickness. Start the test cycle so that the indenter is
indenter into contact with the test surface with negligible
mechanically brought into contact with the mounted specimen
impact, apply the selected full load, maintain it for 18 6 0.5 s,
under a load of 25 g and full load is applied, maintained for 18
and withdraw the indenter.
6 0.5 s, and removed. For maximum accuracy, ensure that the
indenterhasnotpenetratedthecoatingtoadepthbeyondthree
A hardness tester meeting the apparatus requirements for this method is the
Tukon Microhardness Tester, available from the Wilson Instruments, Inc., Division Available from National Institute of Standards and Technology (NIST), 100
of Instron, 100 Royall St., Canton, MA 02021. Bureau Dr., Stop 1070, Gaithersburg, MD 20899-1070, http://www.nist.gov.
D1474 − 98 (2008)
fourths of the coating thickness. This is necessary to eliminate 11.1.3 Specimen preparation and conditioning techniques
any major substrate effect on the hardness values. used, and
11.1.4 Mean and range of KHN values of the replicate
NOTE
...


Questions, Comments and Discussion
Ask us and Technical Secretary will try to provide an answer. You can facilitate discussion about the standard in here.