ASTM F758-14(2023)
(Specification)Standard Specification for Smooth-Wall Poly(Vinyl Chloride) (PVC) Plastic Underdrain Systems for Highway, Airport, and Similar Drainage
Standard Specification for Smooth-Wall Poly(Vinyl Chloride) (PVC) Plastic Underdrain Systems for Highway, Airport, and Similar Drainage
ABSTRACT
This specification covers the requirements for smooth-wall perforated and nonperforated poly(vinyl chloride) (PVC) plastic pipe and couplings for use in subsurface drainage systems of highways, airports, and similar applications. Two classes (or pipe stiffness) are included and designated as PS 28 and PS 46. The pipe stiffness, impact resistance, pipe flattening, and solvent cement joint tightness shall be tested to meet the requirements prescribed.
SCOPE
1.1 This specification covers the requirements for smooth-wall perforated and nonperforated poly(vinyl chloride) (PVC) plastic pipe and couplings for use in subsurface drainage systems of highways, airports, and similar applications in nominal sizes of 4, 6, and 8 in. and in pipe stiffnesses (PS) that are designated as Type PS 28 and Type PS 46 in accordance with its minimum pipe stiffness.
1.2 Molded fittings for use with highway underdrain pipe are in accordance with Specification D3034. For convenience, some of these fittings are reproduced in Annex A1.
1.3 The values stated in inch-pound units are to be regarded as the standard. The values given in parentheses are for information only.
Note 1: Type PS 28 and Type PS 46 indicate “pipe stiffness” of 28 and 46, respectively, as outlined in 11.1.
Note 2: Pipe and fittings should be installed in accordance with Practice D2321, or applicable state or local specifications.
1.4 Units—The values stated in inch-pound units are to be regarded as standard. The values given in parentheses are mathematical conversions to SI units that are provided for information only and are not considered standard.
1.5 The following safety hazards caveat pertains only to the test methods portion, Section 11, of this specification: This standard does not purport to address all of the safety concerns, if any, associated with its use. It is the responsibility of the user of this standard to establish appropriate safety, health, and environmental practices and determine the applicability of regulatory limitations prior to use.
1.6 This international standard was developed in accordance with internationally recognized principles on standardization established in the Decision on Principles for the Development of International Standards, Guides and Recommendations issued by the World Trade Organization Technical Barriers to Trade (TBT) Committee.
General Information
- Status
- Published
- Publication Date
- 30-Jun-2023
- Technical Committee
- F17 - Plastic Piping Systems
- Drafting Committee
- F17.65 - Land Drainage
Relations
- Effective Date
- 01-Nov-2023
- Effective Date
- 01-Aug-2020
- Effective Date
- 01-Aug-2020
- Effective Date
- 01-Apr-2020
- Effective Date
- 15-Mar-2020
- Effective Date
- 15-Jan-2020
- Effective Date
- 01-Jan-2019
- Effective Date
- 01-Aug-2018
- Effective Date
- 01-Mar-2018
- Refers
ASTM D1600-18 - Standard Terminology for Abbreviated Terms Relating to Plastics (Withdrawn 2024) - Effective Date
- 01-Jan-2018
- Effective Date
- 15-Nov-2017
- Effective Date
- 01-Nov-2017
- Effective Date
- 01-Aug-2017
- Effective Date
- 01-Feb-2017
- Effective Date
- 15-Nov-2016
Overview
ASTM F758-14(2023), published by ASTM International, sets the standard specification for smooth-wall poly(vinyl chloride) (PVC) plastic underdrain systems used in subsurface drainage for highways, airports, and similar applications. This standard covers both perforated and nonperforated PVC pipes and couplings designed to efficiently collect and convey subsurface water. It details specific requirements for materials, dimensions, workmanship, pipe stiffness, and performance, ensuring reliability and long-term performance in demanding drainage applications.
Key Topics
- Pipe Types and Sizes: The standard specifies smooth-wall PVC pipes in nominal sizes of 4, 6, and 8 inches, available in two classes of pipe stiffness (PS 28 and PS 46).
- Material Requirements: Pipes must be manufactured from PVC compounds that meet minimum cell classifications as defined in referenced ASTM specifications, ensuring durability and resistance to environmental factors.
- Performance Testing: Requirements include tests for pipe stiffness, impact resistance, pipe flattening, and solvent cement joint tightness, providing assurance of structural integrity.
- Workmanship and Appearance: Pipes must be homogeneous and free from defects such as cracks, holes, and inclusions that could impair their function.
- Joints and Fittings: Both gasket-type and solvent cement-type joints are permitted. Molded fittings for underdrain pipes must comply with ASTM D3034.
- Marking and Certification: Pipes and fittings must be clearly marked with key identification details, and certification is available upon request to verify compliance.
- Quality Control: Comprehensive testing and quality procedures are required to ensure ongoing batch compliance with the standard.
Applications
This standard is highly relevant for:
- Highway Drainage Systems: Used to prevent water accumulation under pavements, extending road longevity and safety.
- Airport Subsurface Drainage: Ensures rapid removal of water from critical areas such as runways and taxiways.
- General Infrastructure: Applicable in other civil and municipal projects requiring reliable subsurface drainage, such as parking lots or sports complexes.
- Installation: Pipes and fittings covered by this standard should be installed according to ASTM D2321 or any applicable local or state specifications to ensure optimal performance.
Key benefits of using standard-compliant PVC underdrain systems include:
- Corrosion Resistance: PVC pipes offer excellent resistance to chemical and biological attack in subsurface environments.
- Structural Performance: The specified pipe stiffness (PS 28 and PS 46) ensures pipes maintain shape and function under load.
- Ease of Handling and Installation: Lightweight and durable, PVC pipes are easy to transport and install, reducing labor costs.
Related Standards
Several other ASTM standards are referenced or related to the requirements of ASTM F758-14(2023):
- ASTM D3034: Specification for Type PSM PVC Sewer Pipe and Fittings.
- ASTM D2321: Practice for Underground Installation of Thermoplastic Pipe for Sewers and Other Gravity-Flow Applications.
- ASTM D1784/D4396: Standards outlining material classifications for PVC pipe compounds.
- ASTM D2412/D2444: Test methods for determining external loading characteristics and impact resistance.
- ASTM D2564/D2855: Guidelines for solvent cements and joining methods for PVC piping systems.
- ASTM D3212: Specification for joints using flexible elastomeric seals.
Conclusion
ASTM F758-14(2023) provides comprehensive requirements for smooth-wall PVC underdrain systems, helping engineers, contractors, and municipalities ensure the dependability and performance of subsurface drainage systems in highways, airports, and similar infrastructure. Adherence to this standard enhances safety, durability, and cost-effectiveness in drainage installations, while providing confidence in quality and compliance.
Buy Documents
ASTM F758-14(2023) - Standard Specification for Smooth-Wall Poly(Vinyl Chloride) (PVC) Plastic Underdrain Systems for Highway, Airport, and Similar Drainage
Get Certified
Connect with accredited certification bodies for this standard

Institut za varilstvo d.o.o. (Welding Institute)
Slovenia's leading welding institute since 1952. ISO 3834, EN 1090, pressure equipment certification, NDT personnel, welder qualification. Only IIW Au
Sponsored listings
Frequently Asked Questions
ASTM F758-14(2023) is a technical specification published by ASTM International. Its full title is "Standard Specification for Smooth-Wall Poly(Vinyl Chloride) (PVC) Plastic Underdrain Systems for Highway, Airport, and Similar Drainage". This standard covers: ABSTRACT This specification covers the requirements for smooth-wall perforated and nonperforated poly(vinyl chloride) (PVC) plastic pipe and couplings for use in subsurface drainage systems of highways, airports, and similar applications. Two classes (or pipe stiffness) are included and designated as PS 28 and PS 46. The pipe stiffness, impact resistance, pipe flattening, and solvent cement joint tightness shall be tested to meet the requirements prescribed. SCOPE 1.1 This specification covers the requirements for smooth-wall perforated and nonperforated poly(vinyl chloride) (PVC) plastic pipe and couplings for use in subsurface drainage systems of highways, airports, and similar applications in nominal sizes of 4, 6, and 8 in. and in pipe stiffnesses (PS) that are designated as Type PS 28 and Type PS 46 in accordance with its minimum pipe stiffness. 1.2 Molded fittings for use with highway underdrain pipe are in accordance with Specification D3034. For convenience, some of these fittings are reproduced in Annex A1. 1.3 The values stated in inch-pound units are to be regarded as the standard. The values given in parentheses are for information only. Note 1: Type PS 28 and Type PS 46 indicate “pipe stiffness” of 28 and 46, respectively, as outlined in 11.1. Note 2: Pipe and fittings should be installed in accordance with Practice D2321, or applicable state or local specifications. 1.4 Units—The values stated in inch-pound units are to be regarded as standard. The values given in parentheses are mathematical conversions to SI units that are provided for information only and are not considered standard. 1.5 The following safety hazards caveat pertains only to the test methods portion, Section 11, of this specification: This standard does not purport to address all of the safety concerns, if any, associated with its use. It is the responsibility of the user of this standard to establish appropriate safety, health, and environmental practices and determine the applicability of regulatory limitations prior to use. 1.6 This international standard was developed in accordance with internationally recognized principles on standardization established in the Decision on Principles for the Development of International Standards, Guides and Recommendations issued by the World Trade Organization Technical Barriers to Trade (TBT) Committee.
ABSTRACT This specification covers the requirements for smooth-wall perforated and nonperforated poly(vinyl chloride) (PVC) plastic pipe and couplings for use in subsurface drainage systems of highways, airports, and similar applications. Two classes (or pipe stiffness) are included and designated as PS 28 and PS 46. The pipe stiffness, impact resistance, pipe flattening, and solvent cement joint tightness shall be tested to meet the requirements prescribed. SCOPE 1.1 This specification covers the requirements for smooth-wall perforated and nonperforated poly(vinyl chloride) (PVC) plastic pipe and couplings for use in subsurface drainage systems of highways, airports, and similar applications in nominal sizes of 4, 6, and 8 in. and in pipe stiffnesses (PS) that are designated as Type PS 28 and Type PS 46 in accordance with its minimum pipe stiffness. 1.2 Molded fittings for use with highway underdrain pipe are in accordance with Specification D3034. For convenience, some of these fittings are reproduced in Annex A1. 1.3 The values stated in inch-pound units are to be regarded as the standard. The values given in parentheses are for information only. Note 1: Type PS 28 and Type PS 46 indicate “pipe stiffness” of 28 and 46, respectively, as outlined in 11.1. Note 2: Pipe and fittings should be installed in accordance with Practice D2321, or applicable state or local specifications. 1.4 Units—The values stated in inch-pound units are to be regarded as standard. The values given in parentheses are mathematical conversions to SI units that are provided for information only and are not considered standard. 1.5 The following safety hazards caveat pertains only to the test methods portion, Section 11, of this specification: This standard does not purport to address all of the safety concerns, if any, associated with its use. It is the responsibility of the user of this standard to establish appropriate safety, health, and environmental practices and determine the applicability of regulatory limitations prior to use. 1.6 This international standard was developed in accordance with internationally recognized principles on standardization established in the Decision on Principles for the Development of International Standards, Guides and Recommendations issued by the World Trade Organization Technical Barriers to Trade (TBT) Committee.
ASTM F758-14(2023) is classified under the following ICS (International Classification for Standards) categories: 23.040.20 - Plastics pipes. The ICS classification helps identify the subject area and facilitates finding related standards.
ASTM F758-14(2023) has the following relationships with other standards: It is inter standard links to ASTM D2152-23, ASTM D2564-20, ASTM D2855-20, ASTM F412-20, ASTM D2321-20, ASTM D1784-20, ASTM F412-19, ASTM D2564-12(2018), ASTM D2321-18, ASTM D1600-18, ASTM D2444-17, ASTM D2152-17, ASTM F412-17a, ASTM F412-17, ASTM F412-16a. Understanding these relationships helps ensure you are using the most current and applicable version of the standard.
ASTM F758-14(2023) is available in PDF format for immediate download after purchase. The document can be added to your cart and obtained through the secure checkout process. Digital delivery ensures instant access to the complete standard document.
Standards Content (Sample)
This international standard was developed in accordance with internationally recognized principles on standardization established in the Decision on Principles for the
Development of International Standards, Guides and Recommendations issued by the World Trade Organization Technical Barriers to Trade (TBT) Committee.
Designation: F758 − 14 (Reapproved 2023)
Standard Specification for
Smooth-Wall Poly(Vinyl Chloride) (PVC) Plastic Underdrain
Systems for Highway, Airport, and Similar Drainage
This standard is issued under the fixed designation F758; the number immediately following the designation indicates the year of original
adoption or, in the case of revision, the year of last revision. A number in parentheses indicates the year of last reapproval. A superscript
epsilon (´) indicates an editorial change since the last revision or reapproval.
This standard has been approved for use by agencies of the U.S. Department of Defense.
1. Scope* mendations issued by the World Trade Organization Technical
Barriers to Trade (TBT) Committee.
1.1 This specification covers the requirements for smooth-
wall perforated and nonperforated poly(vinyl chloride) (PVC)
2. Referenced Documents
plastic pipe and couplings for use in subsurface drainage
2.1 ASTM Standards:
systems of highways, airports, and similar applications in
D618 Practice for Conditioning Plastics for Testing
nominal sizes of 4, 6, and 8 in. and in pipe stiffnesses (PS) that
D1600 Terminology for Abbreviated Terms Relating to Plas-
are designated as Type PS 28 and Type PS 46 in accordance
tics
with its minimum pipe stiffness.
D1784 Classification System and Basis for Specification for
1.2 Molded fittings for use with highway underdrain pipe
Rigid Poly(Vinyl Chloride) (PVC) Compounds and Chlo-
are in accordance with Specification D3034. For convenience,
rinated Poly(Vinyl Chloride) (CPVC) Compounds
some of these fittings are reproduced in Annex A1.
D2122 Test Method for Determining Dimensions of Ther-
1.3 The values stated in inch-pound units are to be regarded moplastic Pipe and Fittings
D2152 Test Method for Adequacy of Fusion of Extruded
as the standard. The values given in parentheses are for
information only. Poly(Vinyl Chloride) (PVC) Pipe and Molded Fittings by
Acetone Immersion
NOTE 1—Type PS 28 and Type PS 46 indicate “pipe stiffness” of 28 and
D2321 Practice for Underground Installation of Thermoplas-
46, respectively, as outlined in 11.1.
tic Pipe for Sewers and Other Gravity-Flow Applications
NOTE 2—Pipe and fittings should be installed in accordance with
Practice D2321, or applicable state or local specifications.
D2412 Test Method for Determination of External Loading
Characteristics of Plastic Pipe by Parallel-Plate Loading
1.4 Units—The values stated in inch-pound units are to be
D2444 Practice for Determination of the Impact Resistance
regarded as standard. The values given in parentheses are
of Thermoplastic Pipe and Fittings by Means of a Tup
mathematical conversions to SI units that are provided for
(Falling Weight)
information only and are not considered standard.
D2564 Specification for Solvent Cements for Poly(Vinyl
1.5 The following safety hazards caveat pertains only to the
Chloride) (PVC) Plastic Piping Systems
test methods portion, Section 11, of this specification: This
D2855 Practice for the Two-Step (Primer and Solvent Ce-
standard does not purport to address all of the safety concerns,
ment) Method of Joining Poly (Vinyl Chloride) (PVC) or
if any, associated with its use. It is the responsibility of the user
Chlorinated Poly (Vinyl Chloride) (CPVC) Pipe and
of this standard to establish appropriate safety, health, and
Piping Components with Tapered Sockets
environmental practices and determine the applicability of
D3034 Specification for Type PSM Poly(Vinyl Chloride)
regulatory limitations prior to use.
(PVC) Sewer Pipe and Fittings
1.6 This international standard was developed in accor-
D3212 Specification for Joints for Drain and Sewer Plastic
dance with internationally recognized principles on standard-
Pipes Using Flexible Elastomeric Seals
ization established in the Decision on Principles for the
D4396 Specification for Rigid Poly(Vinyl Chloride) (PVC)
Development of International Standards, Guides and Recom-
and Chlorinated Poly(Vinyl Chloride) (CPVC) Com-
pounds for Plastic Pipe and Fittings Used in Nonpressure
Applications
This specification is under the jurisdiction of ASTM Committee F17 on Plastic
Piping Systems and is the direct responsibility of Subcommittee F17.65 on Land
Drainage. For referenced ASTM standards, visit the ASTM website, www.astm.org, or
Current edition approved July 1, 2023. Published July 2023. Originally approved contact ASTM Customer Service at service@astm.org. For Annual Book of ASTM
in 1982. Last previous edition approved in 2019 as F758 – 14(2019). DOI: Standards volume information, refer to the standard’s Document Summary page on
10.1520/F0758-23. the ASTM website.
*A Summary of Changes section appears at the end of this standard
Copyright © ASTM International, 100 Barr Harbor Drive, PO Box C700, West Conshohocken, PA 19428-2959. United States
F758 − 14 (2023)
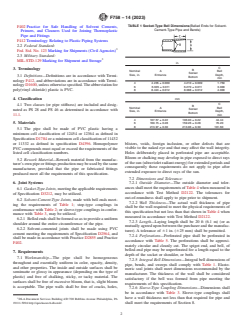
TABLE 1 Socket-Type Bell Dimensions(Belled Ends for Solvent-
F402 Practice for Safe Handling of Solvent Cements,
Cement-Type Pipe and Bends)
Primers, and Cleaners Used for Joining Thermoplastic
Pipe and Fittings
F412 Terminology Relating to Plastic Piping Systems
2.2 Federal Standard:
Fed. Std. No. 123 Marking for Shipments (Civil Agencies)
2.3 Military Standard:
MIL-STD-129 Marking for Shipment and Storage
in.
C
3. Terminology
B
Nominal A Bell
Socket
Size, in. Entrance Depth,
3.1 Definitions—Definitions are in accordance with Termi-
Bottom
min
nology F412, and abbreviations are in accordance with Termi-
4 4.235 ± 0.009 4.210 ± 0.009 1.750
nology D1600, unless otherwise specified. The abbreviation for
6 6.305 ± 0.011 6.270 ± 0.011 3.000
poly(vinyl chloride) plastic is PVC.
8 8.424 ± 0.012 8.388 ± 0.012 4.000
4. Classification
mm
C
4.1 Two classes (or pipe stiffness) are included and desig-
B
Nominal A Bell
Socket
nated as PS 28 and PS 46 as determined in accordance with
Size, in. Entrance Depth,
Bottom
11.1.
min
4 107.57 ± 0.22 106.93 ± 0.22 44.44
5. Materials 6 160.15 ± 0.28 159.26 ± 0.28 76.20
8 213.97 ± 0.30 213.06 ± 0.30 101.60
5.1 The pipe shall be made of PVC plastic having a
minimum cell classification of 12454 or 12364 as defined in
Specification D1784 or a minimum cell classification of 11432
blisters, voids, foreign inclusion, or other defects that are
or 11332 as defined in specification D4396. Homopolymer
PVC compounds must equal or exceed the requirements of the visible to the naked eye and that may affect the wall integrity.
Holes deliberately placed in perforated pipe are acceptable.
listed cell classification numbers.
Bloom or chalking may develop in pipe exposed to direct rays
5.2 Rework Material—Rework material from the manufac-
of the sun (ultraviolet radiant energy) for extended periods and
turer’s own pipe or fittings production may be used by the same
consequently these requirements do not apply to pipe after
manufacturer, provided that the pipe or fabricated fittings
extended exposure to direct rays of the sun.
produced meet all the requirements of this specification.
7.2 Dimensions and Tolerance:
6. Joint Systems
7.2.1 Outside Diameter—The outside diameter and toler-
ances shall meet the requirements of Table 4 when measured in
6.1 Gasket-Type Joints, meeting the applicable requirements
accordance with Test Method D2122. The tolerances for
of Specification D3212, may be utilized.
out-of-roundness shall apply to pipe prior to shipment.
6.2 Solvent-Cement-Type Joints, made with bell ends meet-
7.2.2 Wall Thickness—The actual wall thickness of pipe
ing the requirements of Table 1; stop-type couplings in
shall be the wall required to meet the physical requirements of
conformance with Table 2; or sleeve-type couplings in confor-
this specification but not less than that shown in Table 4 when
mance with Table 3, may be utilized.
measured in accordance with Test Method D2122.
6.2.1 Belled ends shall be formed so as to provide a uniform
7.2.3 Length—Laying length shall be 20 ft (6.1 m) (or as
shoulder around the entire circumference of the pipe.
mutually agreed upon between the purchaser and the manufac-
6.2.2 Solvent-cemented joints shall be made using PVC
turer). A tolerance of 61 in. (625 mm) shall be permitted.
cement meeting the requirements of Specification D2564, and
7.2.4 Perforations—Perforated pipe shall be perforated in
shall be made in accordance with Practice D2855 and Practice
accordance with Table 5. The perforations shall be approxi-
F402.
mately circular and cleanly cut. The spigot end, and bell, of
belled-end pipe may be unperforated for a length equal to the
7. Requirements
depth of the socket or shoulder, or both.
7.1 Workmanship—The pipe shall be homogeneous
7.2.5 Integral Bell Dimensions—Integral bell dimensions of
throughout and essentially uniform in color, opacity, density,
pipe, bends, and sweeps shall comply with Table 1. Elasto-
and other properties. The inside and outside surfaces shall be
meric seal joints shall meet dimensions recommended by the
semimatte or glossy in appearance (depending on the type of
manufacturer. The thickness of the wall shall be considered
plastic) and free of chalking, sticky, or tacky material. The
satisfactory if the bell was formed from pipe meeting the
surfaces shall be free of excessive bloom, that is, slight bloom
requirements of this specification.
is acceptable. The pipe walls shall be free of cracks, holes,
7.2.6 Sleeve-Type Coupling Dimensions—Dimensions shall
be in accordance with Table 3. Sleeve-type couplings shall
have a wall thickness not less than that required for pipe and
DLA Document Services Building 4/D 700 Robbins Avenue Philadelphia, PA
19111-5094 http://quicksearch.dla.mil/. shall meet the requirements of Section 8.
F758 − 14 (2023)
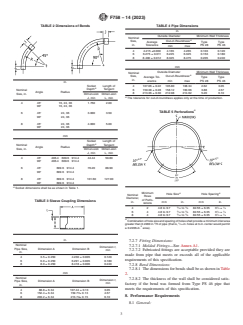
TABLE 2 Dimensions of Bends TABLE 4 Pipe Dimensions
in.
Outside Diameter Minimum Wall Thickness
Nominal
A
Size, Out-of-Roundness
Average Type Type
in.
Tolerance PS 28 PS 46
min max
4 4.215 ±0.009 4.165 4.265 0.103 0.120
6 6.275 ± 0.011 6.225 6.325 0.153 0.180
8 8.400 ± 0.012 8.325 8.475 0.205 0.240
mm
Outside Diameter Minimum Wall Thickness
Nominal
A
Size, Out-of-Roundness
Average Tol- Type Type
in.
erance PS 28 PS 46
min max
in.
Socket Length of 4 107.06 ± 0.22 105.80 108.34 2.62 3.05
A
Depth Tangent 6 159.38 ± 0.28 158.12 160.66 3.88 4.57
Nominal
Angle Radius
8 213.36 ± 0.30 212.08 214.62 5.20 6.10
Size, in.
Dimen-sion Dimen-sion
A
J, min L, min
The tolerance for out-of-roundness applies only at the time of production.
4 45° 16, 24, 36 1.750 2.00
90° 16, 24, 36
A
TABLE 5 Perforations
6 45° 24, 36 3.000 3.50
90° 24, 36
8 45° 24, 36 4.000 5.00
90° 24, 36
mm
Socket Length of
A
Depth Tangent
Nominal
Angle Radius
Size, in.
Dimen-sion Dimen-sion
J, min L, min
4 45° 406.4 609.6 914.4 44.44 50.80
90° 406.4 609.6 914.4
6 45° 609.6 914.4 76.20 88.90
90° 609.6 914.4
8 45° 609.6 914.4 101.60 127.00
90° 609.6 914.4
A
Socket dimensions shall be as shown in Table 1.
Minimum
A A
Hole Size Hole Spacing
Nominal
Rows
Diameter,
of Perfo-
TABLE 3 Sleeve Coupling Dimensions
in. mm in. mm in.
rations
3 3 1 1
4 2 4.8 to 9.7 ⁄16 to ⁄8 82.55 ± 6.35 3 ⁄4 ± ⁄4
3 3 1 1
6 4 4.8 to 9.7 ⁄16 to ⁄8 82.55 ± 6.35 3 ⁄4 ± ⁄4
3 3 1 1
8 4 4.8 to 9.7 ⁄16 to ⁄8 82.55 ± 6.35 3 ⁄4 ± ⁄4
A
Combination of hole size and spacing of holes shall provide a minimum inlet area
greater than 0.2200 in. /ft of pipe (that is, ⁄16-in. holes at 3-in. center would permit
a 0.2206-in. area).
in.
7.2.7 Fitting Dimensions:
Nominal
7.2.7.1 Molded Fittings—See Annex A1.
Dimension t,
Pipe Size, Dimension A Dimension B
min 7.2.7.2 Fabricated fittings are acceptable provided they are
in.
made fr
...


Questions, Comments and Discussion
Ask us and Technical Secretary will try to provide an answer. You can facilitate discussion about the standard in here.
Loading comments...