ASTM F519-12a
(Test Method)Standard Test Method for Mechanical Hydrogen Embrittlement Evaluation of Plating/Coating Processes and Service Environments
Standard Test Method for Mechanical Hydrogen Embrittlement Evaluation of Plating/Coating Processes and Service Environments
SIGNIFICANCE AND USE
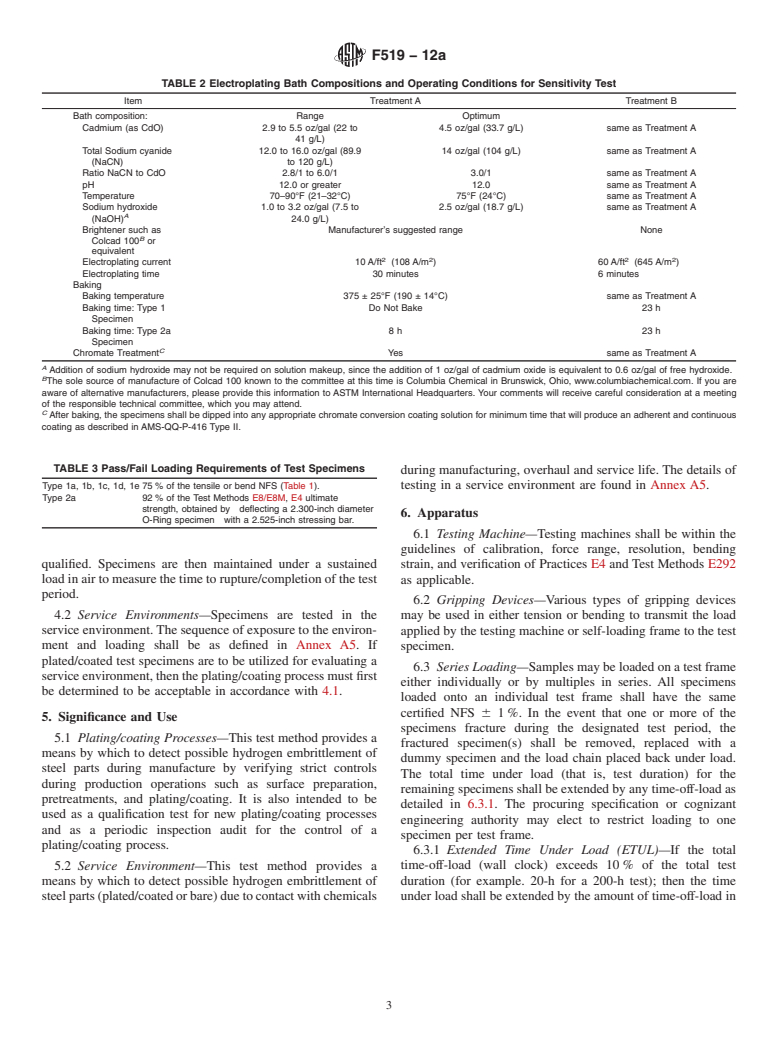
5.1 Plating/coating Processes—This test method provides a means by which to detect possible hydrogen embrittlement of steel parts during manufacture by verifying strict controls during production operations such as surface preparation, pretreatments, and plating/coating. It is also intended to be used as a qualification test for new plating/coating processes and as a periodic inspection audit for the control of a plating/coating process.
5.2 Service Environment—This test method provides a means by which to detect possible hydrogen embrittlement of steel parts (plated/coated or bare) due to contact with chemicals during manufacturing, overhaul and service life. The details of testing in a service environment are found in Annex A5.
SCOPE
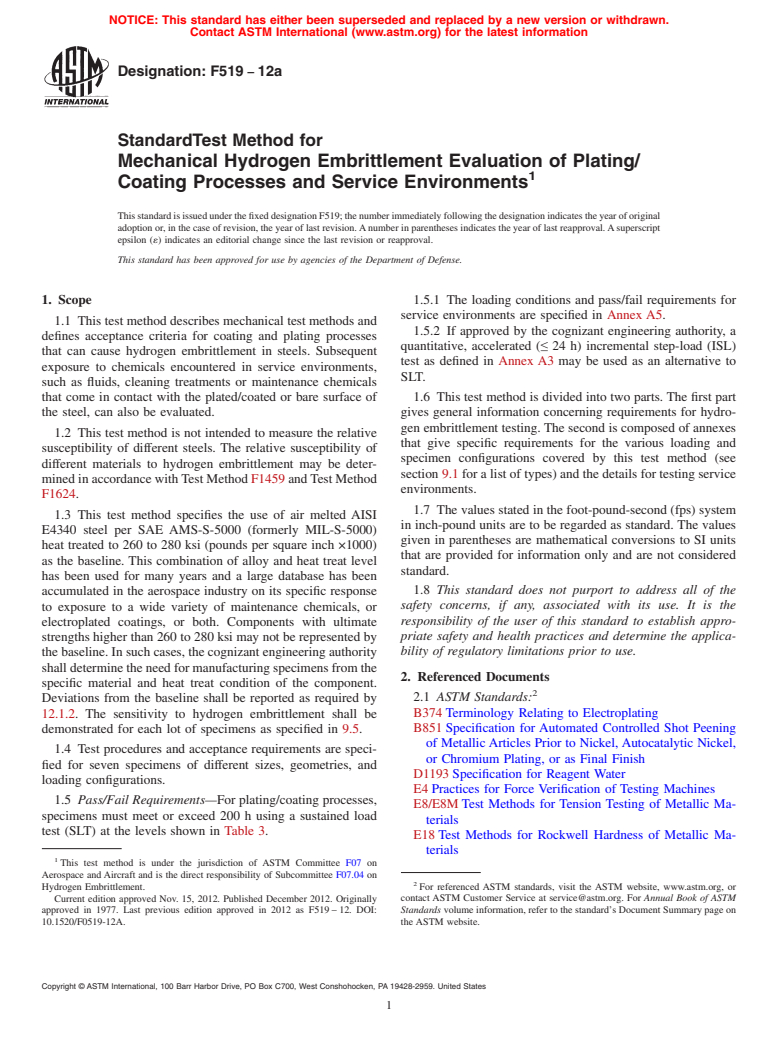
1.1 This test method describes mechanical test methods and defines acceptance criteria for coating and plating processes that can cause hydrogen embrittlement in steels. Subsequent exposure to chemicals encountered in service environments, such as fluids, cleaning treatments or maintenance chemicals that come in contact with the plated/coated or bare surface of the steel, can also be evaluated.
1.2 This test method is not intended to measure the relative susceptibility of different steels. The relative susceptibility of different materials to hydrogen embrittlement may be determined in accordance with Test Method F1459 and Test Method F1624.
1.3 This test method specifies the use of air melted AISI E4340 steel per SAE AMS-S-5000 (formerly MIL-S-5000) heat treated to 260 to 280 ksi (pounds per square inch ×1000) as the baseline. This combination of alloy and heat treat level has been used for many years and a large database has been accumulated in the aerospace industry on its specific response to exposure to a wide variety of maintenance chemicals, or electroplated coatings, or both. Components with ultimate strengths higher than 260 to 280 ksi may not be represented by the baseline. In such cases, the cognizant engineering authority shall determine the need for manufacturing specimens from the specific material and heat treat condition of the component. Deviations from the baseline shall be reported as required by 12.1.2. The sensitivity to hydrogen embrittlement shall be demonstrated for each lot of specimens as specified in 9.5.
1.4 Test procedures and acceptance requirements are specified for seven specimens of different sizes, geometries, and loading configurations.
1.5 Pass/Fail Requirements—For plating/coating processes, specimens must meet or exceed 200 h using a sustained load test (SLT) at the levels shown in Table 3.TABLE 1 Lot Acceptance Criteria for Notched Specimens
Type
Item
Sampling of
Each Lot
Requirement/Method
1
Tensile Strength
4 each
Test Method E8. Tensile strength of each specimen must be within 10 ksi of the average.
1
HardnessA
5 %
51 to 53 HRC per Test Methods E18.
Round the average of
three readings per
specimen per Practice
E29.
1
Dimensions
100 %
Meet tolerances of
corresponding
drawings. Notch
dimension verified with
shadow graphic
projection at 50 to
100× or equivalent.
1
Notched Fracture Strength (NFS)
10 ea
Test Methods E8/E8M. NFS of each specimen
must be within 10 ksi
of the average.
1c
Self-loading
notched round
specimen bend
fixture, Fig. A2.7
10 ea
Alternate: The number of
turns of the loading
bolt, which is required
to produce fracture in
each specimen, must be
within 5 % of the
average.
1d
Self-loading
notched C-Ring
bend fixture,
Fig. A2.8
10 ea
Alternate: The change in
diameter at fracture
load for each specimen
must be within 0.008
inches of the average. A If the hardness requirements of any of the sampled specimens are not satisfied, only those specimens of the lot that are individually inspected for conformance t...
General Information
Relations
Buy Standard
Standards Content (Sample)
NOTICE: This standard has either been superseded and replaced by a new version or withdrawn.
Contact ASTM International (www.astm.org) for the latest information
Designation: F519 − 12a
StandardTest Method for
Mechanical Hydrogen Embrittlement Evaluation of Plating/
1
Coating Processes and Service Environments
ThisstandardisissuedunderthefixeddesignationF519;thenumberimmediatelyfollowingthedesignationindicatestheyearoforiginal
adoptionor,inthecaseofrevision,theyearoflastrevision.Anumberinparenthesesindicatestheyearoflastreapproval.Asuperscript
epsilon (´) indicates an editorial change since the last revision or reapproval.
This standard has been approved for use by agencies of the Department of Defense.
1. Scope 1.5.1 The loading conditions and pass/fail requirements for
service environments are specified in Annex A5.
1.1 This test method describes mechanical test methods and
1.5.2 If approved by the cognizant engineering authority, a
defines acceptance criteria for coating and plating processes
quantitative, accelerated (≤ 24 h) incremental step-load (ISL)
that can cause hydrogen embrittlement in steels. Subsequent
test as defined in Annex A3 may be used as an alternative to
exposure to chemicals encountered in service environments,
SLT.
such as fluids, cleaning treatments or maintenance chemicals
that come in contact with the plated/coated or bare surface of 1.6 This test method is divided into two parts.The first part
the steel, can also be evaluated. gives general information concerning requirements for hydro-
gen embrittlement testing.The second is composed of annexes
1.2 This test method is not intended to measure the relative
that give specific requirements for the various loading and
susceptibility of different steels. The relative susceptibility of
specimen configurations covered by this test method (see
different materials to hydrogen embrittlement may be deter-
section9.1foralistoftypes)andthedetailsfortestingservice
minedinaccordancewithTestMethodF1459andTestMethod
environments.
F1624.
1.7 The values stated in the foot-pound-second (fps) system
1.3 This test method specifies the use of air melted AISI
in inch-pound units are to be regarded as standard. The values
E4340 steel per SAE AMS-S-5000 (formerly MIL-S-5000)
given in parentheses are mathematical conversions to SI units
heat treated to 260 to 280 ksi (pounds per square inch ×1000)
that are provided for information only and are not considered
as the baseline. This combination of alloy and heat treat level
standard.
has been used for many years and a large database has been
accumulated in the aerospace industry on its specific response 1.8 This standard does not purport to address all of the
safety concerns, if any, associated with its use. It is the
to exposure to a wide variety of maintenance chemicals, or
responsibility of the user of this standard to establish appro-
electroplated coatings, or both. Components with ultimate
priate safety and health practices and determine the applica-
strengthshigherthan260to280ksimaynotberepresentedby
bility of regulatory limitations prior to use.
thebaseline.Insuchcases,thecognizantengineeringauthority
shalldeterminetheneedformanufacturingspecimensfromthe
2. Referenced Documents
specific material and heat treat condition of the component.
2
2.1 ASTM Standards:
Deviations from the baseline shall be reported as required by
12.1.2. The sensitivity to hydrogen embrittlement shall be B374Terminology Relating to Electroplating
B851Specification for Automated Controlled Shot Peening
demonstrated for each lot of specimens as specified in 9.5.
of MetallicArticles Prior to Nickel,Autocatalytic Nickel,
1.4 Test procedures and acceptance requirements are speci-
or Chromium Plating, or as Final Finish
fied for seven specimens of different sizes, geometries, and
D1193Specification for Reagent Water
loading configurations.
E4Practices for Force Verification of Testing Machines
1.5 Pass/Fail Requirements—For plating/coating processes,
E8/E8MTest Methods for Tension Testing of Metallic Ma-
specimens must meet or exceed 200 h using a sustained load
terials
test (SLT) at the levels shown in Table 3.
E18Test Methods for Rockwell Hardness of Metallic Ma-
terials
1
This test method is under the jurisdiction of ASTM Committee F07 on
Aerospace andAircraft and is the direct responsibility of Subcommittee F07.04 on
2
Hydrogen Embrittlement. For referenced ASTM standards, visit the ASTM website, www.astm.org, or
Current edition approved Nov. 15, 2012. Published December 2012. Originally contact ASTM Customer Service at service@astm.org. For Annual Book of ASTM
approved in 1977. Last previous edition approved in 2012 as F519–12. DOI: Standards volume information, refer to the standard’s Document Summary page on
10.1520/F0519-12A. the ASTM website.
Copyright © ASTM International, 100 Barr Harbor Drive, PO Box C700, West Conshohocken, PA 19428-2959. United States
1
---------------------- Page: 1 ----------------------
F519 − 12a
3
TABLE 1 Lot
...
This document is not an ASTM standard and is intended only to provide the user of an ASTM standard an indication of what changes have been made to the previous version. Because
it may not be technically possible to adequately depict all changes accurately, ASTM recommends that users consult prior editions as appropriate. In all cases only the current version
of the standard as published by ASTM is to be considered the official document.
Designation: F519 − 12 F519 − 12a
Standard Test Method for
Mechanical Hydrogen Embrittlement Evaluation of Plating/
1
Coating Processes and Service Environments
This standard is issued under the fixed designation F519; the number immediately following the designation indicates the year of original
adoption or, in the case of revision, the year of last revision. A number in parentheses indicates the year of last reapproval. A superscript
epsilon (´) indicates an editorial change since the last revision or reapproval.
This standard has been approved for use by agencies of the Department of Defense.
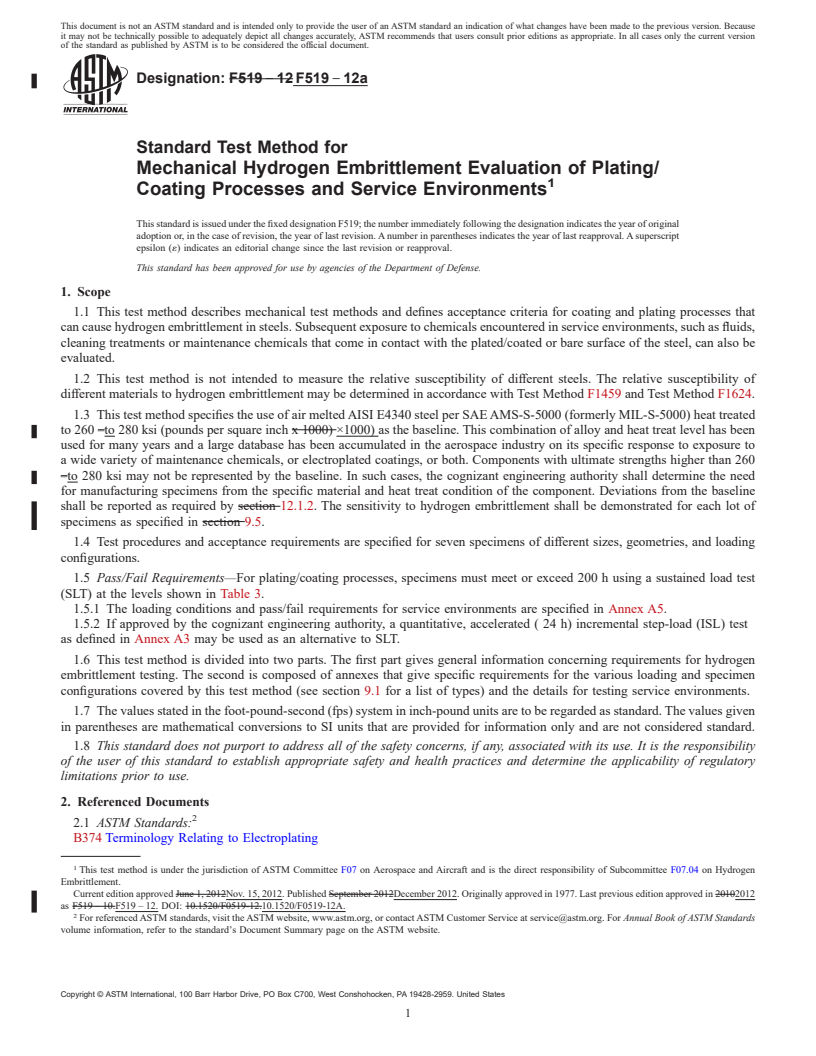
1. Scope
1.1 This test method describes mechanical test methods and defines acceptance criteria for coating and plating processes that
can cause hydrogen embrittlement in steels. Subsequent exposure to chemicals encountered in service environments, such as fluids,
cleaning treatments or maintenance chemicals that come in contact with the plated/coated or bare surface of the steel, can also be
evaluated.
1.2 This test method is not intended to measure the relative susceptibility of different steels. The relative susceptibility of
different materials to hydrogen embrittlement may be determined in accordance with Test Method F1459 and Test Method F1624.
1.3 This test method specifies the use of air melted AISI E4340 steel per SAE AMS-S-5000 (formerly MIL-S-5000) heat treated
to 260 –to 280 ksi (pounds per square inch x 1000) ×1000) as the baseline. This combination of alloy and heat treat level has been
used for many years and a large database has been accumulated in the aerospace industry on its specific response to exposure to
a wide variety of maintenance chemicals, or electroplated coatings, or both. Components with ultimate strengths higher than 260
–to 280 ksi may not be represented by the baseline. In such cases, the cognizant engineering authority shall determine the need
for manufacturing specimens from the specific material and heat treat condition of the component. Deviations from the baseline
shall be reported as required by section 12.1.2. The sensitivity to hydrogen embrittlement shall be demonstrated for each lot of
specimens as specified in section 9.5.
1.4 Test procedures and acceptance requirements are specified for seven specimens of different sizes, geometries, and loading
configurations.
1.5 Pass/Fail Requirements—For plating/coating processes, specimens must meet or exceed 200 h using a sustained load test
(SLT) at the levels shown in Table 3.
1.5.1 The loading conditions and pass/fail requirements for service environments are specified in Annex A5.
1.5.2 If approved by the cognizant engineering authority, a quantitative, accelerated (≤24 h) incremental step-load (ISL) test
as defined in Annex A3 may be used as an alternative to SLT.
1.6 This test method is divided into two parts. The first part gives general information concerning requirements for hydrogen
embrittlement testing. The second is composed of annexes that give specific requirements for the various loading and specimen
configurations covered by this test method (see section 9.1 for a list of types) and the details for testing service environments.
1.7 The values stated in the foot-pound-second (fps) system in inch-pound units are to be regarded as standard. The values given
in parentheses are mathematical conversions to SI units that are provided for information only and are not considered standard.
1.8 This standard does not purport to address all of the safety concerns, if any, associated with its use. It is the responsibility
of the user of this standard to establish appropriate safety and health practices and determine the applicability of regulatory
limitations prior to use.
2. Referenced Documents
2
2.1 ASTM Standards:
B374 Terminology Relating to Electroplating
1
This test method is under the jurisdiction of ASTM Committee F07 on Aerospace and Aircraft and is the direct responsibility of Subcommittee F07.04 on Hydrogen
Embrittlement.
Current edition approved June 1, 2012Nov. 15, 2012. Published September 2012December 2012. Originally approved in 1977. Last previous edition approved in 20102012
as F519 – 10.F519 – 12. DOI: 10.1520/F0519-12.10.1520/F0519-12A.
2
For referenced ASTM standards, visit the ASTM website, www.astm.org, or contact ASTM Customer Service at service@astm.org. For Annual Book of ASTM Standards
volume information, refer to the standard’s Document Summary page on the ASTM website.
Copyright © ASTM International, 100 Barr Harbor Drive, PO Box C700, West Conshohocken, PA 19428-2959. United St
...


Questions, Comments and Discussion
Ask us and Technical Secretary will try to provide an answer. You can facilitate discussion about the standard in here.