ASTM D4366-16(2021)
(Test Method)Standard Test Methods for Hardness of Organic Coatings by Pendulum Damping Tests
Standard Test Methods for Hardness of Organic Coatings by Pendulum Damping Tests
SIGNIFICANCE AND USE
5.1 The pendulum damping test has been found to have good sensitivity in detecting differences in coating hardness, where hardness is defined as resistance to deformation.
5.2 The two procedures given in these test methods embody the principle that the amplitude of oscillation of a pendulum touching a surface decreases more rapidly the softer the surface. However, these test methods differ in respect to pendulum dimensions, and period and amplitude of oscillation.
5.3 In general, the damping time of the König pendulum is approximately half that of the Persoz pendulum.
5.4 The Persoz pendulum has a greater degree of discrimination than the König for measuring the hardness of soft coatings, but it may not be as suitable for testing hard, slippery films because of its tendency to skid on surfaces with a low coefficient of friction.
5.5 The interaction between the pendulum and the paint film is complex, depending on both elastic and viscoelastic properties, and it may not be possible to establish a precise relationship between the two types of pendulum tests.
SCOPE
1.1 These test methods cover the use of pendulum damping testers in the determination of hardness of organic coatings that have been applied to acceptably plane rigid surfaces, such as a metal or glass panel.
1.2 Two test methods based on different pendulum types are covered as follows:
1.2.1 Test Method A—König Pendulum Hardness Test.
1.2.2 Test Method B—Persoz Pendulum Hardness Test.
1.3 This standard is similar in content (but not technically equivalent) to ISO 1522.
1.4 The values stated in SI units are to be regarded as standard. No other units of measurement are included in this standard.
1.5 This standard does not purport to address all of the safety concerns, if any, associated with its use. It is the responsibility of the user of this standard to establish appropriate safety, health, and environmental practices and determine the applicability of regulatory limitations prior to use.
1.6 This international standard was developed in accordance with internationally recognized principles on standardization established in the Decision on Principles for the Development of International Standards, Guides and Recommendations issued by the World Trade Organization Technical Barriers to Trade (TBT) Committee.
General Information
Relations
Standards Content (Sample)
This international standard was developed in accordance with internationally recognized principles on standardization established in the Decision on Principles for the
Development of International Standards, Guides and Recommendations issued by the World Trade Organization Technical Barriers to Trade (TBT) Committee.
Designation: D4366 − 16 (Reapproved 2021)
Standard Test Methods for
Hardness of Organic Coatings by Pendulum Damping Tests
This standard is issued under the fixed designation D4366; the number immediately following the designation indicates the year of
original adoption or, in the case of revision, the year of last revision. A number in parentheses indicates the year of last reapproval. A
superscript epsilon (´) indicates an editorial change since the last revision or reapproval.
1. Scope D3891 Practice for Preparation of Glass Panels for Testing
Paint, Varnish, Lacquer, and Related Products
1.1 These test methods cover the use of pendulum damping
D7091 Practice for Nondestructive Measurement of Dry
testersinthedeterminationofhardnessoforganiccoatingsthat
Film Thickness of Nonmagnetic Coatings Applied to
have been applied to acceptably plane rigid surfaces, such as a
Ferrous Metals and Nonmagnetic, Nonconductive Coat-
metal or glass panel.
ings Applied to Non-Ferrous Metals
1.2 Two test methods based on different pendulum types are
2.2 Other Standard:
covered as follows:
ISO 1522 Paints and Varnishes Pendulum Damping Test
1.2.1 Test Method A—König Pendulum Hardness Test.
1.2.2 Test Method B—Persoz Pendulum Hardness Test.
3. Terminology
1.3 This standard is similar in content (but not technically
3.1 Definitions of Terms Specific to This Standard:
equivalent) to ISO 1522.
3.1.1 König hardness, n—time in seconds for the swing
amplitude of the König pendulum to decrease from 6 to 3°.
1.4 The values stated in SI units are to be regarded as
standard. No other units of measurement are included in this
3.1.2 Persoz hardness, n—time in seconds for the swing
standard.
amplitude of the Persoz pendulum to decrease from 12 to 4°.
1.5 This standard does not purport to address all of the
4. Summary of Test Methods
safety concerns, if any, associated with its use. It is the
responsibility of the user of this standard to establish appro- 4.1 A pendulum resting on a coating surface is set into
priate safety, health, and environmental practices and deter- oscillation (rocking) and the time for the oscillation amplitude
mine the applicability of regulatory limitations prior to use. todecreasebyaspecifiedamountmeasured.Thedampingtime
1.6 This international standard was developed in accor- is influenced by a combination of physical properties, amongst
dance with internationally recognized principles on standard- hardness, elasticity, coefficient of friction and shore of the
ization established in the Decision on Principles for the sample under test. The damping time decreases with the
Development of International Standards, Guides and Recom-
decrease of hardness or an increase of elasticity or coefficient
mendations issued by the World Trade Organization Technical of friction.
Barriers to Trade (TBT) Committee.
5. Significance and Use
2. Referenced Documents
5.1 The pendulum damping test has been found to have
good sensitivity in detecting differences in coating hardness,
2.1 ASTM Standards:
where hardness is defined as resistance to deformation.
D823 Practices for Producing Films of Uniform Thickness
of Paint, Coatings and Related Products on Test Panels
5.2 The two procedures given in these test methods embody
D1005 Test Method for Measurement of Dry-Film Thick-
the principle that the amplitude of oscillation of a pendulum
ness of Organic Coatings Using Micrometers
touching a surface decreases more rapidly the softer the
surface. However, these test methods differ in respect to
pendulum dimensions, and period and amplitude of oscillation.
This test method is under the jurisdiction of ASTM Committee D01 on Paint
5.3 In general, the damping time of the König pendulum is
and Related Coatings, Materials, andApplications and is the direct responsibility of
approximately half that of the Persoz pendulum.
Subcommittee D01.23 on Physical Properties of Applied Paint Films.
Current edition approved June 1, 2021. Published June 2021. Originally
5.4 The Persoz pendulum has a greater degree of discrimi-
approved in 1984. Last previous edition approved in 2016 as D4366 – 16. DOI:
nation than the König for measuring the hardness of soft
10.1520/D4366-16R21.
For referenced ASTM standards, visit the ASTM website, www.astm.org, or
contact ASTM Customer Service at service@astm.org. For Annual Book of ASTM
Standards volume information, refer to the standard’s Document Summary page on Available fromAmerican National Standards Institute (ANSI), 25 W. 43rd St.,
the ASTM website. 4th Floor, New York, NY 10036, http://www.ansi.org.
Copyright © ASTM International, 100 Barr Harbor Drive, PO Box C700, West Conshohocken, PA 19428-2959. United States
D4366 − 16 (2021)
coatings, but it may not be as suitable for testing hard, slippery
films because of its tendency to skid on surfaces with a low
coefficient of friction.
5.5 Theinteractionbetweenthependulumandthepaintfilm
is complex, depending on both elastic and viscoelastic
properties, and it may not be possible to establish a precise
relationship between the two types of pendulum tests.
TEST METHOD A
KÖNIG PENDULUM HARDNESS TEST
6. Apparatus
6.1 König Pendulum Tester , consisting of a stand that
supports a pendulum, a test panel, and a pendulum displace-
ment scale. The stand has a stirrup to support the pendulum
above the table and a mechanism for shock-free positioning of
thependulumontothetestpanel.PendulumTestersaredivided
in:
(1) Manual models: where both positioning of the pendu-
FIG. 2 Apparatus Manual Type
lum and taking the number of counts and timing is done
manually.
(2) Semi automated models: Where positioning of the
pendulum is done manually and the number of counts and
timing is measured automated.
(3) Fully automated models: Where both the positioning of
the pendulum and the number of counts and timing is done
automatically.
Available from various supply companies.
Legend to Figure 3:
A) Pendulum (Persoz)
B) Panel holders
C) Test panel
D) Panel support
E) Scale
FIG. 3 Schematic Representation of a Pendulum Hardness Test
6.1.1 The use of fully automated models is recommended
above that of semi automated models due to their increased
repeatability. When using older manual models results can
fluctuate depending on the operator. Typical apparatus are
FIG. 1 Apparatus Fully Automated Type shown in Fig. 1 and Fig. 2.
D4366 − 16 (2021)
6.1.2 Shown devices (Fig. 1 and Fig. 2) are functioning in 7.1.5 Check the position of the pendulum pointer relative to
the same way. Their essential components are displayed in the scale.With the pendulum at rest, its pointer should indicate
schematic (Fig. 3). zero on the scale. If the pointer does not indicate zero, check
the leveling of the pendulum tester and the fairness of the
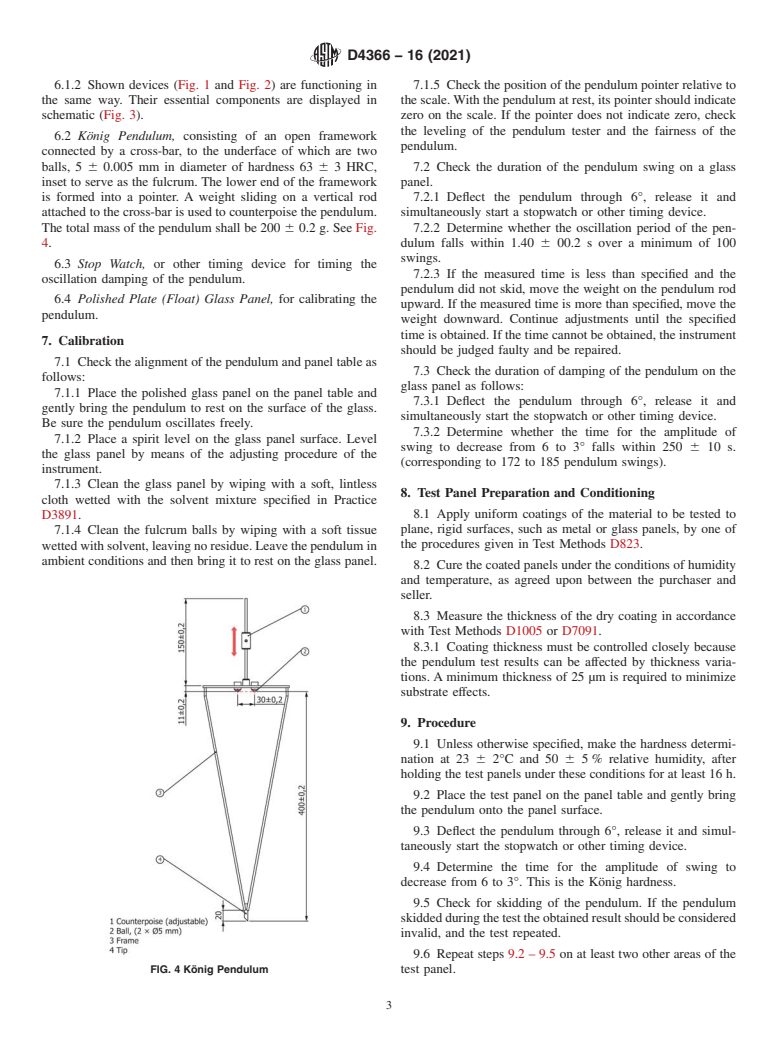
6.2 König Pendulum, consisting of an open framework
pendulum.
connected by a cross-bar, to the underface of which are two
balls, 5 6 0.005 mm in diameter of hardness 63 6 3 HRC, 7.2 Check the duration of the pendulum swing on a glass
inset to serve as the fulcrum. The lower end of the framework panel.
is formed into a pointer. A weight sliding on a vertical rod 7.2.1 Deflect the pendulum through 6°, release it and
attached to the cross-bar is used to counterpoise the pendulum. simultaneously start a stopwatch or other timing device.
The total mass of the pendulum shall be 200 6 0.2 g. See Fig. 7.2.2 Determine whether the oscillation period of the pen-
4. dulum falls within 1.40 6 00.2 s over a minimum of 100
swings.
6.3 Stop Watch, or other timing device for timing the
7.2.3 If the measured time is less than specified and the
oscillation damping of the pendulum.
pendulum did not skid, move the weight on the pendulum rod
6.4 Polished Plate (Float) Glass Panel, for calibrating the
upward. If the measured time is more than specified, move the
pendulum.
weight downward. Continue adjustments until the specified
time is obtained. If the time cannot be obtained, the instrument
7. Calibration
should be judged faulty and be repaired.
7.1 Check the alignment of the pendulum and panel table as
7.3 Check the duration of damping of the pendulum on the
follows:
glass panel as follows:
7.1.1 Place the polished glass panel on the panel table and
7.3.1 Deflect the pendulum through 6°, release it and
gently bring the pendulum to rest on the surface of the glass.
simultaneously start the stopwatch or other timing device.
Be sure the pendulum oscillates freely.
7.3.2 Determine whether the time for the amplitude of
7.1.2 Place a spirit level on the glass panel surface. Level
swing to decrease from 6 to 3° falls within 250 6 10 s.
the glass panel by means of the adjusting procedure of the
(corresponding to 172 to 185 pendulum swings).
instrument.
7.1.3 Clean the glass panel by wiping with a soft, lintless
8. Test Panel Preparation and Conditioning
cloth wetted with the solvent mixture specified in Practice
8.1 Apply uniform coatings of the material to be test
...


Questions, Comments and Discussion
Ask us and Technical Secretary will try to provide an answer. You can facilitate discussion about the standard in here.