ASTM D1004-94a
(Test Method)Standard Test Method for Initial Tear Resistance of Plastic Film and Sheeting
Standard Test Method for Initial Tear Resistance of Plastic Film and Sheeting
SCOPE
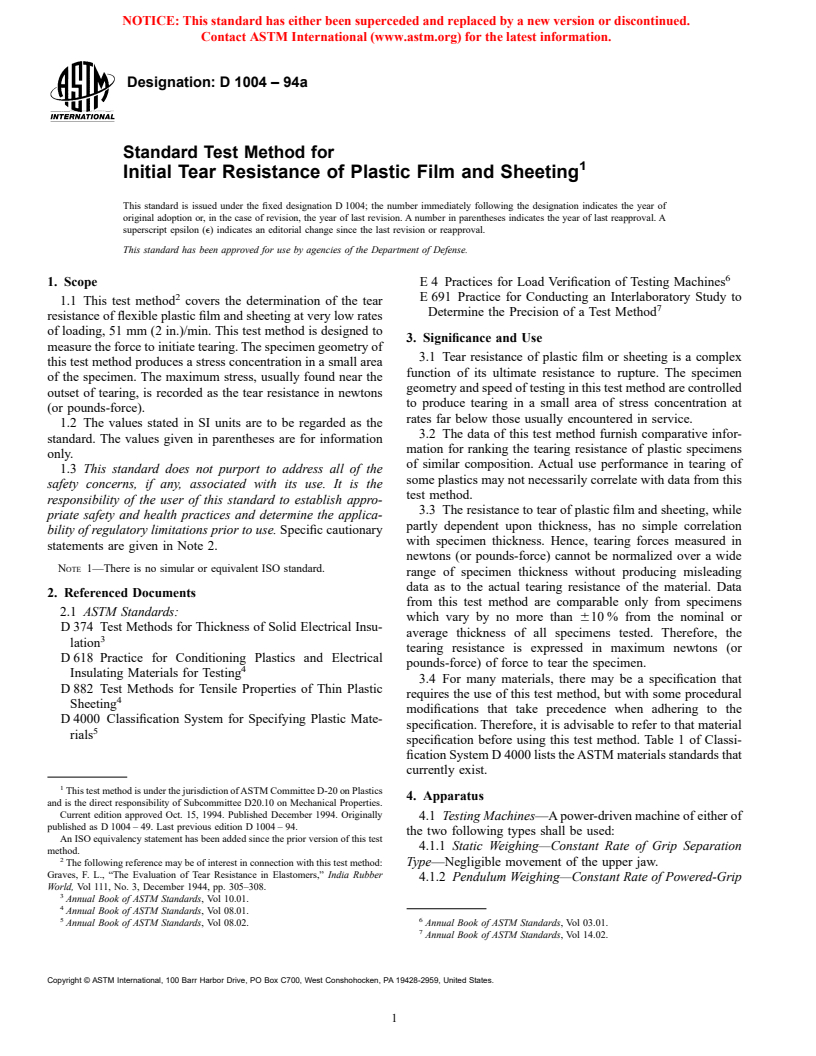
1.1 This test method covers the determination of the tear resistance of flexible plastic film and sheeting at very low rates of loading, 51 mm (2 in.)/min. This test method is designed to measure the force to initiate tearing. The specimen geometry of this test method produces a stress concentration in a small area of the specimen. The maximum stress, usually found near the outset of tearing, is recorded as the tear resistance in newtons (or pounds-force).
1.2 The values stated in SI units are to be regarded as the standard. The values given in parentheses are for information only.
1.3 This standard does not purport to address all of the safety concerns, if any, associated with its use. It is the responsibility of the user of this standard to establish appropriate safety and health practices and determine the applicability of regulatory limitations prior to use. Specific cautionary statements are given in Note 2. Note 1-There is no similar or equivalent ISO standard.
General Information
Relations
Standards Content (Sample)
NOTICE: This standard has either been superceded and replaced by a new version or discontinued.
Contact ASTM International (www.astm.org) for the latest information.
Designation: D 1004 – 94a
Standard Test Method for
Initial Tear Resistance of Plastic Film and Sheeting
This standard is issued under the fixed designation D 1004; the number immediately following the designation indicates the year of
original adoption or, in the case of revision, the year of last revision. A number in parentheses indicates the year of last reapproval. A
superscript epsilon (e) indicates an editorial change since the last revision or reapproval.
This standard has been approved for use by agencies of the Department of Defense.
1. Scope E 4 Practices for Load Verification of Testing Machines
E 691 Practice for Conducting an Interlaboratory Study to
1.1 This test method covers the determination of the tear
Determine the Precision of a Test Method
resistance of flexible plastic film and sheeting at very low rates
of loading, 51 mm (2 in.)/min. This test method is designed to
3. Significance and Use
measure the force to initiate tearing. The specimen geometry of
3.1 Tear resistance of plastic film or sheeting is a complex
this test method produces a stress concentration in a small area
function of its ultimate resistance to rupture. The specimen
of the specimen. The maximum stress, usually found near the
geometry and speed of testing in this test method are controlled
outset of tearing, is recorded as the tear resistance in newtons
to produce tearing in a small area of stress concentration at
(or pounds-force).
rates far below those usually encountered in service.
1.2 The values stated in SI units are to be regarded as the
3.2 The data of this test method furnish comparative infor-
standard. The values given in parentheses are for information
mation for ranking the tearing resistance of plastic specimens
only.
of similar composition. Actual use performance in tearing of
1.3 This standard does not purport to address all of the
some plastics may not necessarily correlate with data from this
safety concerns, if any, associated with its use. It is the
test method.
responsibility of the user of this standard to establish appro-
3.3 The resistance to tear of plastic film and sheeting, while
priate safety and health practices and determine the applica-
partly dependent upon thickness, has no simple correlation
bility of regulatory limitations prior to use. Specific cautionary
with specimen thickness. Hence, tearing forces measured in
statements are given in Note 2.
newtons (or pounds-force) cannot be normalized over a wide
NOTE 1—There is no simular or equivalent ISO standard.
range of specimen thickness without producing misleading
data as to the actual tearing resistance of the material. Data
2. Referenced Documents
from this test method are comparable only from specimens
2.1 ASTM Standards:
which vary by no more than 610 % from the nominal or
D 374 Test Methods for Thickness of Solid Electrical Insu-
average thickness of all specimens tested. Therefore, the
lation
tearing resistance is expressed in maximum newtons (or
D 618 Practice for Conditioning Plastics and Electrical
pounds-force) of force to tear the specimen.
Insulating Materials for Testing
3.4 For many materials, there may be a specification that
D 882 Test Methods for Tensile Properties of Thin Plastic
requires the use of this test method, but with some procedural
Sheeting
modifications that take precedence when adhering to the
D 4000 Classification System for Specifying Plastic Mate-
specification. Therefore, it is advisable to refer to that material
rials
specification before using this test method. Table 1 of Classi-
fication System D 4000 lists the ASTM materials standards that
currently exist.
This test method is under the jurisdiction of ASTM Committee D-20 on Plastics
4. Apparatus
and is the direct responsibility of Subcommittee D20.10 on Mechanical Properties.
Current edition approved Oct. 15, 1994. Published December 1994. Originally
4.1 Testing Machines—A power-driven machine of either of
published as D 1004 – 49. Last previous edition D 1004 – 94.
the two following types shall be used:
An ISO equivalency statement has been added since the prior version of this test
4.1.1 Static Weighing—Constant Rate of Grip Separation
method.
The following reference may be of interest in connection with this test method: Type—Negligible movement of the upper jaw.
Graves, F. L., “The Evaluation of Tear Resistance in Elastomers,” India Rubber
4.1.2 Pendulum Weighing—Constant Rate of Powered-Grip
World, Vol 111, No. 3, December 1944, pp. 305–308.
Annual Book of ASTM Standards, Vol 10.01.
Annual Book of ASTM Standards, Vol 08.01.
5 6
Annual Book of ASTM Standards, Vol 08.02. Annual Book of ASTM Standards, Vol 03.01.
Annual Book of ASTM Standards, Vol 14.02.
Copyright © ASTM International, 100 Barr Harbor Drive, PO Box C700, West Conshohocken, PA 19428-2959, United States.
NOTICE: This standard has either been superceded and replaced by a new version or discontinued.
Contact ASTM International (www.astm.org) for the latest information.
D 1004
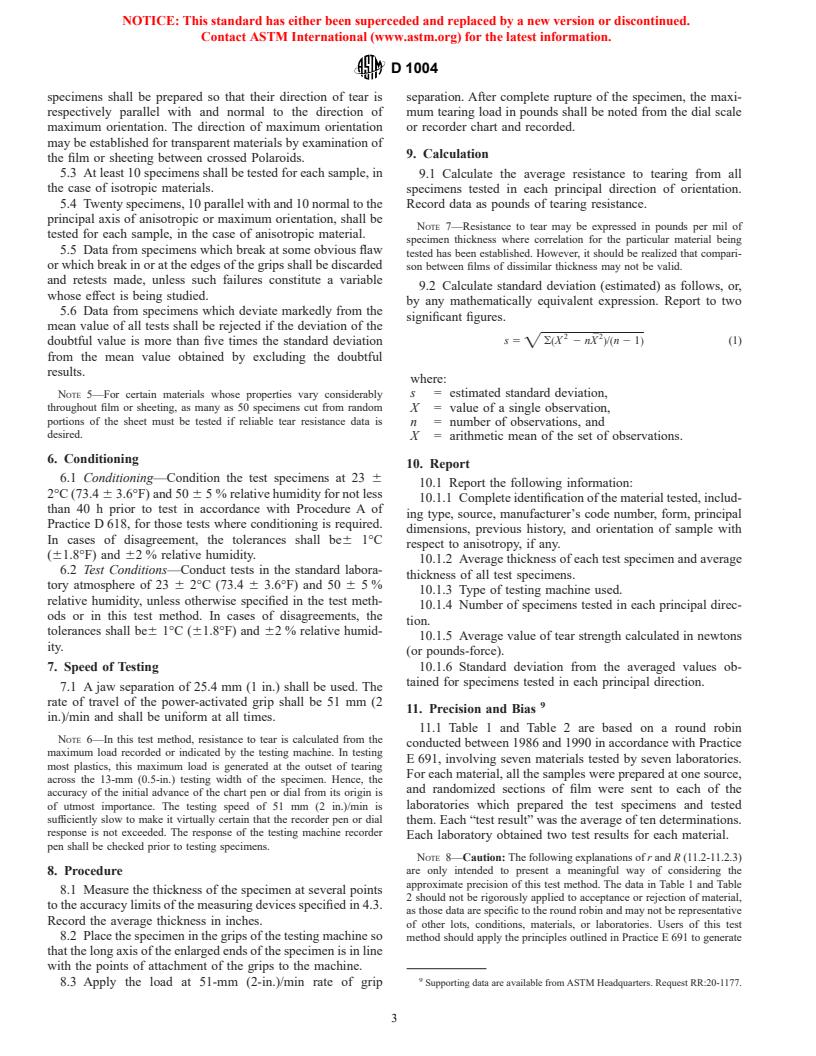
TABLE 1 Initial Tear Resistance (Graves Tear) Machine Direction
Motion Type—Constant rate of lower jaw movement, variable
upper jaw movement (Note 2). The machine shall conform to Values Expressed in Units of Grams-Force
Material
A B C D
requirements given in the appropriate Method A or B of Test
Average S S r R
r R
Methods D 882, except that cross-head rates of other than 51
LDPE—LD 104 314.6 31.98 55.79 89.53 156.2
mm (2 in.)/min are not required. Either maximum load LLDPE 384.9 7.80 41.73 21.84 116.8
Polystyrene 459.8 98.06 261.6 274.6 732.3
indicating devices or recorders are permissible in the testing
HDPE No. 2 474.0 19.82 55.42 55.51 155.2
machine. The accuracy of the testing machine shall be verified
Polypropylene 503.9 29.87 77.45 83.64 216.9
in accordance with Practices E 4 (Note 3). The applied load, as HDPE No. 1 570.9 36.35 78.20 101.8 219.0
Polyester 2494.0 6407.9 599.2 1142.0 1678.0
indicated by a recorder, dial, or scale, shall be accurate to
A
S = within-laboratory standard deviation for the material stated. It is obtained
within 62 %. If an indicating device is used, the indicator shall r
by pooling the standard deviations of the test results from each laboratory:
remain at the point of maximum load after rupture of the test
2 2 2 ½
S 5 @@(~S ! 1 ~S ! . 1 ~S ! #/n#
r 1 2 n
specimen.
B
S = between-laboratories standard deviation for the material stated. It is a
R
NOTE 2—If both jaws of the machine are power activated, the rate of
pooling of the amounts by which the average of the test results for each laboratory
jaw separation shall be nominally 51 mm (2 in.)/min.
deviate from the overall average for that material.
C
NOTE 3—Experience has shown that many testing machines now in use r = within-laboratory repeatability limit = 2.8 3 S .
r
D
R = between-laboratories reproducibility limit = 2.8 3 S .
are incapable of maintaining accuracy for as long as the periods between R
inspection recommended in Practices E 4. Hence, it is recommended that
each machine be studied individually and verified as often as may be
TABLE 2 Initial Tear Resistance (Graves Tear) Transverse
found necessary. It will frequently be necessary to perform this function
Direction
daily.
Values Expressed in Units of Grams–Force
Material
4.2 Grips—A gripping system that minimizes both slippage A B C D
Average S S r R
r R
and uneven stress distribution on the specimen shall be used.
LDPE—LD 104 325.1 15.24 34.63 42.67 96.96
LLDPE 366.6 20.52 28.53 57.45 79.89
NOTE 4—Grips lined with thin rubber. No. 80 emery cloth, or crocus
HDPE No. 2 411.1 31.70 82.06 88.76 229.8
cloth, have been successfully used. Grips may be of the self-tightening
Polypropylene 468.0 33.94 86.73 95.02 242.8
type. In cases where specimens frequently fail at the edge of the grips, the
Polystyrene 481.4 101.7 263.7 284.7 738.2
radius of curvature of the edges of the grips may be increased slightly at
HDPE No. 1 523.9 46.02 97.75 128.9 273.7
Polyester 2341.0 317.2 443.2 888.1 1241.0
the point where they come in contact with the specimen.
A
S = within-laboratory standard deviation for the material stated. It is obtained
r
4.3 Thickness Measuring Devices—Suitable micrometers,
by pooling the standard deviations of the test results from each laboratory:
or thickness gages, reading to 0.0025 mm (0.0001 in.) or less, 2 2 2 ½
S 5 @@(~S ! 1 ~S ! . 1 ~S ! #/n#
r 1 2 n
shall be used for measuring the thickness of the specimens. The
B
S = between-laboratories standard deviation for the material stated. It is a
R
pressure exerted by the gage on the specimen being measured
pooling of the amounts by which the average of the test results for each laboratory
shall be between 0.159 and 0.186 MPa (23 and 27 psi) in
deviate from the overall average for that material.
C
accordance with Method C of Test Methods D 374. r = within-laboratory repeatability limit = 2.8 3 S .
r
D
R = between-laboratories reproducibility limit = 2.8 3 S .
R
4.4 Die —A die having the dimensions shown in Fig. 1
shall be used to cut all specimens. The 90° angle should be
honed sharp with no radius or have a minimum practical
radius. The cutting edge of the die shall have a 5° negative
rake, and shall be kept sharp and free from nicks to avoid
leaving ragged edges on the specimen. Cutting may be facili-
tated by wetting the surface of the sample and the cutting edges
of the die with water. The sample shall rest on the smooth,
slightly yielding surface that will not injure the die blade.
Light-weight cardboard or a piece of leather be
...


Questions, Comments and Discussion
Ask us and Technical Secretary will try to provide an answer. You can facilitate discussion about the standard in here.