ASTM E290-09
(Test Method)Standard Test Methods for Bend Testing of Material for Ductility
Standard Test Methods for Bend Testing of Material for Ductility
SIGNIFICANCE AND USE
Bend tests for ductility provide a simple way to evaluate the quality of materials by their ability to resist cracking or other surface irregularities during one continuous bend. No reversal of the bend force shall be employed when conducting these tests.
The type of bend test used determines the location of the forces and constraints on the bent portion of the specimen, ranging from no direct contact to continuous contact.
The test can terminate at a given angle of bend over a specified radius or continue until the specimen legs are in contact. The bend angle can be measured while the specimen is under the bending force (usually when the semi-guided bend test is employed), or after removal of the force as when performing a free-bend test. Product requirements for the material being tested determine the method used.
Materials with an as-fabricated cross section of rectangular, round, hexagonal, or similar defined shape can be tested in full section to evaluate their bend properties by using the procedures outlined in these test methods, in which case relative width and thickness requirements do not apply.
SCOPE
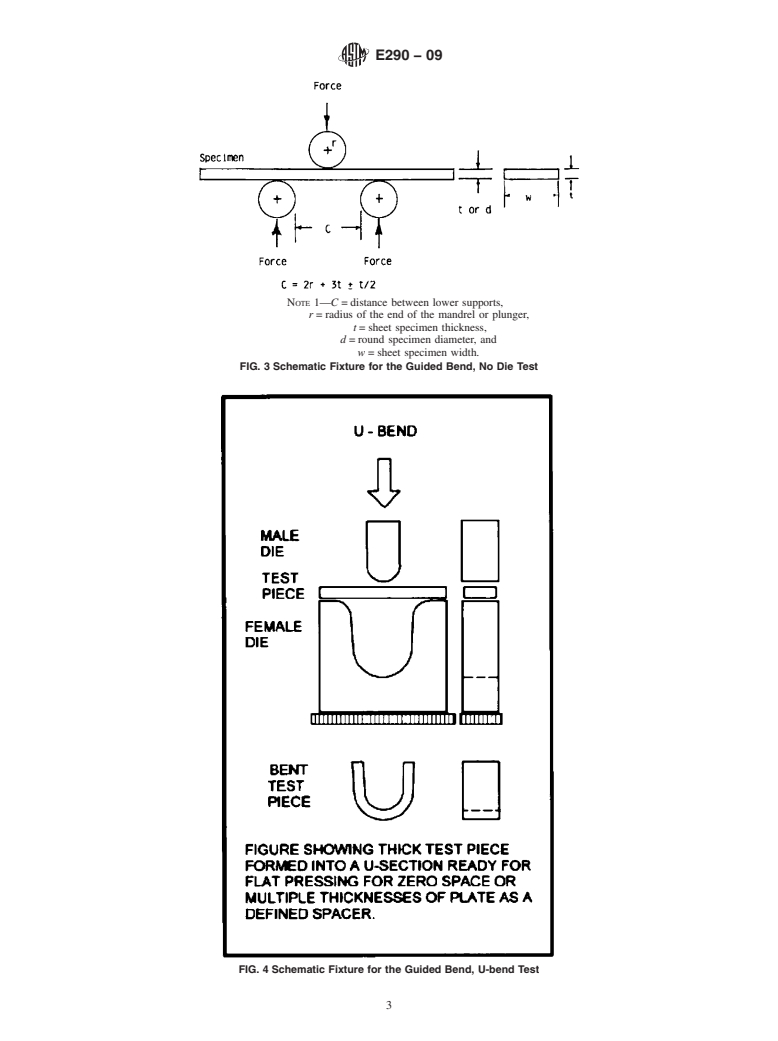
1.1 These test methods cover bend testing for ductility of materials. Included in the procedures are four conditions of constraint on the bent portion of the specimen; a guided-bend test using a mandrel or plunger of defined dimensions to force the mid-length of the specimen between two supports separated by a defined space; a semi-guided bend test in which the specimen is bent, while in contact with a mandrel, through a specified angle or to a specified inside radius (r) of curvature, measured while under the bending force; a free-bend test in which the ends of the specimen are brought toward each other, but in which no transverse force is applied to the bend itself and there is no contact of the concave inside surface of the bend with other material; a bend and flatten test, in which a transverse force is applied to the bend such that the legs make contact with each other over the length of the specimen.
1.2 After bending, the convex surface of the bend is examined for evidence of a crack or surface irregularities. If the specimen fractures, the material has failed the test. When complete fracture does not occur, the criterion for failure is the number and size of cracks or surface irregularities visible to the unaided eye occurring on the convex surface of the specimen after bending, as specified by the product standard. Any cracks within one thickness of the edge of the specimen are not considered a bend test failure. Cracks occurring in the corners of the bent portion shall not be considered significant unless they exceed the size specified for corner cracks in the product standard.
1.3 The values stated in SI units are to be regarded as standard. Inch-pound values given in parentheses were used in establishing test parameters and are for information only.
1.4 This standard does not purport to address all of the safety concerns, if any, associated with its use. It is the responsibility of the user of this standard to establish appropriate safety and health practices and determine the applicability of regulatory limitations prior to use.
General Information
Relations
Buy Standard
Standards Content (Sample)
NOTICE: This standard has either been superseded and replaced by a new version or withdrawn.
Contact ASTM International (www.astm.org) for the latest information
Designation: E290 − 09
StandardTest Methods for
1
Bend Testing of Material for Ductility
This standard is issued under the fixed designation E290; the number immediately following the designation indicates the year of
original adoption or, in the case of revision, the year of last revision. A number in parentheses indicates the year of last reapproval. A
superscript epsilon (´) indicates an editorial change since the last revision or reapproval.
This standard has been approved for use by agencies of the Department of Defense.
1. Scope priate safety and health practices and determine the applica-
bility of regulatory limitations prior to use.
1.1 These test methods cover bend testing for ductility of
materials. Included in the procedures are four conditions of
2. Referenced Documents
constraint on the bent portion of the specimen; a guided-bend
2
2.1 ASTM Standards:
test using a mandrel or plunger of defined dimensions to force
E6 Terminology Relating to Methods of Mechanical Testing
themid-lengthofthespecimenbetweentwosupportsseparated
E8/E8M Test Methods for Tension Testing of Metallic Ma-
by a defined space; a semi-guided bend test in which the
terials
specimen is bent, while in contact with a mandrel, through a
E18 Test Methods for Rockwell Hardness of Metallic Ma-
specified angle or to a specified inside radius (r) of curvature,
terials
measured while under the bending force; a free-bend test in
E190 Test Method for Guided Bend Test for Ductility of
which the ends of the specimen are brought toward each other,
Welds
but in which no transverse force is applied to the bend itself
and there is no contact of the concave inside surface of the
3. Summary of Test Methods
bend with other material; a bend and flatten test, in which a
3.1 Four methods for ductility testing employing bending
transverse force is applied to the bend such that the legs make
are included in these test methods. Three methods have
contact with each other over the length of the specimen.
subgroups with specific procedures.
1.2 After bending, the convex surface of the bend is 3.1.1 Guided Bend:
examined for evidence of a crack or surface irregularities. If 3.1.1.1 Guided Bend, No Die,
3.1.1.2 Guided Bend, U-Bend,
the specimen fractures, the material has failed the test. When
complete fracture does not occur, the criterion for failure is the 3.1.1.3 Guided Bend, V-Bend,
3.1.1.4 Guided Bend, V-Bend for cold rolled sheet,
numberandsizeofcracksorsurfaceirregularitiesvisibletothe
unaided eye occurring on the convex surface of the specimen 3.1.2 Semi-guided Bend:
3.1.2.1 Arrangement A, specimen held at one end.
after bending, as specified by the product standard.Any cracks
within one thickness of the edge of the specimen are not 3.1.2.2 Arrangement B, for thin material.
3.1.2.3 Arrangement C, mandrel contact force in the bend.
considered a bend test failure. Cracks occurring in the corners
of the bent portion shall not be considered significant unless 3.1.3 Free-Bend:
3.1.3.1 Type 1, 180° bend.
they exceed the size specified for corner cracks in the product
standard. 3.1.3.2 Type 2, bend flat on itself.
3.1.4 Bend and Flatten:
1.3 The values stated in SI units are to be regarded as
3.2 Aguided-bend test for ductility of welds is described in
standard. Inch-pound values given in parentheses were used in
Method E190 and may be used for flat-rolled materials when
establishing test parameters and are for information only.
specified by the product standard. The essential features of this
1.4 This standard does not purport to address all of the
bending method are employed in 3.1.1.2, Guided Bend,
safety concerns, if any, associated with its use. It is the
U-Bend.
responsibility of the user of this standard to establish appro-
3.3 Bend tests are made in one of two directions relative to
the principal working direction employed in production pro-
cessing of the material.
1
This test method is under the jurisdiction of ASTM Committee E28 on
Mechanical Testing and is the direct responsibility of Subcommittee E28.02 on
2
Ductility and Formability. For referenced ASTM standards, visit the ASTM website, www.astm.org, or
Current edition approved April 1, 2009. Published June 2009. Originally contact ASTM Customer Service at service@astm.org. For Annual Book of ASTM
approved in 1966. Last previous edition approved in 2004 as E290 – 97a(2004) Standards volume information, refer to the standard’s Document Summary page on
DOI: 10.1520/E0290-09. the ASTM website.
Copyright © ASTM International, 100 Barr Harbor Drive, PO Box C700, West Conshohocken, PA 19428-2959. United States
1
---------------------- Page: 1 ----------------------
E290 − 09
3.3.1 Longitudinal tests use a specimen with its long dimen-
sion aligned with the processing direction such that the bend is
formed across the processing direction, as show
...
This document is not an ASTM standard and is intended only to provide the user of an ASTM standard an indication of what changes have been made to the previous version. Because
it may not be technically possible to adequately depict all changes accurately, ASTM recommends that users consult prior editions as appropriate. In all cases only the current version
of the standard as published by ASTM is to be considered the official document.
Designation:E290–97a (Reapproved 2004) Designation:E290–09
Standard Test Methods for
1
Bend Testing of Material for Ductility
This standard is issued under the fixed designation E 290; the number immediately following the designation indicates the year of
original adoption or, in the case of revision, the year of last revision. A number in parentheses indicates the year of last reapproval. A
superscript epsilon (´) indicates an editorial change since the last revision or reapproval.
This standard has been approved for use by agencies of the Department of Defense.
1. Scope
1.1 These test methods cover bend testing for ductility of materials. Included in the procedures are four conditions of constraint
on the bent portion of the specimen; a guided-bend test using a mandrel or plunger of defined dimensions to force the mid-length
of the specimen between two supports separated by a defined space; a semi-guided- bend test in which the specimen is bent, while
in contact with a mandrel, through a specified angle or to a specified inside radius (r) of curvature, measured while under the
bending force; a free-bend test in which the ends of the specimen are brought toward each other, but in which no transverse force
is applied to the bend itself and there is no contact of the concave inside surface of the bend with other material; a bend and flatten
test, in which a transverse force is applied to the bend such that the legs make contact with each other over the length of the
specimen.
1.2 After bending, the convex surface of the bend is examined for evidence of a crack or surface irregularityies. If the specimen
fractures, the material has failed the test. When complete fracture does not occur, the criterion for failure is the number and size
of cracks or other surface irregularityies visible to the unaided eye occurring on the convex surface of the specimen after bending,
as specified by the product standard. Any cracks within one thickness of the edge of the specimen are not considered a bend test
failure. Cracks occurring in the corners of the bent portion shall not be considered significant unless they exceed the size specified
for corner cracks in the product standard.
1.3 The values stated in SI units are to be regarded as standard. Inch-pound values given in parentheses were used in
establishing test parameters and are for information only.
1.4 This standard does not purport to address all of the safety concerns, if any, associated with its use. It is the responsibility
of the user of this standard to establish appropriate safety and health practices and determine the applicability of regulatory
limitations prior to use.
2. Referenced Documents
2
2.1 ASTM Standards:
E6 Terminology Relating to Methods of Mechanical Testing
E8 8/E 8M Test Methods forTensionTesting of Metallic Materials E8MTest Methods forTensionTesting of Metallic Materials
(Metric)
E18 Test Methods for Rockwell Hardness and Rockwell Superficial Hardness of Metallic MaterialsTest Methods for Rockwell
Hardness of Metallic Materials
E 190 Test Method for Guided Bend Test for Ductility of Welds
3. Summary of Test Methods
3.1Four methods for ductility testing employing bending are included in these test methods. Two methods have subgroups with
specific procedures.
3.1.1Guided-Bend
3.1 Four methods for ductility testing employing bending are included in these test methods. Three methods have subgroups
with specific procedures.
3.1.1 Guided Bend:
3.1.1.1 Guided Bend, No Die,
1
This test method is under the jurisdiction of ASTM Committee E28 on Mechanical Testing and is the direct responsibility of Subcommittee E28.02 on Ductility and
Flexure Testing. Formability.
Current edition approved Oct.April 1, 2004.2009. Published October 2004.June 2009. Originally approved in 1966. Last previous edition approved in 19972004 as
E 290 – 97a.(2004)
2
For referencedASTM standards, visit theASTM website, www.astm.org, or contactASTM Customer Service at service@astm.org. For Annual Book of ASTM Standards
volume information, refer to the standard’s Document Summary page on the ASTM website.
Copyright © ASTM International, 100 Barr Harbor Drive, PO Box C700, West Conshohocken, PA 19428-2959, United States.
1
---------------------- Page: 1 ----------------------
E290–09
3.1.1.2 Guided Bend, U-Bend,
3.1.1.3 Guided Bend, V-Bend,
3.1.1.4 Guided Bend, V-Bend for cold rolled sheet,
3.1.2 Semi-guided Bend:
3.1.2.1 Arrangement A, specimen held at one end.
3.1.2.2 Arrangement B, for thin material.
3.1.2.3 Arrangement C, mandrel contact force in the be
...


Questions, Comments and Discussion
Ask us and Technical Secretary will try to provide an answer. You can facilitate discussion about the standard in here.