ASTM F2098-01
(Specification)Standard Specification for Stainless Steel Clamps for Securing SDR9 Cross-linked Polyethylene (PEX) Tubing to Metal Insert Fittings
Standard Specification for Stainless Steel Clamps for Securing SDR9 Cross-linked Polyethylene (PEX) Tubing to Metal Insert Fittings
SCOPE
1.1 This specification covers stainless steel clamps for use with four sizes of insert fittings that comply with F 1807, and cross-linked polyethylene (PEX) plastic tubing that complies with F 876 or F 877. These clamps are intended as an alternative to the copper-alloy crimp-rings of F 1807, for use in 100 psi (689.5 kPa) cold- and hot-water distribution systems operating at temperatures up to and including 180°F (82°C). Included are requirements for materials, workmanship, dimensions and marking of the stainless steel clamps; requirements for deforming the clamps; and requirements for burst pressure, sustained pressure, excessive temperature and pressure, and temperature cycling, which apply to assemblies of PEX tubing and F 1807 insert fittings secured with deformed clamps per this specification.
1.2 The values stated in inch-pound units are to be regarded as the standard. The SI values stated in parentheses are provided for information purposes.
1.3 The following precautionary caveat pertains only to the test methods portion, Section 10, of this specification. This standard does not purport to address all of the safety concerns, if any, associated with its use. It is the responsibility of the user of this standard to establish appropriate safety and health practices and determine the applicability of regulatory limitations prior to use.
General Information
Relations
Standards Content (Sample)
NOTICE: This standard has either been superseded and replaced by a new version or withdrawn.
Contact ASTM International (www.astm.org) for the latest information
An American National Standard
Designation: F 2098 – 01
Standard Specification for
Stainless Steel Clamps for Securing SDR9 Cross-linked
Polyethylene (PEX) Tubing to Metal Insert Fittings
This standard is issued under the fixed designation F 2098; the number immediately following the designation indicates the year of
original adoption or, in the case of revision, the year of last revision. A number in parentheses indicates the year of last reapproval. A
superscript epsilon (e) indicates an editorial change since the last revision or reapproval.
1. Scope D 1598 Test Method for Time-To-Failure of Plastic Pipe
Under Constant Internal Pressure
1.1 This specification covers stainless steel clamps for use
D 1599 Test Method for Short-Time, Hydraulic Failure
with four sizes of insert fittings that comply with F 1807, and
Pressure of Plastic Pipe, Tubing, and Fittings
cross-linked polyethylene (PEX) plastic tubing that complies
D 1600 Terminology for Abbreviated Terms Relating to
with F 876 or F 877. These clamps are intended as an alterna-
Plastics
tive to the copper-alloy crimp-rings of F 1807, for use in 100
D 2122 Test Method for Determining Dimensions of Ther-
psi (689.5 kPa) cold- and hot-water distribution systems
moplastic Pipe and Fittings
operating at temperatures up to and including 180°F (82°C).
E 18 Test Methods for Rockwell Hardness and Superficial
Included are requirements for materials, workmanship, dimen-
Hardness of Metallic Materials
sions and marking of the stainless steel clamps; requirements
F 412 Terminology Relating to Plastic Piping Systems
for deforming the clamps; and requirements for burst pressure,
F 876 Specification for Cross-linked Polyethylene (PEX)
sustained pressure, excessive temperature and pressure, and
Tubing
temperature cycling, which apply to assemblies of PEX tubing
F 877 Specification for Cross-linked Polyethylene (PEX)
and F 1807 insert fittings secured with deformed clamps per
Plastic Hot- and Cold-Water Distribution Systems
this specification.
1.2 The values stated in inch-pound units are to be regarded
3. Terminology
as the standard. The SI values stated in parentheses are
3.1 Definitions are in accordance with Terminology F 412
provided for information purposes.
and abbreviations are in accordance with Terminology D 1600,
1.3 The following precautionary caveat pertains only to the
unless otherwise indicated.
test methods portion, Section 10, of this specification. This
standard does not purport to address all of the safety concerns,
4. Classification
if any, associated with its use. It is the responsibility of the user
4.1 This specification covers one class of stainless steel
of this standard to establish appropriate safety and health
clamps in four sizes suitable for securing PEX tubing that
practices and determine the applicability of regulatory limita-
meets the requirements of Specifications F 876 or F 877 to
tions prior to use.
insert fittings that meet the requirements of F 1807.
2. Referenced Documents
5. Materials and Manufacture
2.1 ASTM Standards:
5.1 Clamps—Clamps shall be made from material meeting
A 240 Specification for Heat-Resisting Chromium and
the requirements of Specification A 240 stainless steel UNS
Chromium-Nickel Stainless Steel Plate, Sheet, and Strip
3 S304000.
for Pressure Vessels
D 618 Practice for Conditioning Plastics and Electrical
6. Performance Requirements
Insulating Materials for Testing
6.1 General—All performance tests shall be performed on
assemblies of fittings, clamps and PEX tubing. Clamps shall
meet the material and dimensional requirements of this speci-
This specification is under the jurisdiction of ASTM Committee F17 on Plastic
Piping Systems and is the direct responsibility of Subcommittee F17.10 on Fittings.
fication. Fittings shall meet the material and dimensional
Current edition approved April 10, 2001. Published July 2001.
requirements of F 1807. PEX tubing shall meet the require-
The stainless steel clamp described in this standard is covered by a patent.
ments of Specification F 876 or F 877. Assembly of test
Interested parties are invited to submit information regarding the identification of an
alternative to this patented item to ASTM Headquarters. Your comments will receive
careful consideration at a meeting of F17, which you may attend.
3 5
Annual Book of ASTM Standards, Vol 01.03. Annual Book of ASTM Standards, Vol 08.04.
4 6
Annual Book of ASTM Standards, Vol 08.01. Annual Book of ASTM Standards, Vol 03.01.
Copyright © ASTM International, 100 Barr Harbor Drive, PO Box C700, West Conshohocken, PA 19428-2959, United States.
F2098–01
TABLE 2 Minimum Hydrostatic Sustained Pressure
specimens shall be in accordance with 9.1.1. Each assembly
A,B
Requirements for Fitting, Clamp and PEX Tubing Assemblies
shall contain at least two (2) joints. Use separate sets of
Pressure Required for Test,
assemblies for each performance test requirement.
Nominal Tubing Size
A
psi (kPa)
6.2 Hydrostatic Burst—Assemblies shall meet the mini-
in. mm 180°F (82.2°C)
mum hydrostatic burst requirements shown in Table 1 when
⁄8 10 250 (1724)
⁄2 13 195 (1344)
tested in accordance with 10.5.
⁄4 and 16 and 190 (1310)
6.3 Hydrostatic Sustained Pressure Strength—Assemblies
larger larger
shall meet the hydrostatic sustained pressure requirements
A
The fiber stress to derive this test pressure is: 770 psi (5.31 MPa) at 180°F
shown in Table 2 when tested in accordance with 10.6.
(82.2°C).
B
Test duration is 1000 h.
6.4 Thermocycling—Assemblies shall not leak or separate
when thermocycled 1000 cycles between the temperatures of
TABLE 3 Excessive Temperature and Pressure Requirements for
60°F (16°C) and 180°F (82°C) when tested in accordance with
Fitting, Clamp and PEX Tubing Assemblies
10.7.
Hydrostatic Test Pressure
6.5 Excessive Temperature-Pressure Capability:
Test Duration, Air Bath Temperature
A
Air Bath,
6.5.1 General—Assemblies shall have adequate strength to h °F (°C)
A psi (kPa)
accommodate short-term conditions, 30 days (720 h) of 210°F
720 150 (1034) 210 (99)
(99°C) and 150 psi (1034 kPa).
A
The fiber stress used to derive this test pressure is 595 psi (4.1 MPa) at 210°F
6.5.2 Excessive Temperature Hydrostatic Sustained
(99°C).
Pressure—Assemblies shall meet sustained pressure require-
ments shown in Table 3 when tested in accordance with 10.8.
to ⁄4 in. (3.2 to 6.4 mm) from the end of the tube. The
7. Dimensions
ratcheting clamping tool shall be used to close the clamp. The
7.1 Dimensions and Tolerances—The dimensions and tol-
tool will not release until the clamp is properly closed.
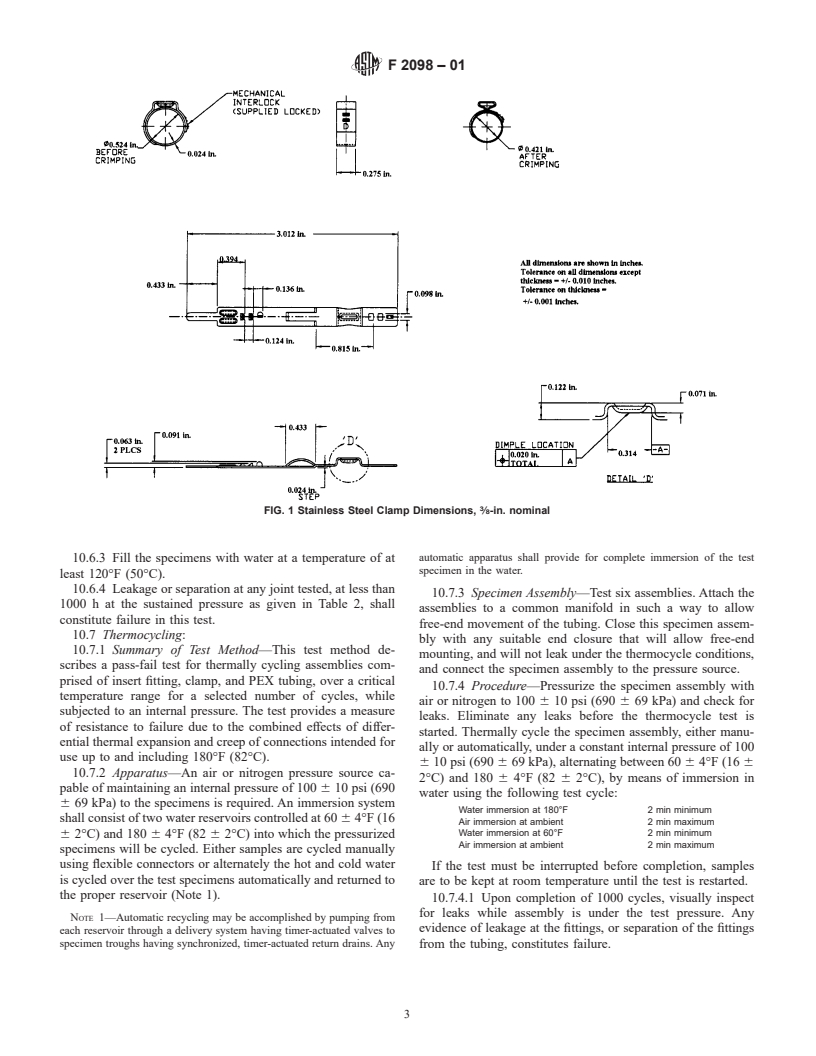
erances of clamps shall be as shown in Figs. 1-4 when
Ratcheting hand tools shall conform to the dimensional re-
measured in accordance with 10.4.
quirements of Fig. 5.
8. Workmanship, Finish and Appearance
10. Test Methods
8.1 The surfaces of the clamps shall be smooth and free of
10.1 Conditioning—Condition specimens at 73 6 4°F (23
foreign material. Clamps shall be free of cracks, holes, corro-
6 2°C) and 50 6 5 % relative humidity for not less than 4 h
sion, voids, foreign inclusions, or other defects that are visible
prior to testing. Practice D 618 shall be used as applicable, as
to the unaided eye that have potential to affect the clamp
a guide to other conditions.
integrity.
10.2 Test Conditions—Conduct the tests in the standard
laboratory atmosphere at 73 6 4°F (23 6 2°C) and 50 6 5%
9. Assembly
relative humidity, unless otherwise specified in the test meth-
9.1 Clamp Joints—Insert fittings shall be joined to PEX
ods or in this specification.
tubing by deforming and locking a stainless steel clamp around
10.3 Sampling—A sample of the fittings, clamps, and PEX
the outer circumference of the tubing, forcing the tubing
tubing, sufficient to determine conformance with this specifi-
material into annular spaces formed by the ribs on the fitting.
cation, shall be taken. Sampling of clamps shall be random.
Insert fittings shall meet the dimensional and material require-
10.4 Dimensions—Randomly selected clamp or clamps,
ments of F 1807. PEX tubing shall meet the requirements of
shall be used to determine dimensional conformance of
Specifications F 876 or F 877. Clamps shall meet the dimen-
clamps. Clamp dimensions shall be measured on flat clamps
sional and material requirements of this specification.
prior to forming (rounding). Dimensional requirements do not
9.1.1 Clamping Procedure—The clamping procedure shall
apply to clamps that have been flattened after forming. Mea-
be as follows: slide the clamp onto the tubing, insert the ribbed
surements of clamps, tubing, and fittings shall be made in
end of the fitting into the end of the tubing until the tubing
accordance with Method D 2122
...


Questions, Comments and Discussion
Ask us and Technical Secretary will try to provide an answer. You can facilitate discussion about the standard in here.