ASTM B432-91(1998)
(Specification)Standard Specification for Copper and Copper Alloy Clad Steel Plate
Standard Specification for Copper and Copper Alloy Clad Steel Plate
SCOPE
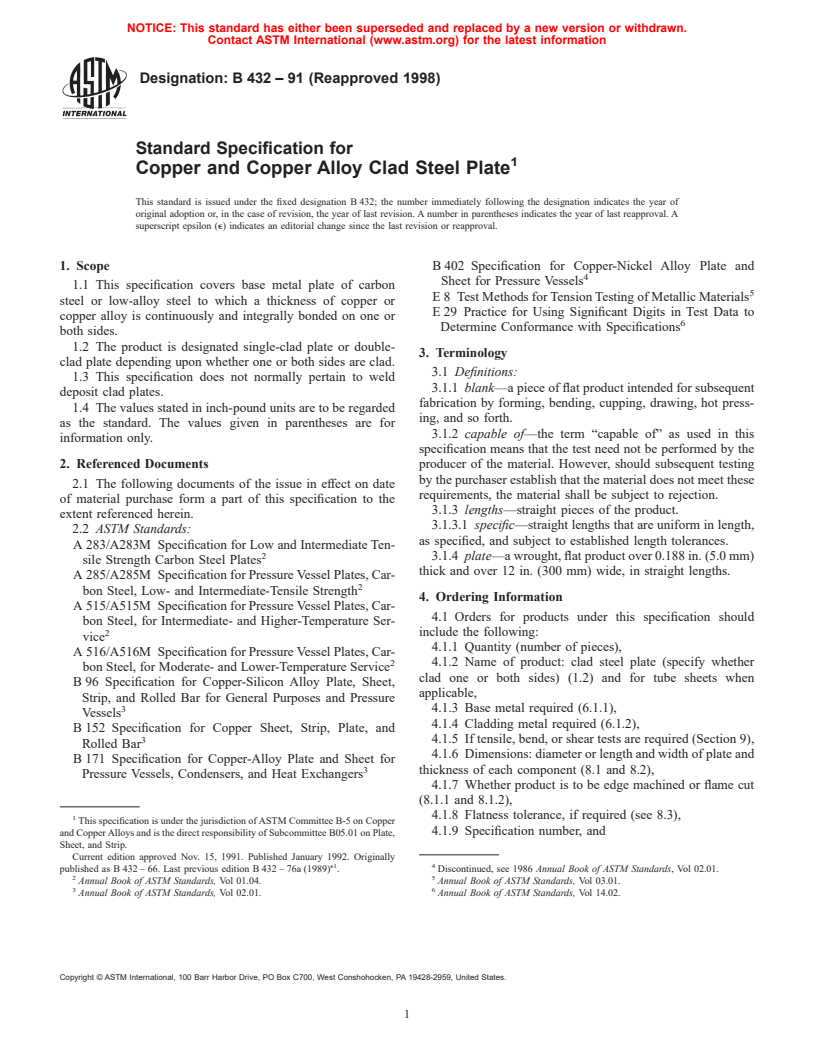
1.1 This specification covers base metal plate of carbon steel or low-alloy steel to which a thickness of copper or copper alloy is continuously and integrally bonded on one or both sides.
1.2 The product is designated single-clad plate or double-clad plate depending upon whether one or both sides are clad.
1.3 This specification does not normally pertain to weld deposit clad plates.
1.4 The values stated in inch-pound units are to be regarded as the standard. The values given in parentheses are for information only.
General Information
Relations
Standards Content (Sample)
NOTICE: This standard has either been superseded and replaced by a new version or withdrawn.
Contact ASTM International (www.astm.org) for the latest information
Designation: B 432 – 91 (Reapproved 1998)
Standard Specification for
Copper and Copper Alloy Clad Steel Plate
This standard is issued under the fixed designation B 432; the number immediately following the designation indicates the year of
original adoption or, in the case of revision, the year of last revision. A number in parentheses indicates the year of last reapproval. A
superscript epsilon (e) indicates an editorial change since the last revision or reapproval.
1. Scope B 402 Specification for Copper-Nickel Alloy Plate and
Sheet for Pressure Vessels
1.1 This specification covers base metal plate of carbon
E 8 Test Methods for Tension Testing of Metallic Materials
steel or low-alloy steel to which a thickness of copper or
E 29 Practice for Using Significant Digits in Test Data to
copper alloy is continuously and integrally bonded on one or
Determine Conformance with Specifications
both sides.
1.2 The product is designated single-clad plate or double-
3. Terminology
clad plate depending upon whether one or both sides are clad.
3.1 Definitions:
1.3 This specification does not normally pertain to weld
3.1.1 blank—a piece of flat product intended for subsequent
deposit clad plates.
fabrication by forming, bending, cupping, drawing, hot press-
1.4 The values stated in inch-pound units are to be regarded
ing, and so forth.
as the standard. The values given in parentheses are for
3.1.2 capable of—the term “capable of” as used in this
information only.
specification means that the test need not be performed by the
2. Referenced Documents producer of the material. However, should subsequent testing
by the purchaser establish that the material does not meet these
2.1 The following documents of the issue in effect on date
requirements, the material shall be subject to rejection.
of material purchase form a part of this specification to the
3.1.3 lengths—straight pieces of the product.
extent referenced herein.
3.1.3.1 specific—straight lengths that are uniform in length,
2.2 ASTM Standards:
as specified, and subject to established length tolerances.
A 283/A283M Specification for Low and Intermediate Ten-
3.1.4 plate—a wrought, flat product over 0.188 in. (5.0 mm)
sile Strength Carbon Steel Plates
thick and over 12 in. (300 mm) wide, in straight lengths.
A 285/A285M Specification for Pressure Vessel Plates, Car-
bon Steel, Low- and Intermediate-Tensile Strength
4. Ordering Information
A 515/A515M Specification for Pressure Vessel Plates, Car-
4.1 Orders for products under this specification should
bon Steel, for Intermediate- and Higher-Temperature Ser-
2 include the following:
vice
4.1.1 Quantity (number of pieces),
A 516/A516M Specification for Pressure Vessel Plates, Car-
2 4.1.2 Name of product: clad steel plate (specify whether
bon Steel, for Moderate- and Lower-Temperature Service
clad one or both sides) (1.2) and for tube sheets when
B 96 Specification for Copper-Silicon Alloy Plate, Sheet,
applicable,
Strip, and Rolled Bar for General Purposes and Pressure
3 4.1.3 Base metal required (6.1.1),
Vessels
4.1.4 Cladding metal required (6.1.2),
B 152 Specification for Copper Sheet, Strip, Plate, and
3 4.1.5 If tensile, bend, or shear tests are required (Section 9),
Rolled Bar
4.1.6 Dimensions: diameter or length and width of plate and
B 171 Specification for Copper-Alloy Plate and Sheet for
thickness of each component (8.1 and 8.2),
Pressure Vessels, Condensers, and Heat Exchangers
4.1.7 Whether product is to be edge machined or flame cut
(8.1.1 and 8.1.2),
1 4.1.8 Flatness tolerance, if required (see 8.3),
This specification is under the jurisdiction of ASTM Committee B-5 on Copper
and Copper Alloys and is the direct responsibility of Subcommittee B05.01 on Plate, 4.1.9 Specification number, and
Sheet, and Strip.
Current edition approved Nov. 15, 1991. Published January 1992. Originally
e1 4
published as B 432 – 66. Last previous edition B 432 – 76a (1989) . Discontinued, see 1986 Annual Book of ASTM Standards, Vol 02.01.
2 5
Annual Book of ASTM Standards, Vol 01.04. Annual Book of ASTM Standards, Vol 03.01.
3 6
Annual Book of ASTM Standards, Vol 02.01. Annual Book of ASTM Standards, Vol 14.02.
Copyright © ASTM International, 100 Barr Harbor Drive, PO Box C700, West Conshohocken, PA 19428-2959, United States.
B 432
4.1.10 Whether ultrasonic testing is required. 8.2 Thickness—Components of clad plate shall be supplied
in any standard gage with standard tolerances. Special gages
5. Materials and Manufacture
and tolerances may be supplied by special arrangement.
5.1 The cladding metal may be bonded to the base metal by
8.3 Flatness:
any method that will produce a metallurgically bonded clad
8.3.1 The flatness of clad plate to be used as tube sheets
steel conforming to the requirements of this specification.
shall be measured on the cladding component side across the
diameter of the circular tube sheet or the width and length
6. Chemical Composition
dimensions of a rectangular tube sheet and shall conform to the
6.1 The clad plate shall conform to any desired combination
applicable tolerances in Table 1. Variations in flatness along the
of base metal and cladding metal components as described in
lengths of plate up to 18 ft (5.5 m) in length or along any 12-ft
the following paragraphs:
(3.7-m) length of plate longer than 18 ft (5.5 m) shall not
6.1.1 Base Metal—The base metal may be carbon steel or
exceed tabular amount specified for width of plate.
low-alloy steel, chemically conforming to an ASTM specifica-
8.3.2 The flatness tolerance (maximum concavity across
tion for steel plate. The chemical composition of a specified
width or length) of rectangular clad plate intended for purposes
low-alloy steel not so covered shall be as agreed upon by the
other than tube sheet shall conform to Table 2 or shall be
manufacturer or supplier and the purchaser. The base metal
agreed upon between purchaser and producer.
shall conform to the requirements of the specification to which
8.3.3 Measurement of flatness shall be made by placing the
it is ordered.
plate on a flat surface, applying a straight edge across the plate,
6.1.2 Cladding Metal—The cladding metal covered by this
and measuring the depth of arc between the straight edge and
specification may include any copper or copper alloy that is
the plate.
specified and shall be made according to an ASTM specifica-
tion covering that copper or copper alloy. If an ASTM
9. Workmanship, Finish, and Appearance
specification is not available for that copper or copper alloy,
agreement between the purchaser and manufacturer must be
9.1 The material shall be free from defects of a nature that
obtained before fabrication of the cladding metal as to chemi-
interferes with normal commercial operations. It shall be well
cal composition, mechanical properties, tolerances, and so
cleaned and free of dirt. A superficial film of residual light
forth.
lubricant is normally present and is permissible unless other-
wise specified.
7. Mechanical Requirements
7.1 The product, after bonding, with cladding removed shall
10. Sampling
be capable of meeting the minimum mechanical properties
10.1 All tests shall be made on specimens in the same
required of the specified base steel plate.
condition and temper as that in which the composite plate is
7.2 The minimum shear strength of the bond between the
furnished.
alloy cladding and base metal shall be 12 ksi (85 MPa).
10.2 Test specimens may be taken at the manufacturer’s
7.3 When required by the purchase order, the clad steel plate
option from the excess portion of the material after the final cut
shall be ultrasonically tested for bond integrity. See Supple-
to size or from separate pieces produced under the same
mentary Requirements.
specification and temper.
8. Dimensions and Permissible Variations
10.3 When the bend test samples are taken from the product
to be supplied, these shall be taken from the middle of one end
8.1 Diameter, or Length and Width:
8.1.1 When clad plate is to be supplied in the edge machined of the plate and the axis of the test coupon shall be transverse
to the major axis of rolling of the plate.
condition, the following tolerances shall apply:
Diameter, or Length Tolerance, Plus
and Width and Minus
11. Number of Tests
Under 60 in. (1.52 m) ⁄16 in. (1.6 mm)
11.1 When specified, one or more tension tests, as required
60 to 84 in. (1.52 to 2.13 m) ⁄8 in. (3.2 mm)
by the specification for the base metal one face-bend test
8.1.2 When clad plate is to be supplied flame cut, tolerances (cladding metal in tension), one reverse-bend test (cladding
shall be as agreed upon between purchaser and supplier. metal in compression), and one shear test shall be made.
A
TABLE 1 Flatness Tolerances for Tube Sheets, Clad One Side Only
B
Maximum Deviation from True Flatness for a Given Diameter, Width, or Length, in. (mm)
Total Thickness, in. (mm)
Over 48 (1219) Over 72 (1829) Over 96 (2438) Over 120
To 48 (1219)
to 72 (1829) to 96 (2438) to 120 (3048) (3048)
1 1 1 3 1 1
To 2 ⁄2 (63.5) ⁄8 (3.18) ⁄8 (3.18) ⁄16 (4.76) ⁄4 (6.35) ⁄2 (12.7)
1 1 1 1 1 1
Over 2 ⁄2 (63.5) to 4 (102) ⁄8 (3.18) ⁄8 (3.18) ⁄4 (6.35) ⁄2 (12.7) ⁄2 (12.7)
1 1 3 1 1
Over 4 (102) to 6 (152) ⁄8 (3.18) ⁄4 (6.35) ⁄8 (9.52) ⁄2 (12.7) ⁄2 (12.7)
3 3 1 1 1
Over 6 (152) to 8 (203) ⁄16 (4.76) ⁄8 (9.52) ⁄2 (12.7) ⁄2 (12.7) ⁄2 (12.7)
A
Two side clads by special arrangement.
B
Measured along the radial arms of a planar reference wheel placed on the plate.
B 432
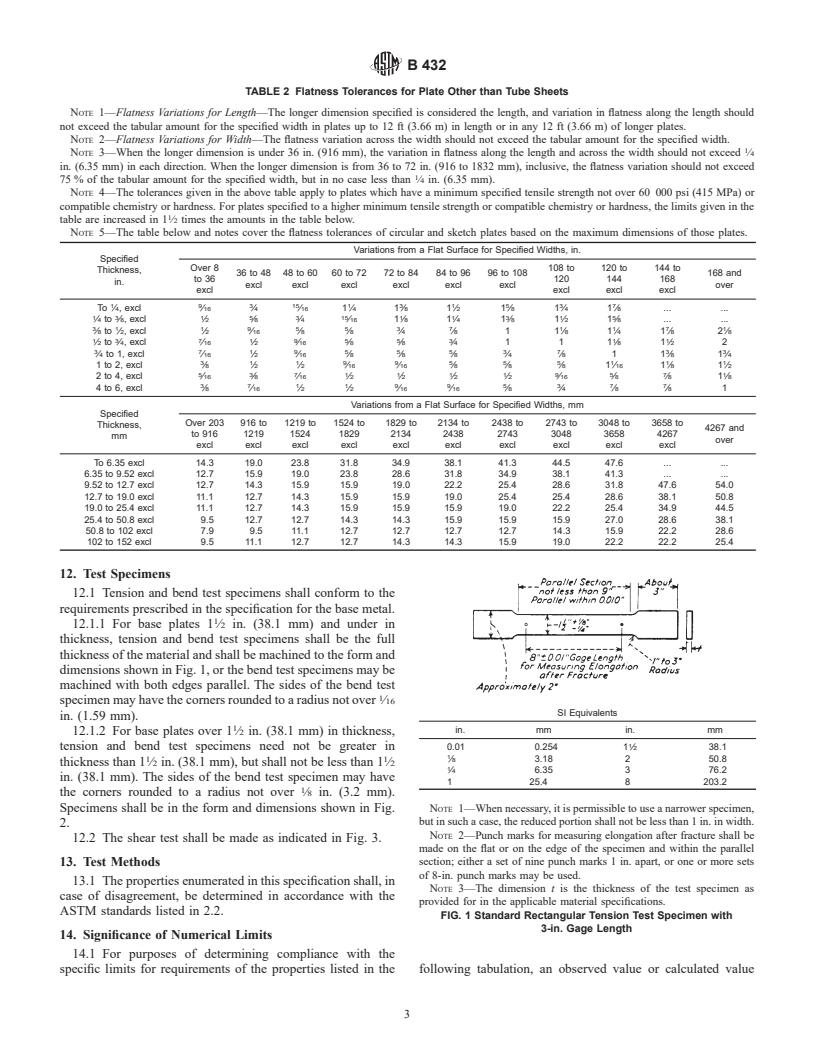
TABLE 2 Flatness Tolerances for Plate Other than Tube Sheets
NOTE 1—Flatness Variations for Length—The longer dimension specified is considered the length, and variation in flatness along the length should
not exceed the tabular amount for the specified width in plates up to 12 ft (3.66 m) in length or in any 12 ft (3.66 m) of longer plates.
NOTE 2—Flatness Variations for Width—The flatness variation across the width should not exceed the tabular amount for the specified width.
NOTE 3—When the long
...


Questions, Comments and Discussion
Ask us and Technical Secretary will try to provide an answer. You can facilitate discussion about the standard in here.