ASTM A997/A997M-23
(Practice)Standard Practice for Investment Castings, Surface Acceptance Standards, Visual Examination
Standard Practice for Investment Castings, Surface Acceptance Standards, Visual Examination
ABSTRACT
This practice covers the acceptance criteria for surface inspection of investment castings through visual examination. The material shall conform to Levels II, III, and IV acceptance criteria for features of surface pits, positive metal, parting line and ejector pin marks, gate height, and surface roughness. The material shall be free of any linear discontinuity.
SCOPE
1.1 This practice covers the acceptance criteria for surface inspection of investment castings by visual examination.
1.2 This practice is expressed in both inch-pound units and in SI units; however, unless the purchase order or contract specifies the applicable M-specification designation (SI units), the inch-pound units shall apply.
1.3 The values stated in either SI units or inch-pound units are to be regarded separately as standard. The values stated in each system may not be exact equivalents; therefore, each system shall be used independently of the other. Combining values from the two systems may result in nonconformance with the standard.
1.4 This standard does not purport to address all of the safety concerns, if any, associated with its use. It is the responsibility of the user of this standard to establish appropriate safety, health, and environmental practices and determine the applicability of regulatory limitations prior to use.
1.5 This international standard was developed in accordance with internationally recognized principles on standardization established in the Decision on Principles for the Development of International Standards, Guides and Recommendations issued by the World Trade Organization Technical Barriers to Trade (TBT) Committee.
General Information
Buy Standard
Standards Content (Sample)
This international standard was developed in accordance with internationally recognized principles on standardization established in the Decision on Principles for the
Development of International Standards, Guides and Recommendations issued by the World Trade Organization Technical Barriers to Trade (TBT) Committee.
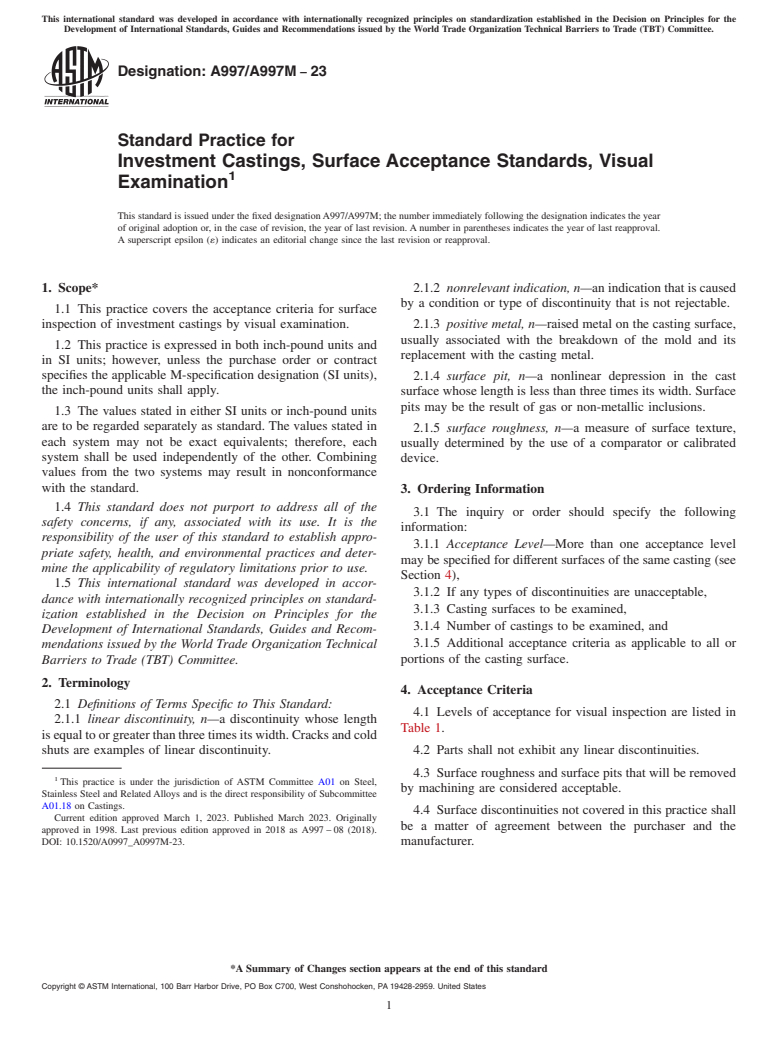
Designation: A997/A997M − 23
Standard Practice for
Investment Castings, Surface Acceptance Standards, Visual
1
Examination
This standard is issued under the fixed designation A997/A997M; the number immediately following the designation indicates the year
of original adoption or, in the case of revision, the year of last revision. A number in parentheses indicates the year of last reapproval.
A superscript epsilon (´) indicates an editorial change since the last revision or reapproval.
1. Scope* 2.1.2 nonrelevant indication, n—an indication that is caused
by a condition or type of discontinuity that is not rejectable.
1.1 This practice covers the acceptance criteria for surface
inspection of investment castings by visual examination. 2.1.3 positive metal, n—raised metal on the casting surface,
usually associated with the breakdown of the mold and its
1.2 This practice is expressed in both inch-pound units and
replacement with the casting metal.
in SI units; however, unless the purchase order or contract
specifies the applicable M-specification designation (SI units),
2.1.4 surface pit, n—a nonlinear depression in the cast
the inch-pound units shall apply. surface whose length is less than three times its width. Surface
pits may be the result of gas or non-metallic inclusions.
1.3 The values stated in either SI units or inch-pound units
are to be regarded separately as standard. The values stated in
2.1.5 surface roughness, n—a measure of surface texture,
each system may not be exact equivalents; therefore, each
usually determined by the use of a comparator or calibrated
system shall be used independently of the other. Combining
device.
values from the two systems may result in nonconformance
with the standard.
3. Ordering Information
1.4 This standard does not purport to address all of the
3.1 The inquiry or order should specify the following
safety concerns, if any, associated with its use. It is the
information:
responsibility of the user of this standard to establish appro-
3.1.1 Acceptance Level—More than one acceptance level
priate safety, health, and environmental practices and deter-
may be specified for different surfaces of the same casting (see
mine the applicability of regulatory limitations prior to use.
Section 4),
1.5 This international standard was developed in accor-
3.1.2 If any types of discontinuities are unacceptable,
dance with internationally recognized principles on standard-
3.1.3 Casting surfaces to be examined,
ization established in the Decision on Principles for the
3.1.4 Number of castings to be examined, and
Development of International Standards, Guides and Recom-
mendations issued by the World Trade Organization Technical 3.1.5 Additional acceptance criteria as applicable to all or
portions of the casting surface.
Barriers to Trade (TBT) Committee.
2. Terminology
4. Acceptance Criteria
2.1 Definitions of Terms Specific to This Standard:
4.1 Levels of acceptance for visual inspection are listed in
2.1.1 linear discontinuity, n—a discontinuity whose length
Table 1.
is equal to or greater than three times its width. Cracks and cold
shuts are examples of linear discontinuity. 4.2 Parts shall not exhibit any linear discontinuities.
4.3 Surface roughness and surface pits that will be removed
1
This practice is under the jurisdiction of ASTM Committee A01 on Steel,
by machining are considered acceptable.
Stainless Steel and Related Alloys and is the direct responsibility of Subcommittee
A01.18 on Castings.
4.4 Surface discontinuities not covered in this practice shall
Current edition approved March 1, 2023. Published March 2023. Originally
be a matter of agreement between the purchaser and the
approved in 1998. Last previous edition approved in 2018 as A997 – 08 (2018).
DOI: 10.1520/A0997_A0997M-23. manufacturer.
*A Summary of Changes section appears at the end of this standard
Copyright © ASTM International, 100 Barr Harbor Drive, PO Box C700, West Conshohocken, PA 19428-2959. United States
1
---------------------- Page: 1 ----------------------
A997/A997M − 23
A,B
TABLE 1 Visual Inspection Acceptance Criteria
Surface Feature Level II Level III Level IV
C,D,E
Surface Pits 0.030 in. [0.76 mm] 0.060 in. [1.52 mm] 0.060 in. [1.52 mm]
diameter by 0.015 in. diameter by 0.030 in. diameter by 0.030 in.
[0.38 mm] deep with [0.76 mm] deep with [0.76 mm] deep with
2 2 2
no more than 1 per in. no more than 1 per in. no more than 4 per in.
2 2 2
[645 mm ] [645 mm ] [645 mm ]
D,E
Positive Metal 0.060 in. [1.52 mm] 0.125 in. [3.18 mm] 0.125 in. [3.18 mm]
diameter by 0.015 in. diameter by 0.030 in. diameter by 0.030 in.
[0.38 mm] high with [0.76 mm] high with [0.76 mm] high with
2 2 2
...
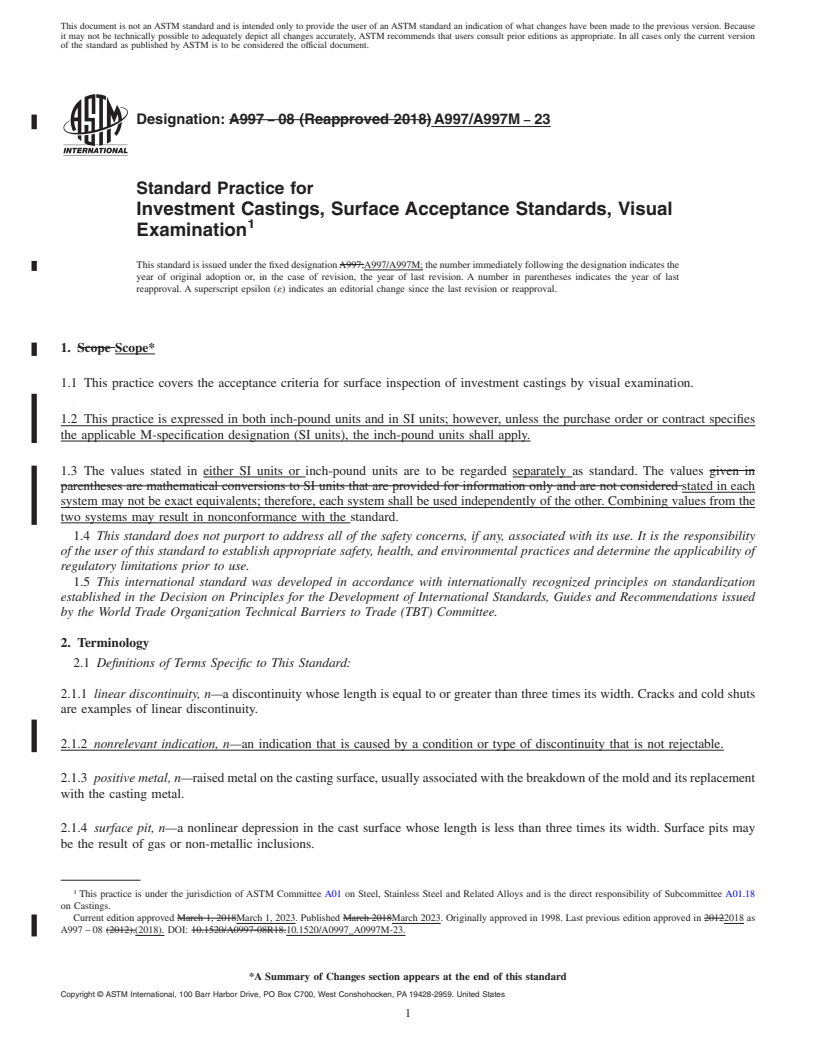
This document is not an ASTM standard and is intended only to provide the user of an ASTM standard an indication of what changes have been made to the previous version. Because
it may not be technically possible to adequately depict all changes accurately, ASTM recommends that users consult prior editions as appropriate. In all cases only the current version
of the standard as published by ASTM is to be considered the official document.
Designation: A997 − 08 (Reapproved 2018) A997/A997M − 23
Standard Practice for
Investment Castings, Surface Acceptance Standards, Visual
1
Examination
This standard is issued under the fixed designation A997;A997/A997M; the number immediately following the designation indicates the
year of original adoption or, in the case of revision, the year of last revision. A number in parentheses indicates the year of last
reapproval. A superscript epsilon (´) indicates an editorial change since the last revision or reapproval.
1. Scope Scope*
1.1 This practice covers the acceptance criteria for surface inspection of investment castings by visual examination.
1.2 This practice is expressed in both inch-pound units and in SI units; however, unless the purchase order or contract specifies
the applicable M-specification designation (SI units), the inch-pound units shall apply.
1.3 The values stated in either SI units or inch-pound units are to be regarded separately as standard. The values given in
parentheses are mathematical conversions to SI units that are provided for information only and are not considered stated in each
system may not be exact equivalents; therefore, each system shall be used independently of the other. Combining values from the
two systems may result in nonconformance with the standard.
1.4 This standard does not purport to address all of the safety concerns, if any, associated with its use. It is the responsibility
of the user of this standard to establish appropriate safety, health, and environmental practices and determine the applicability of
regulatory limitations prior to use.
1.5 This international standard was developed in accordance with internationally recognized principles on standardization
established in the Decision on Principles for the Development of International Standards, Guides and Recommendations issued
by the World Trade Organization Technical Barriers to Trade (TBT) Committee.
2. Terminology
2.1 Definitions of Terms Specific to This Standard:
2.1.1 linear discontinuity, n—a discontinuity whose length is equal to or greater than three times its width. Cracks and cold shuts
are examples of linear discontinuity.
2.1.2 nonrelevant indication, n—an indication that is caused by a condition or type of discontinuity that is not rejectable.
2.1.3 positive metal, n—raised metal on the casting surface, usually associated with the breakdown of the mold and its replacement
with the casting metal.
2.1.4 surface pit, n—a nonlinear depression in the cast surface whose length is less than three times its width. Surface pits may
be the result of gas or non-metallic inclusions.
1
This practice is under the jurisdiction of ASTM Committee A01 on Steel, Stainless Steel and Related Alloys and is the direct responsibility of Subcommittee A01.18
on Castings.
Current edition approved March 1, 2018March 1, 2023. Published March 2018March 2023. Originally approved in 1998. Last previous edition approved in 20122018 as
A997 – 08 (2012).(2018). DOI: 10.1520/A0997-08R18.10.1520/A0997_A0997M-23.
*A Summary of Changes section appears at the end of this standard
Copyright © ASTM International, 100 Barr Harbor Drive, PO Box C700, West Conshohocken, PA 19428-2959. United States
1
---------------------- Page: 1 ----------------------
A997/A997M − 23
2.1.5 surface roughness, n—a measure of surface texture, usually determined by the use of a comparator.comparator or calibrated
device.
3. Ordering Information
3.1 The inquiry or order should specify the following information:
3.1.1 Acceptance Level—More than one acceptance level may be specified for different surfaces of the same casting (see Section
4),
3.1.2 If any types of discontinuities are unacceptable,
3.1.3 Casting surfaces to be examined,
3.1.4 Number of castings to be examined, and
3.1.5 Additional acceptance criteria as applicable to all or portions of the casting surface.
4. Acceptance Criteria
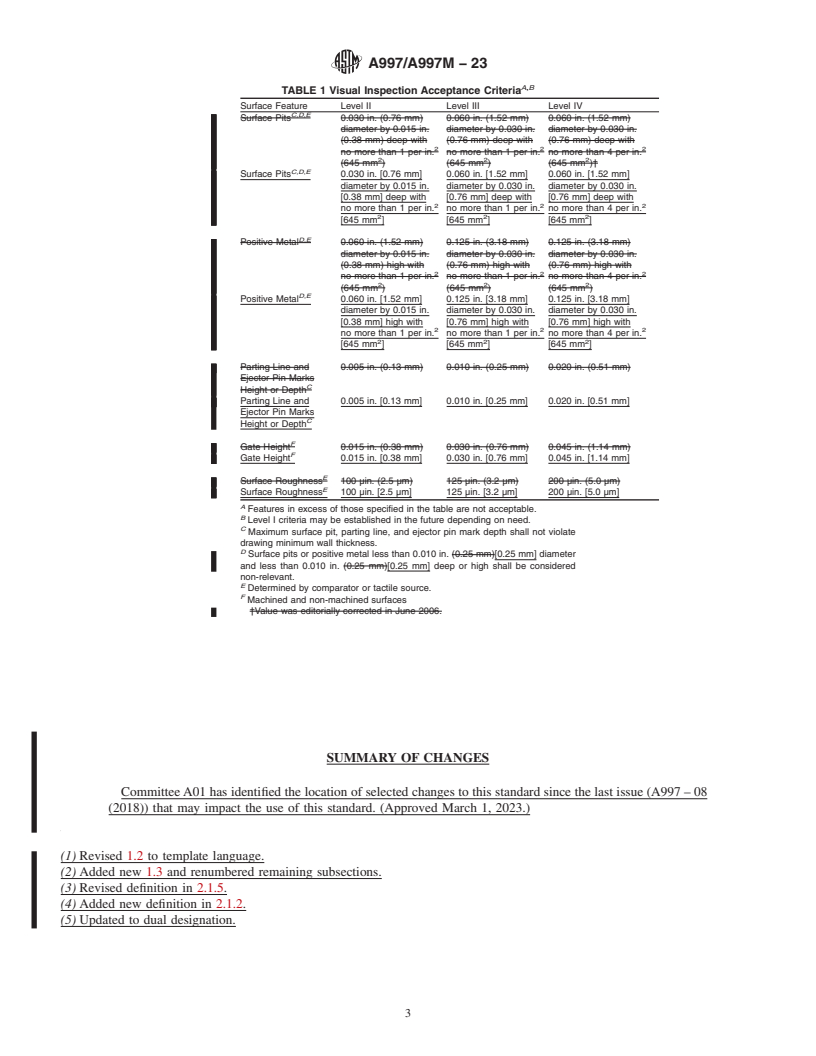
4.1 Levels of acceptance for visual inspection are listed in Table 1.
4.2 Parts shall not exhibit any linear discontinuities.
4.3 Surface roughness and surface pits that will be removed by machining are considered acceptable.
4.4 Surface discontinuities not covered in this practice shall be a matter of agreement between the purchaser and the manufacturer.
2
---------------------- Page: 2 ----------------------
A997/A997M − 23
A,B
TABLE 1 Visual Inspection Acceptance Criteria
Surface Feature Level II Level III Level IV
C,D,E
Surface Pits 0.030 in. (0.76 mm) 0.060 in. (1.52 mm) 0.060 in. (1.52 mm)
diameter by 0.015 in. diameter b
...


Questions, Comments and Discussion
Ask us and Technical Secretary will try to provide an answer. You can facilitate discussion about the standard in here.