ASTM C1717-09
(Test Method)Standard Test Methods for Conducting Strength Tests of Masonry Wall Panels
Standard Test Methods for Conducting Strength Tests of Masonry Wall Panels
SIGNIFICANCE AND USE
The test methods described in this standard are intended for use as a starting point in developing specific testing protocols for masonry elements.
The testing protocols could be used for general research on the load-deflection behavior of masonry elements.
The testing protocols could be used for qualification of masonry elements and materials by evaluation services and other parties.
The test methods described in this standard are general, and are intended to be adaptable to address a wide range of anticipated support and loading conditions.
How the test results are interpreted will depend on the intended use of the masonry element being tested.
SCOPE
1.1 These test methods cover methods for determining the strength and load-deflection characteristics of masonry wall elements.
1.2 The values stated in inch-pound units are to be regarded as standard. The values given in parentheses are mathematical conversions to SI units that are provided for information only and are not considered standard.
1.3 This standard does not purport to address all of the safety concerns, if any, associated with its use. It is the responsibility of the user of this standard to establish appropriate safety and health practices and determine the applicability of regulatory limitations prior to use.
General Information
Relations
Standards Content (Sample)
NOTICE: This standard has either been superseded and replaced by a new version or withdrawn.
Contact ASTM International (www.astm.org) for the latest information
Designation:C1717–09
Standard Test Methods for
Conducting Strength Tests of Masonry Wall Panels
This standard is issued under the fixed designation C1717; the number immediately following the designation indicates the year of
original adoption or, in the case of revision, the year of last revision. A number in parentheses indicates the year of last reapproval. A
superscript epsilon (´) indicates an editorial change since the last revision or reapproval.
INTRODUCTION
Engineered design of masonry structures requires accurate technical data on the strength and
load-deflection behavior of masonry wall elements. These test methods provide a systematic basis for
obtaining such data.
1. Scope 3.1.3 The test methods described in this standard are gen-
eral, and are intended to be adaptable to address a wide range
1.1 These test methods cover methods for determining the
of anticipated support and loading conditions.
strength and load-deflection characteristics of masonry wall
3.2 How the test results are interpreted will depend on the
elements.
intended use of the masonry element being tested.
1.2 The values stated in inch-pound units are to be regarded
as standard. The values given in parentheses are mathematical
4. Test Specimens
conversions to SI units that are provided for information only
4.1 General Description—The specimens shall have mate-
and are not considered standard.
rialsandworkmanshiprepresentativeofthestructuralelements
1.3 This standard does not purport to address all of the
they are intended to represent, and be large enough to be useful
safety concerns, if any, associated with its use. It is the
in predicting the structural performance of those elements.
responsibility of the user of this standard to establish appro-
4.2 Length or Height—The specimen shall be long enough
priate safety and health practices and determine the applica-
(for horizontal testing) or tall enough (for vertical testing) so
bility of regulatory limitations prior to use.
that its behavior under load will simulate that of the element
2. Referenced Documents that the specimen is intended to represent.
4.3 Width—The specimen shall be wide enough so that its
2.1 ASTM Standards:
behavior under load will simulate that of the element the
E2126 Test Methods for Cyclic (Reversed) Load Test for
specimen is intended to represent.
Shear Resistance of Vertical Elements of the Lateral Force
4.4 Laboratory Environment—Maintain the air in the labo-
Resisting Systems for Buildings
ratory at a temperature of 75 6 15°F (24 6 8°C) and a relative
3. Significance and Use humidity of 55 6 25 %.
4.5 Preconditioning of Masonry Materials—Precondition
3.1 The test methods described in this standard are intended
materials by storing in the laboratory environment for at least
for use as a starting point in developing specific testing
5 days before use.
protocols for masonry elements.
4.6 Age—Test masonry construction at an age of at least 28
3.1.1 The testing protocols could be used for general re-
days after fabrication, unless specified otherwise.
search on the load-deflection behavior of masonry elements.
3.1.2 Thetestingprotocolscouldbeusedforqualificationof
5. General Requirements for Instrumentation
masonry elements and materials by evaluation services and
5.1 Load Measurement—Measure loads with a load cell or
other parties.
pressure transducer having a precision better than or equal to
1 % of the expected maximum load.
These test methods are under the jurisdiction of ASTM Committee C15 on
5.2 Displacement Measurement—Measure displacements
Manufactured Masonry Units and is the direct responsibility of Subcommittee
with a linear potentiometer, linear variable displacement trans-
C15.04 on Research.
former (LVDT), or dial gauge having a precision equal to or
Current edition approved June 1, 2009. Published July 2009. DOI: 10.1520/
C1717-09.
better than the lesser of 61 % of the expected maximum
For referenced ASTM standards, visit the ASTM website, www.astm.org, or
displacement, or 60.02 in. (60.5 mm).
contact ASTM Customer Service at service@astm.org. For Annual Book of ASTM
Standards volume information, refer to the standard’s Document Summary page on
the ASTM website.
Copyright © ASTM International, 100 Barr Harbor Drive, PO Box C700, West Conshohocken, PA 19428-2959, United States.
C1717–09
5.3 Data Acquisition—Record sufficient data to define the the specimen shall be simply supported (with a zero or
load-displacement curve with sufficient precision for the pur- non-zero eccentricity) or restrained. The top of the specimen
poses of the test. Each set of data (load and displacement) is shallbesimplysupported(withazeroornon-zeroeccentricity)
referred to as a “loading point.” or restrained. Apply the axial load at the top with a zero or
non-zero eccentricity. Apply the load uniformly along the top
6. General Requirements for Loading
of the specimen.
6.1 Loading Method—Load specimens hydraulically using 7.2 Instrumentation:
a hand pump, electrical pump, or air-driven pump.
7.2.1 Axial Load—Measure the applied axial load.
6.2 Test Control—Control the load manually or automati-
7.2.2 Axial Deformation—Attach a bracket to the specimen
cally (servo-controlled feedback system).
near the upper end, supporting a metal rod. Attach another
6.2.1 Manual Control—If the load is controlled manually,
bracket to the specimen near its lower end, supporting a
displacements are imposed on the specimen. The loading
displacement gauge. Other means of measuring the axial
protocol may be based on target loads or target displacements.
deformation shall be acceptable, provided that they meet the
It is generally convenient to use target loads until the load level
requirements of 4.2.
approaches the expected capacity, and then use target displace-
7.2.3 Out-of-plane Deflection—Measure out-of-plane de-
ments.
flection using either a reference line attached to the wall, or a
6.2.2 Automatic Control—If the load is controlled automati-
fixed reference.
cally, either load or displacement is imposed on the system.
7.2.3.1 Out-of-plane Deflection Using a Reference Line—
The loading protocol may be based on target loads or target
Measure out-of-plane deflection using a deflection gauge
displacements. Use load control until the load level approaches
oriented perpendicular to the plane of the wall, and placed at
the expected capacity, and then use displacement control.
the mid-height and plan mid-length of the wall. Alternatively,
6.3 Loading Protocol—Use a loading protocol that is ap-
use two deflection gauges oriented perpendicular to the plane
propriate for the purposes of the test. The simplest loading
of the wall, and placed at the mid-height and plan ends of the
protocol is monotonic loading to failure. A more complex
wall. Attach one end of the deflection gauge or gauges to the
loading protocol is cycles of loading (possibly reversed) to
wall, and the other end to a reference line between the top and
monotonically increasing maximum amplitudes. Other proto-
bottom of the wall.
cols shall be permitted to be used.
7.2.3.2 Out-of-plane Deflection Using a Fixed Reference—
Use three deflection gauges, oriented perpendicular to the
NOTE 1—A wide range of loading protocols for in-plane tests is
plane of the wall, one placed at mid-height, the other two
provided in Test Methods E2126.
placed at the top and the bottom, and all placed at the plan
7. Axial Compression Test
mid-lengthofthewall.Attachoneendofeachdeflectiongauge
7.1 Apparatus—Use a test setup incorporating the essential to the wall, and attach the other end to a fixed reference.
aspects of Fig. 1. Design the test setup to resist at least twice 7.3 Data Recording—Report the bottom support conditions
the maximum anticipated load. Design the test setup so its and eccentricity.At each loading point, record the applied load,
stiffness parallel to the axis of the specimen is at least 103 the axial deformation of each axial deformation gauge and the
anticipated axial stiffness of the specimen itself. The bottom of average of these deformations, and the out-of-plane deflection.
FIG. 1 Test Setup for Axial Compressive Loading
C1717–09
8. Transverse Quarter-Point Loading—Specimen the support and midspan deflections shall be acceptable,
Horizontal provided that they meet the requirements of 5.2.
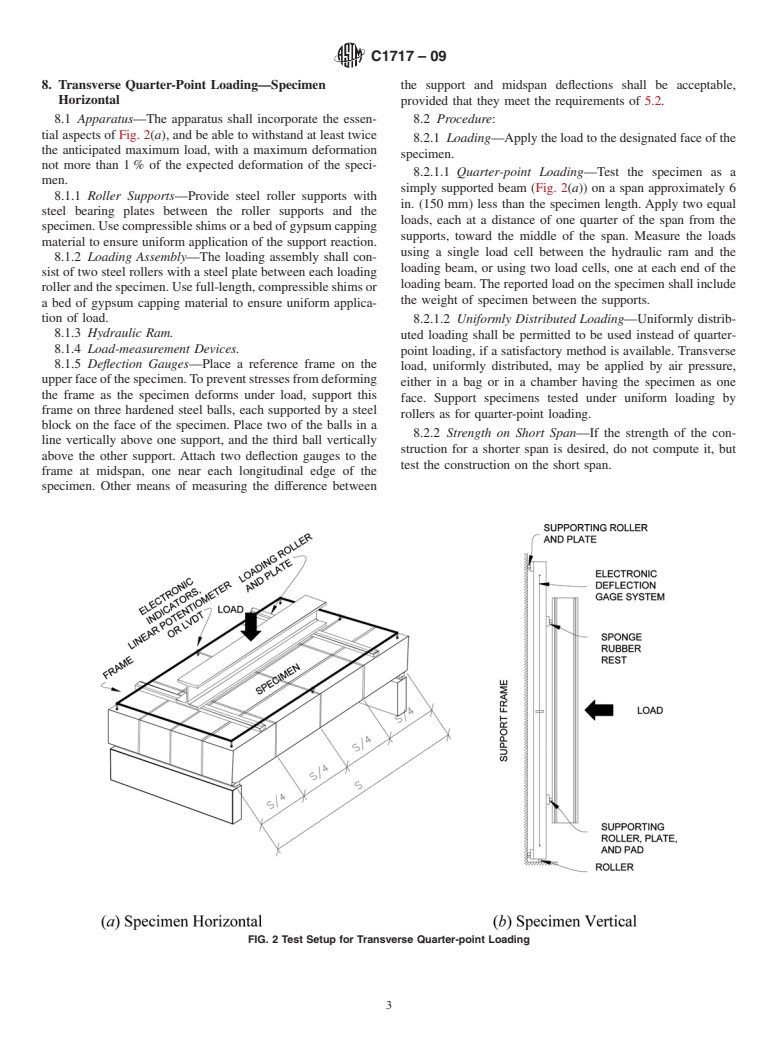
8.1 Apparatus—The apparatus shall incorporate the essen- 8.2 Procedure:
tial aspects of Fig. 2(a), and be able to withstand at least twice
8.2.1 Loading—Apply the load to the designated face of the
the anticipated maximum load, with a maximum deformation
specimen.
not more than 1 % of the expected deformation of the speci-
8.2.1.1 Quarter-point Loading—Test the specimen as a
men.
simply supported beam (Fig. 2(a)) on a span approximately 6
8.1.1 Roller Supports—Provide steel roller supports with
in. (150 mm) less than the specimen length. Apply two equal
steel bearing plates between the roller supports and the
loads, each at a distance of one quarter of the span from the
specimen. Use compressible shims or a bed of gypsum capping
supports, toward the middle of the span. Measure the loads
material to ensure uniform application of the support reaction.
using a single load cell between the hydraulic ram and the
8.1.2 Loading Assembly—The loading assembly shall con-
loading beam, or using two load cells, one at each end of the
sist of two steel rollers with a steel plate between each loading
loading beam. The reported load on the specimen shall include
roller and the specimen. Use full-length, compressible shims or
the weight of specimen between the supports.
a bed of gypsum capping material to ensure uniform applica-
tion of load.
8.2.1.2 Uniformly Distributed Loading—Uniformly distrib-
8.1.3 Hydraulic Ram.
uted loading shall be permitted to be used instead of quarter-
8.1.4 Load-measurement Devices
...


Questions, Comments and Discussion
Ask us and Technical Secretary will try to provide an answer. You can facilitate discussion about the standard in here.