ASTM A536-84(2004)e1
(Specification)Standard Specification for Ductile Iron Castings
Standard Specification for Ductile Iron Castings
ABSTRACT
This specification covers ductile iron castings, also known as spheroidal or nodular iron, that is described as cast iron with the graphite substantially spheroidal in shape and essentially free of other forms of graphite. Appropriate heat treatment shall be identified according to grades, as follows: a full ferritizing anneal for 60-40-18; a quench and temper, or normalize and temper, or isothermal heat treatment for 100-70-03 and 120-90-02; and as-cast for 65-45-12 and 80-55-06. Castings shall be tested and conform to specified tensile requirements such as tensile strength, yield strength, and elongation. When indicated in the contract or purchase order, castings shall also adhere to special requirements like hardness, chemical composition, microstructure, pressure tightness, radiographic soundness, magnetic particle inspection dimensions, and surface finish.
SCOPE
1.1 This specification covers castings made of ductile iron, also known as spheroidal or nodular iron, that is described as cast iron with the graphite substantially spheroidal in shape and essentially free of other forms of graphite, as defined in Terminology A 644.
1.2 The values stated in inch-pound units are to be regarded as the standard.
1.3 No precise quantitative relationship can be stated between the properties of the iron in various locations of the same casting or between the properties of castings and those of a test specimen cast from the same iron (see Appendix X1).
General Information
Relations
Buy Standard
Standards Content (Sample)
NOTICE: This standard has either been superseded and replaced by a new version or withdrawn.
Contact ASTM International (www.astm.org) for the latest information
´1
Designation: A 536 – 84 (Reapproved 2004)
Standard Specification for
Ductile Iron Castings
This standard is issued under the fixed designation A536; the number immediately following the designation indicates the year of
original adoption or, in the case of revision, the year of last revision.Anumber in parentheses indicates the year of last reapproval.A
superscript epsilon (´) indicates an editorial change since the last revision or reapproval.
This standard has been approved for use by agencies of the Department of Defense.
´ NOTE—Keywords editorially updated in December 2008.
1. Scope 3.1.2 Grade of ductile iron required (see Table 1, and
Sections 4 and 9),
1.1 This specification covers castings made of ductile iron,
3.1.3 Special properties, if required (see Section 7),
also known as spheroidal or nodular iron, that is described as
3.1.4 If a different number of samples are required (see
castironwiththegraphitesubstantiallyspheroidalinshapeand
Section 10),
essentially free of other forms of graphite, as defined in
3.1.5 Certification, if required (see Section 14), and
Terminology A644.
3.1.6 Special preparation for delivery, if required (see Sec-
1.2 Thevaluesstatedininch-poundunitsaretoberegarded
tion 15).
as the standard.
1.3 No precise quantitative relationship can be stated be-
4. Tensile Requirements
tweenthepropertiesoftheironinvariouslocationsofthesame
4.1 The iron represented by the test specimens shall con-
castingorbetweenthepropertiesofcastingsandthoseofatest
form to the requirements as to tensile properties presented in
specimen cast from the same iron (see Appendix X1).
Tables 1 and 2. The irons listed in Table 1 cover those in
2. Referenced Documents general use, while those listed in Table 2 are used for special
applications (such as pipes, fittings, etc.).
2.1 ASTM Standards:
4.2 Theyieldstrengthshallbedeterminedat0.2%offsetby
A370 TestMethodsandDefinitionsforMechanicalTesting
the offset method (see Test MethodsE8). Other methods may
of Steel Products
be used by mutual consent of the manufacturer and purchaser.
A644 Terminology Relating to Iron Castings
A732/A732M Specification for Castings, Investment,
5. Heat Treatment
Carbon and LowAlloy Steel for GeneralApplication, and
5.1 The 60-40-18 grade will normally require a full ferritiz-
Cobalt Alloy for High Strength at Elevated Temperatures
ing anneal.The 120-90-02 and the 100-70-03 grades generally
E8 Test Methods for Tension Testing of Metallic Materials
3 require a quench and temper or a normalize and temper, or an
2.2 Military Standard:
isothermal heat treatment. The other two grades can be met
MIL-STD-129 Marking for Shipment and Storage
either as-cast or by heat treatment. Ductile iron, which is heat
3. Ordering Information treated by quenching to martensite and tempering, may have
substantiallylowerfatiguestrengththanas-castmaterialofthe
3.1 Ordersformaterialtothisspecificationshallincludethe
same hardness.
following information:
3.1.1 ASTM designation,
6. Test Coupons
6.1 The separately cast test coupons from which the tension
testspecimensaremachinedshallbecasttothesizeandshape
ThisspecificationisunderthejurisdictionoftheASTMCommitteeA04onIron
Castings and is the direct responsibility of SubcommitteeA04.02 on Malleable and
shown in Fig. 1 or Fig. 2.Amodified keel block cast from the
Ductile Iron Castings.
mold shown in Fig. 3 may be substituted for the 1-in.Y-block
Current edition approved Oct. 1, 2004. Published October 2004. Originally
´1 or the 1-in. keel block. The test coupons shall be cast in open
approved in 1965. Last previous edition approved in 1999 asA536–84 (1999) .
molds made of suitable core sand having a minimum wall
For referenced ASTM standards, visit the ASTM website, www.astm.org, or
1 1
contact ASTM Customer Service at service@astm.org. For Annual Book of ASTM
thicknessof1 ⁄2in.(38mm)forthe ⁄2-in.(12.5mm)and1-in.
Standards volume information, refer to the standard’s Document Summary page on
(25-mm) sizes and 3 in. (75 mm) for the 3-in. size. The
the ASTM website.
3 coupons shall be left in the mold until they have cooled to a
Available from Standardization Documents Order Desk, DODSSP, Bldg. 4,
Section D, 700 Robbins Ave., Philadelphia, PA 19111-5098 blackcolor(approximately900°F(482°C)orless).Thesizeof
Copyright © ASTM International, 100 Barr Harbor Drive, PO Box C700, West Conshohocken, PA 19428-2959, United States.
´1
A 536 – 84 (2004)
TABLE 1 Tensile Requirements
Grade Grade Grade Grade Grade
60-40-18 65-45-12 80-55-06 100-70-03 120-90-02
Tensile strength, min, psi 60 000 65 000 80 000 100 000 120 000
Tensile strength, min, MPa 414 448 552 689 827
Yield strength, min, psi 40 000 45 000 55 000 70 000 90 000
Yield strength, min, MPa 276 310 379 483 621
Elongation in 2 in. or 50 mm, min, % 18 12 6.0 3.0 2.0
TABLE 2 Tensile Requirements for Special Applications
Grade Grade Grade
60-42-10 70-50-05 80-60-03
Tensile strength, min, psi 60 000 70 000 80 000
Tensile strength, min, MPa 415 485 555
Yield strength, min, psi 42 000 50 000 60 000
Yield strength, min, MPa 290 345 415
Elongation in 2 in. or 50 mm, 10 5 3
min, %
“Y” Block Size
For Castings
For Castings For Castings
of Thickness
of Thickness of Thickness
Dimen- ⁄2 in.
Less Than of 1 ⁄2 in.
sions (13 mm) to
⁄2 in. (38 mm)
1 ⁄2 in.
(13 mm) and Over
(38 mm)
in. mm in. mm in. mm
A ⁄2 13 1 25 3 75
5 1
B1 ⁄8 40 2 ⁄8 54 5 125
C 2 50 3 75 4 100
D 4 100 6 150 8 200
E 7 175 7 175 7 175
approx approx approx approx approx approx
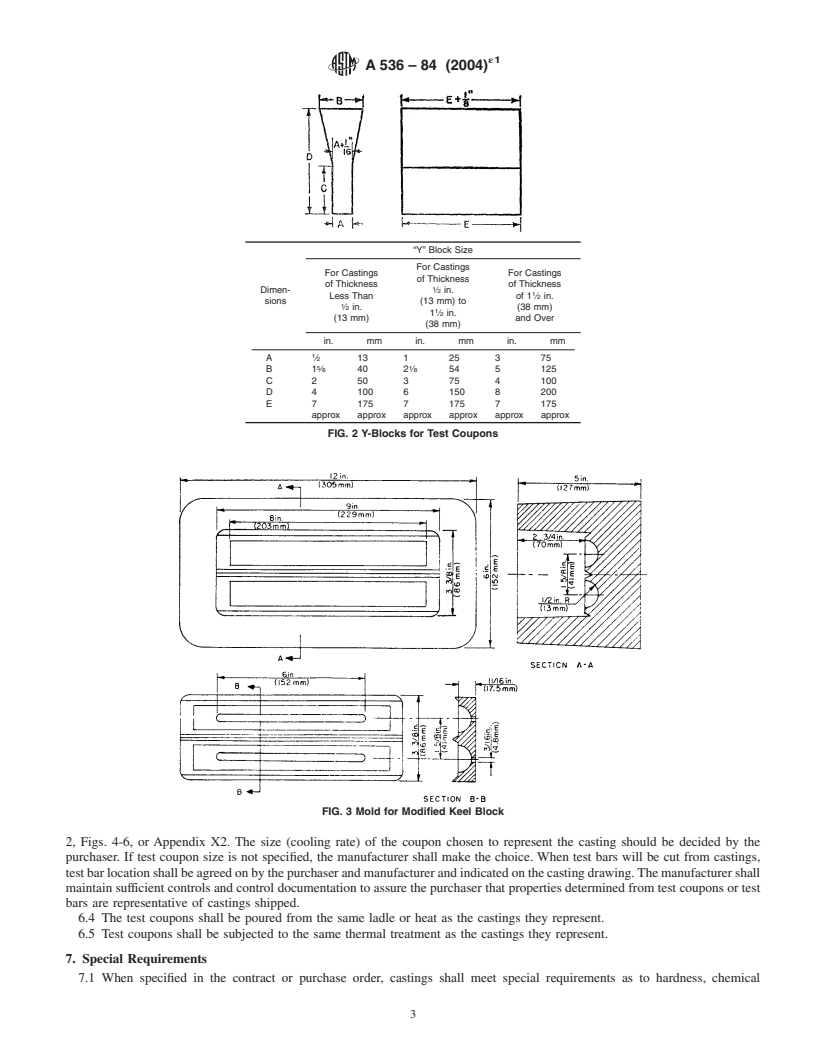
FIG. 2 Y-Blocks for Test Coupons
sentative of castings produced from the ladle poured and a
Metric Equivalents
cooling rate equivalent to that obtained with the test molds
in. mm in. mm
shown in Figs. 1 and 2, Figs. 4-6,or Appendix X2. The size
1 1
⁄2 12.7 1 ⁄2 38.1
(cooling rate) of the coupon chosen to represent the casting
1 25.4 2 ⁄2 63.5
should be decided by the purchaser. If test coupon size is not
NOTE—The length of the keel block shall be 6 in. (152 mm).
specified, the manufacturer shall make the choice. When test
FIG. 1 Keel Block for Test Coupons
bars will be cut from castings, test bar location shall be agreed
on by the purchaser and manufacturer and indicated on the
couponcasttorepresentthecastingshallbeattheoptionofthe casting drawing. The manufacturer shall maintain sufficient
purchaser. In case no option is expressed, the manufacturer
controlsandcontroldocumentationtoassurethepurchaserthat
shall make the choice.
properties determined from test coupons or test bars are
6.2 Wheninvestmentcastingsaremadetothisspecification,
representative of castings shipped.
the manufacturer may use test specimens cast to size incorpo-
6.4 Thetestcouponsshallbepouredfromthesameladleor
rated in the mold with the castings, or separately cast to size
heat as the castings they represent.
using the same type of mold and the same thermal conditions
6.5 Test coupons shall be subjected to the same thermal
that are used to produce the castings. These test specimens
treatment as the castings they represent.
shall be made to the dimensions shown in Fig. 1 of Specifica-
7. Special Requirements
tion A732/A732M or Figs. 5 and 6 of Test Methods and
Definitions A370. 7.1 When specified in the contract or purchase order,
6.3 The manufacturer may use separately cast test coupons castingsshallmeetspecialrequirementsastohardness,chemi-
or test specimens cut from castings when castings made to this cal composition, microstructure, pressure tightness, radio-
specification are nodularized or inoculated in the
...
This document is not anASTM standard and is intended only to provide the user of anASTM standard an indication of what changes have been made to the previous version. Because
it may not be technically possible to adequately depict all changes accurately, ASTM recommends that users consult prior editions as appropriate. In all cases only the current version
of the standard as published by ASTM is to be considered the official document.
´1
Designation:A536–84(Reapproved2004) Designation: A 536 – 84 (Reapproved 2004)
Standard Specification for
Ductile Iron Castings
This standard is issued under the fixed designation A536; the number immediately following the designation indicates the year of
original adoption or, in the case of revision, the year of last revision.Anumber in parentheses indicates the year of last reapproval.A
superscript epsilon (´) indicates an editorial change since the last revision or reapproval.
This standard has been approved for use by agencies of the Department of Defense.
´ NOTE—Keywords editorially updated in December 2008.
1. Scope
1.1 This specification covers castings made of ductile iron, also known as spheroidal or nodular iron, that is described as cast
iron with the graphite substantially spheroidal in shape and essentially free of other forms of graphite, as defined in Terminology
A644.
1.2 The values stated in inch-pound units are to be regarded as the standard.
1.3 Noprecisequantitativerelationshipcanbestatedbetweenthepropertiesoftheironinvariouslocationsofthesamecasting
or between the properties of castings and those of a test specimen cast from the same iron (see Appendix X1).
2. Referenced Documents
2.1 ASTM Standards:
A370 Test Methods and Definitions for Mechanical Testing of Steel Products
A644 Terminology Relating to Iron Castings
A732/A732M SpecificationforCastings,Investment,CarbonandLowAlloySteelforGeneralApplication,andCobaltAlloy
for High Strength at Elevated Temperatures
E8 Test Methods for Tension Testing of Metallic Materials
2.2 Military Standard:
MIL-STD-129 Marking for Shipment and Storage
3. Ordering Information
3.1 Orders for material to this specification shall include the following information:
3.1.1 ASTM designation,
3.1.2 Grade of ductile iron required (see Table 1, and Sections 4 and 9),
3.1.3 Special properties, if required (see Section 7),
3.1.4 If a different number of samples are required (see Section 10),
3.1.5 Certification, if required (see Section 14), and
3.1.6 Special preparation for delivery, if required (see Section 15).
4. Tensile Requirements
4.1 The iron represented by the test specimens shall conform to the requirements as to tensile properties presented in Tables 1
and 2. The irons listed in Table 1 cover those in general use, while those listed in Table 2 are used for special applications (such
as pipes, fittings, etc.).
4.2 The yield strength shall be determined at 0.2% offset by the offset method (see Test Methods E8). Other methods may be
used by mutual consent of the manufacturer and purchaser.
5. Heat Treatment
5.1 The 60-40-18 grade will normally require a full ferritizing anneal. The 120-90-02 and the 100-70-03 grades generally
require a quench and temper or a normalize and temper, or an isothermal heat treatment. The other two grades can be met either
ThisspecificationisunderthejurisdictionoftheASTMCommitteeA04onIronCastingsandisthedirectresponsibilityofSubcommitteeA04.02onMalleableandDuctile
Iron Castings.
´1
Current edition approved Oct. 1, 2004. Published October 2004. Originally approved in 1965. Last previous edition approved in 1999 as A536–84 (1999) .
ForreferencedASTMstandards,visittheASTMwebsite,www.astm.org,orcontactASTMCustomerServiceatservice@astm.org.For Annual Book ofASTM Standards
volume information, refer to the standard’s Document Summary page on the ASTM website.
Available from Standardization Documents Order Desk, DODSSP, Bldg. 4, Section D, 700 Robbins Ave., Philadelphia, PA 19111-5098
Copyright © ASTM International, 100 Barr Harbor Drive, PO Box C700, West Conshohocken, PA 19428-2959, United States.
´1
A 536 – 84 (2004)
TABLE 1 Tensile Requirements
Grade Grade Grade Grade Grade
60-40-18 65-45-12 80-55-06 100-70-03 120-90-02
Tensile strength, min, psi 60 000 65 000 80 000 100 000 120 000
Tensile strength, min, MPa 414 448 552 689 827
Yield strength, min, psi 40 000 45 000 55 000 70 000 90 000
Yield strength, min, MPa 276 310 379 483 621
Elongation in 2 in. or 50 mm, min, % 18 12 6.0 3.0 2.0
TABLE 2 Tensile Requirements for Special Applications
Grade Grade Grade
60-42-10 70-50-05 80-60-03
Tensile strength, min, psi 60 000 70 000 80 000
Tensile strength, min, MPa 415 485 555
Yield strength, min, psi 42 000 50 000 60 000
Yield strength, min, MPa 290 345 415
Elongation in 2 in. or 50 mm, 10 5 3
min, %
as-cast or by heat treatment. Ductile iron, which is heat treated by quenching to martensite and tempering, may have substantially
lower fatigue strength than as-cast material of the same hardness.
6. Test Coupons
6.1 The separately cast test coupons from which the tension test specimens are machined shall be cast to the size and shape
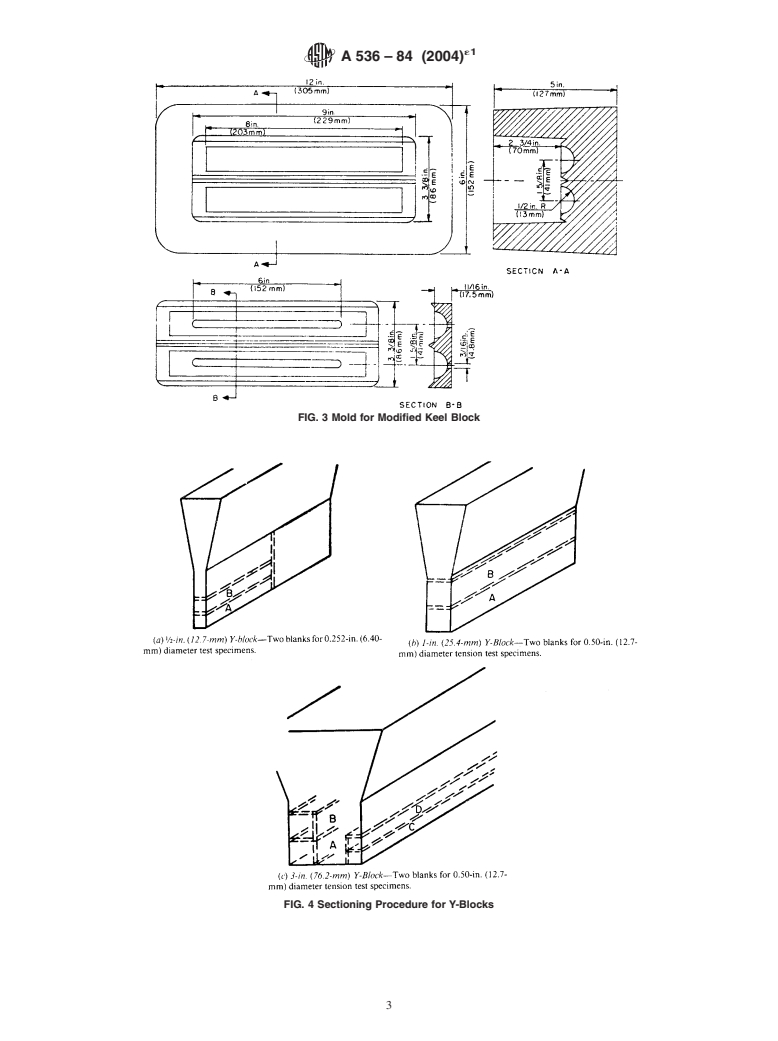
shown in Fig. 1 or Fig. 2.Amodified keel block cast from the mold shown in Fig. 3 may be substituted for the 1-in. Y-block or
the 1-in. keel block. The test coupons shall be cast in open molds made of suitable core sand having a minimum wall thickness
1 1
of 1 ⁄2 in. (38 mm) for the ⁄2-in. (12.5 mm) and 1-in. (25-mm) sizes and 3 in. (75 mm) for the 3-in. size. The coupons shall be
leftinthemolduntiltheyhavecooledtoablackcolor(approximately900°F(482°C)orless).Thesizeofcouponcasttorepresent
the casting shall be at the option of the purchaser. In case no option is expressed, the manufacturer shall make the choice.
6.2 When investment castings are made to this specification, the manufacturer may use test specimens cast to size incorporated
in the mold with the castings, or separately cast to size using the same type of mold and the same thermal conditions that are used
to produce the castings. These test specimens shall be made to the dimensions shown in Fig. 1 of SpecificationA732/A732M or
Figs. 5 and 6 of Test Methods and Definitions A370.
6.3 The manufacturer may use separately cast test coupons or test specimens cut from castings when castings made to this
specification are nodularized or inoculated in the mold. Separately cast test coupons shall have a chemistry that is representative
of castings produced from the ladle poured and a cooling rate equivalent to that obtained with the test molds shown in Figs. 1 and
Metric Equivalents
in. mm in. mm
1 1
⁄2 12.7 1 ⁄2 38.1
1 25.4 2 ⁄2 63.5
NOTE—The length of the keel block shall be 6 in. (152 mm).
FIG. 1 Keel Block for Test Coupons
´1
A 536 – 84 (2004)
“Y” Block Size
For Castings
For Castings For Castings
of Thickness
of Thickness of Thickness
Dimen- ⁄2 in.
Less Than of 1 ⁄2 in.
sions (13 mm) to
⁄2 in. (38 mm)
1 ⁄2 in.
(13 mm) and Over
(38 mm)
in. mm in. mm in. mm
A ⁄2 13 1 25 3 75
5 1
B1 ⁄8 40 2 ⁄8 54 5 125
C 2 50 3 75 4 100
D 4 100 6 150 8 200
E 7 175 7 175 7 175
approx approx approx approx approx approx
FIG. 2 Y-Blocks for Test Coupons
FIG. 3 Mold for Modified Keel Block
2, Figs. 4-6, or Appendix X2. The size (cooling rate) of the coupon chosen to represent the casting should be decided by the
purchaser. If test coupon size is not specified, the manufacturer shall make the choice. When test bars will be cut from castings,
testbarlocationshallbeagreedonbythepurchaserandmanufacturerandindicatedonthecastingdrawing.Themanufacturershall
maintainsufficientcontrolsandcontroldocumentationtoassurethepurchaserthatpropertiesdeterminedfromtestcouponsortest
bars are representative of castings shipped.
6.4 The test coupons shal
...


Questions, Comments and Discussion
Ask us and Technical Secretary will try to provide an answer. You can facilitate discussion about the standard in here.