ISO 4600:1981
(Main)Plastics — Determination of environmental stress cracking (ESC) — Ball or pin impression method
Plastics — Determination of environmental stress cracking (ESC) — Ball or pin impression method
Plastiques — Détermination de la fissuration sous contrainte dans un environnement donné (ESC) — Méthode par enfoncement de billes ou de goupilles
General Information
- Status
- Withdrawn
- Publication Date
- 30-Jun-1981
- Withdrawal Date
- 30-Jun-1981
- Technical Committee
- ISO/TC 61 - Plastics
- Drafting Committee
- ISO/TC 61 - Plastics
- Current Stage
- 9599 - Withdrawal of International Standard
- Start Date
- 20-Aug-1992
- Completion Date
- 14-Feb-2026
Relations
- Effective Date
- 12-May-2008
- Effective Date
- 15-Apr-2008
Get Certified
Connect with accredited certification bodies for this standard

Smithers Quality Assessments
US management systems and product certification.

DIN CERTCO
DIN Group product certification.
Sponsored listings
Frequently Asked Questions
ISO 4600:1981 is a standard published by the International Organization for Standardization (ISO). Its full title is "Plastics — Determination of environmental stress cracking (ESC) — Ball or pin impression method". This standard covers: Plastics — Determination of environmental stress cracking (ESC) — Ball or pin impression method
Plastics — Determination of environmental stress cracking (ESC) — Ball or pin impression method
ISO 4600:1981 is classified under the following ICS (International Classification for Standards) categories: 83.080.01 - Plastics in general. The ICS classification helps identify the subject area and facilitates finding related standards.
ISO 4600:1981 has the following relationships with other standards: It is inter standard links to SIST ISO 4600:1996, ISO 4600:1992. Understanding these relationships helps ensure you are using the most current and applicable version of the standard.
ISO 4600:1981 is available in PDF format for immediate download after purchase. The document can be added to your cart and obtained through the secure checkout process. Digital delivery ensures instant access to the complete standard document.
Standards Content (Sample)
International Standard @ 4600
INTERNATIONAL ORGANIZATION FOR STANDARDIZATION*MEmOYHAPOAHAR OPrAHH3AUMR Il0 CTAHAAPTH3A~HH~RGANlSATlON INTERNATIONALE DE NORMALISATION
0 Plastics - Determination of environmental stress
cracking (ESC) - Ball or pin impression method
plastiques - Détermination de la fissuration sous contrainte dans un environnement donné (ESCI - Méthode par enfoncement
de billes ou de goupilles
First edition - 1981-07-01
!
- UDC 678.017 : 678.019.3 : 678.019.133 Ref. No. IS0 4600-1981 (E)
E!
Descriptors : plastics, tests, cracking tests, strain deformation, chemical tests, test equipment.
Price based on 7 pages
Foreword
IS0 (the International Organization for Standardization) is a worldwide federation of
national standards institutes (IS0 member bodies). The work of developing Inter-
national Standards is carried out through IS0 technical committees. Every member
body interested in a subject for which a technical committee has been set up has the
right to be represented on that committee. International organizations, governmental
and non-governmental, in liaison with ISO, also take part in the work.
Draft International Standards adopted by the technical committees are circulated to
the member bodies for approval before their acceptance as International Standards by
IS0 Council.
the
International Standard IS0 4600 was developed by Technical Committee ISO/TC 61,
Plastics, and was circulated to the member bodies in December 1978.
It has been approved by the member bodies of the following countries :
Austria India Poland
Belgium Ireland Romania
Bulgaria Israel South Africa, Rep. of
Italy Sweden
Canada
Finland Japan Switzerland
Korea, Rep. of Turkey
France
Germany, F.R. Libyan Arab Jamahiriya United Kingdom
Greece Netherlands USSR
New Zealand
Hungary
The member bodies of the following countries expressed disapproval of the document
on technical grounds :
Czechoslovakia
USA
0 International Organization for Standardization, 1981 O
Printed in Switzerland
INTERNATIONAL STANDARD IS0 4600-1981 (E)
Plastics - Determination of environmental stress
cracking (ESC) - Ball or pin impression method
O Introduction on test specimens and the actual service behaviour of articles,
because the behaviour of the latter may be more complex than
Environmental stress cracking is exhibited by many materials,
that of test specimens.
including plastics. When aplastic material is stressed or strained
in air below its yield point, stress cracking can occur after a
period of time which may be very long. These stresses may be
1 Scope and field of application
internal or external, or a combination of both. Exposure to a
chemical medium simultaneously with the same stress or strain
This International Standard specifies methods for the deter-
may result in a dramatic shortening of the time to failure. This
mination of environmental stress cracking (ESC) of plastics by
phenomenon is referred to as environmental stress cracking
means of a constant strain test.
(ESC).
The test is applicable to finished products and to test
The cracks produced may penetrate completely through the
specimens, prepared by moulding, and can be used for the
it into two or more pieces,
thickness of the material, separating
assessment of both ESC of a plastic product or material ex-
or they may be arrested on reaching regions of lower stress or
posed to different environments, and for the determination of
different material morphology.
ESC of different plastic materials exposed to a specific environ-
ment.
The determination of ESC is complex because it is influenced
by many parameters, including :
NOTE - A method for the determination of environmental stress
cracking by means of a coristant stress test is specified in IS0 6252.
- test specimen dimensions;
- test specimen state (orientation, structure, internal
stresses);
2 References
- stress and strain;
IS0 178, Plastics - Determination of flexural properties of
rigid plas tics.
- temperature of test;
IS0 291, Plastics - Standard atmospheres for conditioning
- duration of test;
and testing.
- chemical medium; IS0 468, Surface roughness - Parameters, their values and
general rules for specifying surfaces.')
-
test method and failure criterion.
IS0 527, Plastics - Determination of tensile properties.2)
By keeping all but one parameter constant, the influence of the
variable parameter on ESC can be assessed. The main objective
IS0 25571 1, Plastics - Amorphous thermoplastic moulding
of ESC measurements is to determine the effect of chemical
materials - Preparation of test specimens with a defined level
media (environment) on plastics (test specimens and articles). of shrinkage - Part 1 : Test Specimens in the form of
The measurements may also be used to evaluate the influence parallelepipedic bars (Injection moulding and compression
of the moulding conditions upon the quality of an article when moulding).
the failure mode corresponds to that obtained in actual service.
It may not be possible, however, to establish any direct correla- I SO 6252, Plastics - Determination of environmental stress
tion between the results of short-duration ESC measurements cracking - Constant tensile stress method.3)
1) At present at the stage of draft. (Revision of ISO/R 468.)
2) At present at the stage of draft. (Revision of ISO/R 527.)
3) At present at the stage of draft.
IS0 4600-1981 (E)
Failure is defined :
3 Definitions
in method A (for test specimens taken from products),
a)
3.1 oversize id,,) : The difference between the diameter of
by visible cracks, observed with the unaided eye;
an impressed steel ball or pin (d,) and the diameter of the hole
(d,) drilled into the test specimen.
in method B (for moulded or machined test specimens),
b)
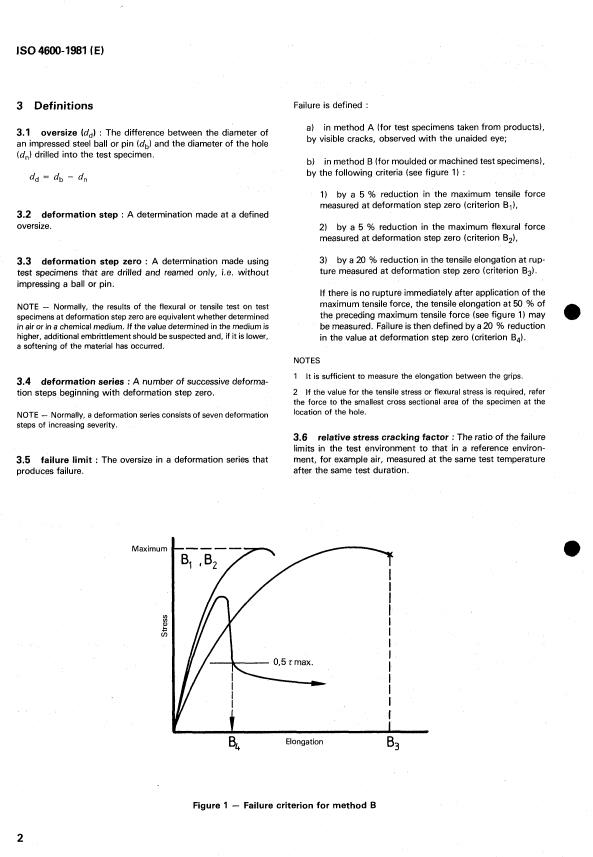
by the following criteria (see figure 1) :
d, = db - d"
by a 5 % reduction in the maximum tensile force
1)
measured at deformation step zero (criterion BI),
3.2 deformation step : A determination made at a defined
oversize.
by a 5 YO reduction in the maximum flexural force
2)
measured at deformation step zero (criterion B2),
by a 20 % reduction in the tensile elongation at rup-
3)
3.3 deformation step zero : A determination made using
ture measured at deformation step zero (criterion B3).
test specimens that are drilled and reamed only, i.e. without
impressing a ball or pin.
If there is no rupture immediately after application of the
maximum tensile force, the tensile elongation at 50 % of
NOTE - Normally, the results of the flexural or tensile test on test
the preceding maximum tensile force (see figure 1) may
specimens at deformation step zero are equivalent whether determined
in air or in a chemical medium. If the value determined in the medium is be measured. Failure is then defined by a 20 % reduction
higher, additional embrittlement should be suspected and, if it is lower,
in the value at deformation step zero (criterion B4).
a softening of the material has occurred.
NOTES
1 It is sufficient to measure the elongation between the grips.
3.4 deformation series : A number of successive deforma-
tion steps beginning with deformation step zero. 2 If the value for the tensile stress or flexural stress is required, refer
the force to the smallest cross sectional area of the specimen at the
location of the hole.
NOTE - Normally, a deformation series consists of seven deformation
steps of increasing severity.
3.6 relative stress cracking factor : The ratio of the failure
limits in the test environment to that in a reference environ-
failure limit : The oversize in a deformation series that ment, for example air, measured at the same test temperature
3.5
after the same test duration.
produces failure.
Maximum
'I
I
I
Elongation
Figure 1 - Failure criterion for method B
IS0 4600-1981 (E)
5.6.2 Pins, free of roughness or sharp edges, having
4 Principle
a parallel part 10 to 50 mm long and a taper (1:5) at one
end to reduce the entry diameter to 2,5 mm (see 8.3.2). The
A constant strain, produced by impressed balls or pins in a test
surface roughness of the pins shall be equal, preferably with
specimen in a test environment, often generates microcracks
Ra G 0.02 pm (see IS0 468).
which may, in time, develop to visible cracks. To shorten the
time for the test, the failure may be accelerated by subsequent
NOTE - A longer parallel part of the pin will allow mounting several
mechanical testing. If products cannot be assessed by
test specimens on the same pin.
mechanical tests, visual examination for cracks around the balls
or pins may be undertaken.
is recom-
The use of the range of diameters given in the table
mended.
A hole of specified diameter is drilled in the specimen, an over-
size steel ball or pin is inserted into the hole and the test
specimen is brought into contact with a chemical medium. This Table - Recommended range of diameters
procedure is repeated using balls or pins of progressively
greater diameter. After a specified time, the effect of the inter-
Diameter Increment
mm mm I
action may be determined by visual examination (method A) or I
by the determination of the tensile or flexural properties
2,98 to 3.2 0,Ol
(method 6). A parallel series of tests may be performed in
3.2 to 3,5 0,05
which the test specimens are exposed to air and the com-
4.0 0,lO
3,5 to
parative behaviour determined.
4,O to 6,O 0,50
NOTE - Pins are preferred for a single series of test specimens or
articles with thicknesses greater than 1 mm. The deformation of the
5.7 Jig, for drilling the holes.
test specimen is equivalent along the total length of the hole.
Balls are preferred for a number of series of test specimens or articles
and for routine testing if the test specimens have a thickness of 2 to
5.8 Apparatus for pressing the balls or pins into
4 mm. The deformation of the test specimen is greatest at the ball
the hole.
equator.
The spindle of the drilling machine or the tensile machine itself
Due to the differences in deformation, the results of ball tests and pin
tests may be different. may be used.
Vessels, for immersion of the specimens.
5.9
5 Apparatus
5.10 Clock.
5.1 Drilling machine, operating at a suitable frequency of
rotation, for example at 1 O00 min-’.
5.11 Flexural or tensile testing machine (see IS0 178 and
IS0 527), for the determination of flexural or tensile properties.
5.2 Drills, of diameter 2,8 mm.
5.3 Reamer, suitable for finishing a hole of diameter
3,OO f 0,05 mm.
6 Test specimens
NOTE - A 3H7 reamer (3,004 to 3,008 mm) is suitable.
6.1 Form
Plug gauges, or other suitable devices, for measuring
5.4 In general, use the form of test specimen and method of
the diameter of the reamed holes to within 0,005 mm.
preparation specified in the International Standard appropriate
to the material or product concerned.
5.5 Micrometer, for determining the diameter of the balls or
If the relevant Internationai Standard contains no such specifi-
pins with an accuracy of 0,001 mm.
cations, the following form of test specimens shall be used.
6.1.1 Method A
5.6 Steel balls or pins.
Use the product or parts of
...


Questions, Comments and Discussion
Ask us and Technical Secretary will try to provide an answer. You can facilitate discussion about the standard in here.
Loading comments...