ASTM E967-97
(Practice)Standard Practice for Temperature Calibration of Differential Scanning Calorimeters and Differential Thermal Analyzers
Standard Practice for Temperature Calibration of Differential Scanning Calorimeters and Differential Thermal Analyzers
SCOPE
1.1 This practice covers the temperature calibration of differential thermal analyzers and differential scanning calorimeters over the temperature range from -40 to +2500°C.
1.2 Computer or electronic based instruments, techniques, or data manipulation equivalent to this practice may also be used.
1.3 This standard does not purport to address all of the safety problems, if any, associated with its use. It is the responsibility of the user of this standard to establish appropriate safety and health practices and determine the applicability of regulatory limitations prior to use.
General Information
Relations
Standards Content (Sample)
NOTICE: This standard has either been superceded and replaced by a new version or discontinued.
Contact ASTM International (www.astm.org) for the latest information.
Designation: E 967 – 97
AMERICAN SOCIETY FOR TESTING AND MATERIALS
100 Barr Harbor Dr., West Conshohocken, PA 19428
Reprinted from the Annual Book of ASTM Standards. Copyright ASTM
Standard Practice for
Temperature Calibration of Differential Scanning
Calorimeters and Differential Thermal Analyzers
This standard is issued under the fixed designation E 967; the number immediately following the designation indicates the year of
original adoption or, in the case of revision, the year of last revision. A number in parentheses indicates the year of last reapproval. A
superscript epsilon (e) indicates an editorial change since the last revision or reapproval.
tion with temperature calibration. Some differential scanning calorimeters
1. Scope
and quantitative differential thermal analyzers permit both heat flow and
1.1 This practice covers the temperature calibration of
temperature calibrations to be obtained from the same experimental
differential thermal analyzers and differential scanning calo-
procedure.
rimeters over the temperature range from −40 to +2500°C.
5. Significance and Use
1.2 Computer or electronic based instruments, techniques,
or data manipulation equivalent to this practice may also be
5.1 Differential scanning calorimeters and differential ther-
used.
mal analyzers are used to determine the transition temperatures
1.3 The values stated in SI units are to be regarded as the
of materials. For this information to be meaningful in an
standard.
absolute sense, temperature calibration of the apparatus or
1.4 This standard does not purport to address all of the
comparison of the resulting data to that of known standard
safety concerns, if any, associated with its use. It is the
materials is required.
responsibility of the user of this standard to establish appro-
5.2 This practice is useful in calibrating the temperature axis
priate safety and health practices and determine the applica-
of differential scanning calorimeters and differential thermal
bility of regulatory limitations prior to use. Specific precau-
analyzers.
tionary statements are given in Section 7.
6. Apparatus
2. Referenced Documents
6.1 Apparatus shall be of either type listed below:
2.1 ASTM Standards:
6.1.1 Differential Scanning Calorimeter (DSC), capable of
E 473 Terminology Relating to Thermal Analysis
heating a test specimen and a reference material at a controlled
E 968 Practice for Heat Flow Calibration of Differential
rate and of automatically recording the differential heat flow
Scanning Calorimeters
between the sample and the reference material to the required
E 1142 Terminology Relating to Thermophysical Proper-
sensitivity and precision.
ties
6.1.2 Differential Thermal Analyzer (DTA), capable of heat-
ing a test specimen and reference material at a controlled rate
3. Terminology
and of automatically recording the differential temperature
3.1 Specific technical terms used in this practice are defined
between sample and reference material both to the required
in Terminologies E 473 and E 1142.
sensitivity and precision.
6.2 Specimen Pans, for DSC, composed of clean aluminum
4. Summary of Practice
or of other high thermal conductivity material. For DTA,
4.1 This practice consists of heating the calibration materi-
specimen cups or tubes composed of clean borosilicate glass,
als at a controlled rate in a controlled atmosphere through a
alumina, platinum, aluminum, or quartz may be used. Speci-
region of known thermal transition. The difference in heat flow
men containers composed of tungsten, graphite or silicon
or temperature between the calibration material and a reference
carbide/nitride may be used above 1600°C. The specimen pans
material is monitored and continuously recorded. A transition
or tubes must not react with the specimen and must not melt
is marked by the absorption of energy by the specimen
under the temperatures of the test.
resulting in a corresponding endothermic peak in the heating
6.3 Nitrogen, or other inert purge gas supply.
curve.
6.4 Analytical Balance, with a capacity greater than 20 mg,
capable of weighing to the nearest 0.1 mg.
NOTE 1—Heat flow calibrations are sometimes determined in conjunc-
7. Precautions
This practice is under the jurisdiction of ASTM Committee E-37 on Thermal
7.1 Toxic or corrosive effluents, or both, may be released
Measurements and is the direct responsibility of Subcommittee E 37.01 on Test
Methods and Practices.
when heating some material and could be harmful to personnel
Current edition approved March 10, 1997. Published February 1998. Originally
and to apparatus.
published as E 967 – 83. Last previous edition E 967 – 92.
7.2 Some differential thermal analyzers and differential
Annual Book of ASTM Standards, Vol 14.02.
NOTICE: This standard has either been superceded and replaced by a new version or discontinued.
Contact ASTM International (www.astm.org) for the latest information.
E 967
scanning calorimeters have nonlinear temperature indication 9.1.2.3 Select the appropriate sensitivity for energy input or
over some temperature regions of applications. This practice temperature difference axis to yield a 40 to 95 % deflection of
assumes linear temperature indication. Care must be taken in the recorder.
the application of this practice to ensure that calibration points
NOTE 2—Preanalysis on a similar specimen may be run to yield this
are taken sufficiently close together so that linear temperature
information.
indication may be approximated.
9.1.2.4 Heat (or cool) the calibration material rapidly to
30°C below the calibration temperature and allow to equili-
8. Calibration Materials
brate.
8.1 For the temperature range covered by many applica-
9.1.2.5 Heat the calibration material at 10°C/min through
tions, the melting transition of >99.99 % pure materials in
the transition until baseline is reestablished above the transi-
Table 1 may be used for calibration.
tion. Other heating rates may be used but must be noted in the
report. Record the resulting thermal curve.
9. Procedure
9.1 Two Point Calibration:
NOTE 3—Temperature scale calibration may be affected by temperature
9.1.1 Select two calibration materials from Table 1, with scan rate, specimen holder, purge gas and purge gas flow rate. The
temperature calibration shall be made under the same conditions used for
melting temperatures one above and one below the temperature
test specimens.
range of interest. The calibration materials should be as close
to the temperature range of interest as practical. 9.1.2.6 From the resultant curve, measure the temperatures
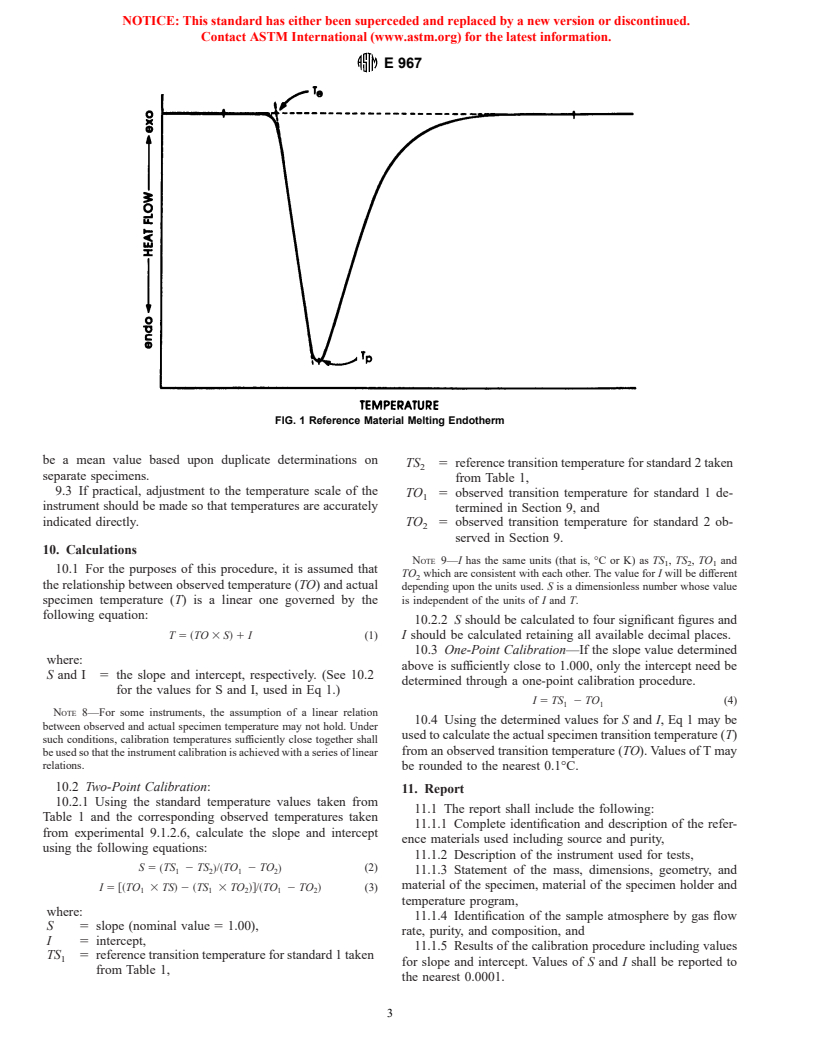
9.1.2 Determine the apparent transition temperature for for the desired points on the curve, T , T (see Fig. 1) retaining
e p
each calibration material. all available decimal places.
9.1.2.1 Into a clean specimen holder, placea5to 15-mg
where:
weighed amount of calibration material. Other specimen
T 5 extrapolated onset temperature for fusion, °C
e
masses may be used but must be indicated in the report.
T 5 melting peak temperature,° C
p
9.1.2.2 Load the specimen into the instrument chamber,
purge the chamber with dry nitrogen (or other inert gas) at a NOTE 4—The actual temperature displayed on the temperature axis
differs depending upon the instrument type; for example, sample tempera-
flow rate of 10 to 50 cm /min throughout the experiment.
ture, program temperature, sample program temperature average. Follow
the instructions of the particular instrument manufacturer to obtain sample
TABLE 1 Melting Temperature of Calibration Material
temperature at the point of interest.
NOTE 5—The available precision of the temperature measurements
NOTE 1—The values in Table 1 were determined under special, highly
depends upon instrument capabilities and the temperature range of the
accurate steady state conditions that are not attainable or applicable to
test. Below 300°C, measurements to 60.5°C are common while at greater
thermal analysis techniques. The actual precision of this test method is
than 700°C,6 2°C is reasonable.
given in Section 12 of this practice.
NOTE 6—For high-purity crystalline materials (not polymers), T is
A e
Melting Temperature
taken as the transition temperature when measured by differential scan-
Calibration Material
ning calorimeters and other instruments where the test specimen is
(°C) (K)
removed from the temperature sensor. For instruments in which the
Mercury −38.862 234.288
temperature sensor is in intimate contact with the sample, (such as some
B B
Water 0.01 273.16
differential thermal analyzers), T is taken as the transition temperature.
p
Phenoxybenzene 26.87 300.02
Benzoic Acid 122.37 395.52 9.1.3 Using the apparent transition temperatures thus ob-
B B
Indium 156.60 429.73
tained, calculate the slope (S) and intercept (I) of the calibra-
C B B
Tin 231.93 505.08
tion Eq 1 (see Section 10). The slope and intercept values
Bismuth 271.442 544.592
D
Cadmium 321.108
...


Questions, Comments and Discussion
Ask us and Technical Secretary will try to provide an answer. You can facilitate discussion about the standard in here.