ASTM A973/A973M-00
(Specification)Standard Specification for Grade 100 Alloy Steel Chain
Standard Specification for Grade 100 Alloy Steel Chain
SCOPE
1.1 This specification covers Grade 100 heat-treated alloy steel chain for such applications as slings, lifting assemblies, and load binding.
Note 1—This specification does not cover alloy steel chain for pocket wheel applications.
1.2 This specification is a performance standard for Grade 100 chain used between -20 and 400°F (-29 and 205 °C). The chain manufacturer should be contacted for use at temperatures outside this range.
1.3 The values stated in in either SI units or in other units shall be regarded separately as standard. The values stated in each system may not be exact equivalents; therefore, each system must be used independently of the other, without combining values in any way.
General Information
Relations
Standards Content (Sample)
NOTICE: This standard has either been superseded and replaced by a new version or discontinued.
Contact ASTM International (www.astm.org) for the latest information.
Designation: A 973/A 973M – 00 An American National Standard
Standard Specification for
Grade 100 Alloy Steel Chain
This standard is issued under the fixed designation A 973/A 973M; the number immediately following the designation indicates the year
of original adoption or, in the case of revision, the year of last revision. A number in parentheses indicates the year of last reapproval.
A superscript epsilon (e) indicates an editorial change since the last revision or reapproval.
1. Scope SAE J422 Microscopic Determination of Inclusions in
Steels
1.1 This specification covers Grade 100 heat-treated alloy
steel chain for such applications as slings, lifting assemblies,
3. Terminology
and load binding.
3.1 Definitions of Terms Specific to This Standard:
NOTE 1—This specification does not cover alloy steel chain for pocket
3.1.1 breaking force, minimum—the minimum force in
wheel applications.
pounds or newtons at which the chain, in the condition it leaves
1.2 This specification is a performance standard for Grade
the producer’s plant, has been found by representative testing
100 chain used between −20 and 400°F [−29 and 205°C]. The
to break when a constantly increasing force was applied in
chain manufacturer should be contacted for use at temperatures
direct tension to a straight length of chain on a standard testing
outside this range.
machine. Breaking force values are a statistical attribute test
1.3 The values stated in either SI units or in other units shall
and are not a guarantee that all chain segments per lot will
be regarded separately as standard. The values stated in each
endure these loads. Breaking force loads shall not be used as
system may not be exact equivalents; therefore, each system
criteria for service or design purposes.
must be used independently of the other, without combining
3.1.2 lot—for the purpose of acceptance testing, a lot shall
values in any way.
consist of 3000 ft [1000 m], or fraction thereof, of the same
size chain. If a continuous length of chain exceeds 3000 ft
2. Referenced Documents
[1000 m], it shall also be considered a lot.
2.1 ASTM Standards:
3.1.3 proof test—a quality control tensile test applied to
A 29/A 29M Specification for Steel Bars, Carbon and
chain for the purpose of verifying weld and material quality. It
Alloy, Hot-Wrought and Cold-Finished, General Require-
is the minimum force in pounds or newtons which the chain
ments for
has withstood at the time it left the producer, under a test in
A 919 Terminology Relating to Heat Treatment of Metals
which a constantly increasing force has been applied in direct
E 30 Test Methods for Chemical Analysis of Steel, Cast
tension to a straight length of chain. Proof test loads are a
Iron, Open-Hearth Iron, and Wrought Iron
manufacturing integrity test and shall not be used as criteria for
E 350 Test Methods for Chemical Analysis of Carbon Steel,
service or design purposes.
Low-Alloy Steel, Silicon Electrical Steel, Ingot Iron, and
3.1.4 working load limit (WLL)—the maximum combined
Wrought Iron
static and dynamic load in pounds or kilograms that shall be
E 415 Test Method for Optical Emission Vacuum Spectro-
applied in direct tension to an undamaged straight length of
metric Analysis of Carbon and Low-Alloy Steel
chain.
2.2 SAE Standard:
4. Ordering Information
4.1 It shall be the responsibility of the purchaser to specify
all requirements that are necessary for material ordered under
this specification. Such requirements include, but are not
limited to, the following:
This specification is under the jurisdiction of ASTM Committee A-1 on Steel,
4.1.1 Product to conform to Specification A 973/A 973M
Stainless Steel, and Related Alloys and is the direct responsibility of Subcommittee
and date of issue,
A01.27 on Steel Chain.
Current edition approved March 10, 2000. Published April 2000. Originally
4.1.2 Nominal size of chain (in. or mm),
published as A 973/A 973M-97. Last previous edition A 973/A 973M-97.
4.1.3 Quantity of chain (ft or m),
Annual Book of ASTM Standards, Vol 01.05.
Discontinued. See 1998 Annual Book of ASTM Standards, Vol 01.02.
Discontinued. See 1995 Annual Book of ASTM Standards, Vol 03.05.
5 7
Annual Book of ASTM Standards, Vol 03.05. Available from Society of Automotive Engineers, 400 Commonwealth Drive,
Annual Book of ASTM Standards, Vol 03.06. Warrendale, PA 15096.
Copyright © ASTM, 100 Barr Harbor Drive, West Conshohocken, PA 19428-2959, United States.
A 973/A 973M
TABLE 2 Mechanical Test Sample Length Requirements
4.1.4 Length of each piece, if required,
4.1.5 Finish, if required, Minimum Number of
Size of Chain Links
4.1.6 Certification of test(s), if required,
in Test Specimen
4.1.7 Acceptance of inspection by purchaser, if required,
⁄32 in. [5.5 mm] 9
and
Larger than ⁄32 in. [5.5 mm] but less 7
4.1.8 Supplementary requirements, if required.
than ⁄4 in. [20.0 mm]
⁄4 in. [20.0 mm] and larger 3
5. Manufacturing
5.1 Melting Process—The alloy steel shall be fully killed
(see Note 2). The opening in the fixture shall not be more than
and have an austenitic grain size of five or finer.
125 % of the stock diameter being tested. Links engaged in the
5.2 Welding Process—Alloy steel chain may be made by the
testing fixture shall not be considered part of the test specimen.
electric welding or gas welding process.
NOTE 2—“U” bolts of the same or larger diameter and the same or
5.3 Heat Treatment—After welding, alloy steel chain shall
greater strength may be used to secure the chain to the jaws of the testing
be heat treated before applying the proof test. Heat treatment
machine.
shall include quenching and tempering as defined by Termi-
7.2.2 Test results shall meet or exceed the minimum break-
nology A 919.
ing force values given in Table 1 for the appropriate size chain.
6. Material Requirements 7.3 Elongation:
7.3.1 All chain must be in the quenched and tempered
6.1 Heat Analysis—The selection and amounts of the alloy-
condition before the elongation is measured.
ing elements in the steel are left to the judgment of the
7.3.2 Elongation is to be determined as follows:
individual chain manufacturer provided the steel meets the
7.3.2.1 Test samples are to consist of at least the number of
following criteria: carbon 5 0.35 % max; phosphorous 5
links in Table 2 that constitutes the gage length. Two additional
0.025 % max; sulfur 5 0.025 % max. The following elements
links will be required to engage the jaws of the testing machine
must all be present in alloying amounts, nickel (0.40% min),
unless this is done by half links or another method.
chromium (0.40% min), and molybdenum (0.15% min). The
7.3.2.2 Place the test sample in the testing machine and load
steel shall have oxide and silicate inclusions of 4 or less as
to a maximum of 10 % of the proof test force. Measure the
determined by SAE J422.
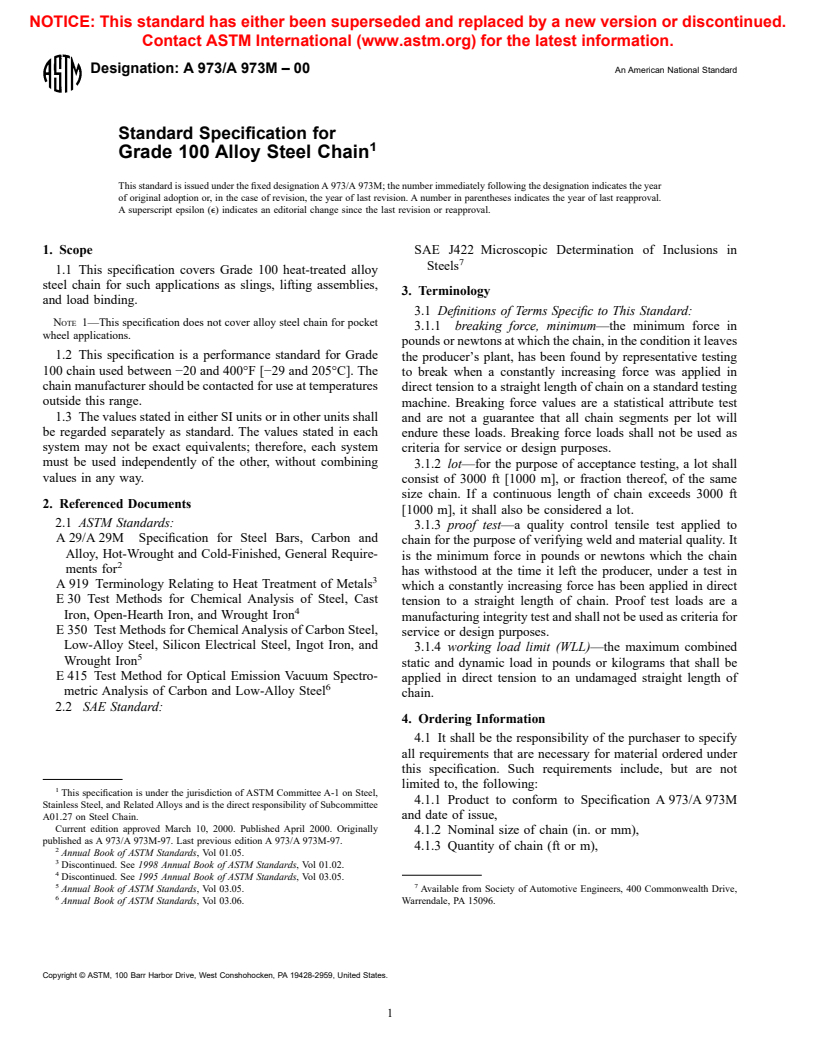
gage length (L), which does not include the links engaged in
6.2 Product Analysis—The steel used may be analyzed by
the jaws of the testing machine (see Fig. 1).
the purchaser and shall conform to the requirements of 6.1
7.3.2.3 The load is then gradually and smoothly increased
subject to the product analysis tolerances specified in Specifi-
until fracture occurs, and the maximum load applied is re-
cation A 29/A 29M. Test samples may be taken from rods,
corded as the breaking force. The elongation may be deter-
bars, or finished chain. Samples for analysis shall be so taken
mined by an autographic recorder, side scale, or alternatively
as to represent the full cross section of the specimen.
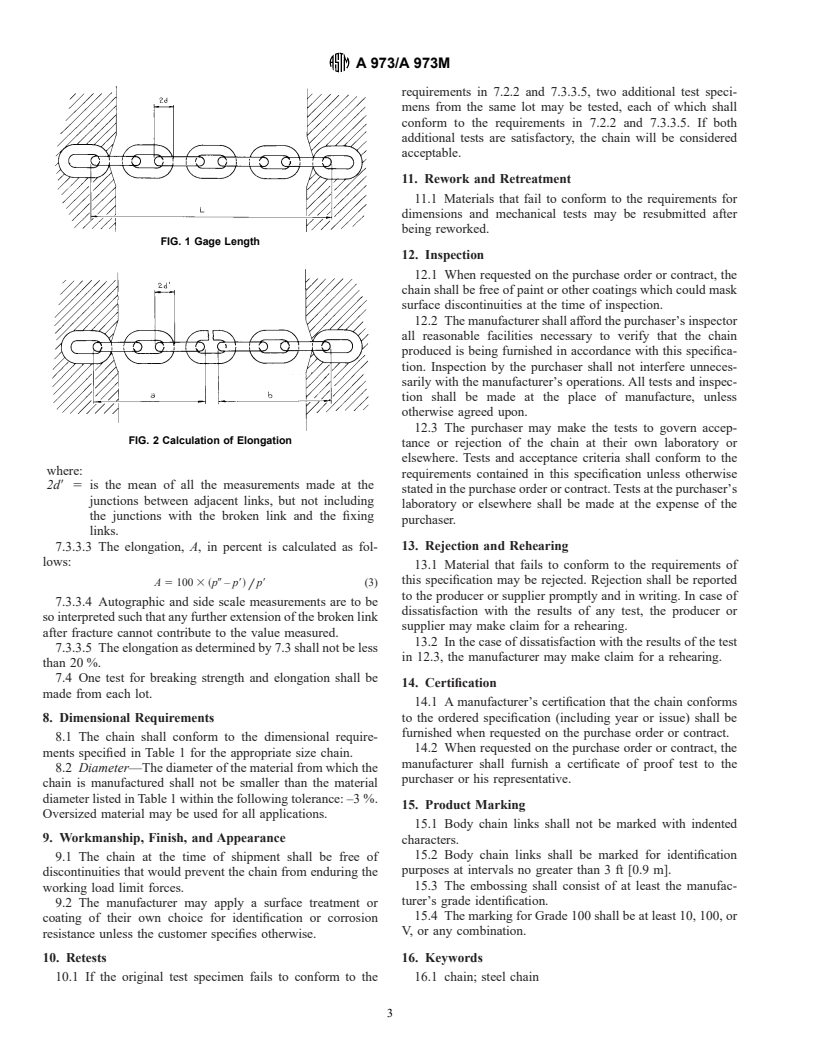
by measuring the broken lengths on either side of the broken
6.3 Test Methods E 30, E 350, or E 415 shall be used for
link as shown in Fig. 2.
referee purposes.
7.3.3 Calculation of Elongation:
7. Mechanical Requirements
7.3.3.1 The mean pitch (p8) after seating of the links at some
load not exceeding 10 % of the manufacturing test force is
7.1 Proof Test—All chain shall be tested to at least the proof
calculated as follows:
load prescribed in Table 1 for the appropriate size chain. When
so tested it shall withstand these loads without loss of chain
p8 5 ~L –2d! n (1)
/
integrity. Links or chain segments not withstanding the proof
where:
test load shall be removed from the chain.
n 5 is
...


Questions, Comments and Discussion
Ask us and Technical Secretary will try to provide an answer. You can facilitate discussion about the standard in here.