ASTM D1212-91(2001)
(Test Method)Standard Test Methods for Measurement of Wet Film Thickness of Organic Coatings
Standard Test Methods for Measurement of Wet Film Thickness of Organic Coatings
SCOPE
1.1 These test methods cover the determination of wet film thickness of organic coatings such as paint, varnish, and lacquer. Two methods are described as follows:
1.1.1 In Test Method A, the Wet Film Thickness Gage (English or Metric graduation (see 5.1)) is used to measure wet film thicknesses up to 60 mils on the English scale series, and up to 700 m on the metric scale series (Sections 5-8).
1.1.2 In Test Method B, the Pfund Gage is used to measure wet film thicknesses up to 14.2 mils (360 µm) (Sections 9-13).
1.2 The values stated in SI units are to be regarded as the standard. The values given in parentheses are for information only.
1.3 This standard does not purport to address all of the safety concerns, if any, associated with its use. It is the responsibility of the user of this standard to establish appropriate safety and health practices and determine the applicability of regulatory limitations prior to use.
General Information
Relations
Standards Content (Sample)
Designation: D 1212 – 91 (Reapproved 2001)
Standard Test Methods for
Measurement of Wet Film Thickness of Organic Coatings
This standard is issued under the fixed designation D 1212; the number immediately following the designation indicates the year of
original adoption or, in the case of revision, the year of last revision. A number in parentheses indicates the year of last reapproval. A
superscript epsilon (e) indicates an editorial change since the last revision or reapproval.
1. Scope surface is measured and the film thickness calculated from the
diameter of the spot and the radius of curvature.
1.1 These test methods cover the determination of wet film
thickness of organic coatings such as paint, varnish, and
4. Significance and Use
lacquer. Two methods are described as follows:
4.1 Wet film thickness measurements aid in the prediction
1.1.1 In Test Method A, the Wet Film Thickness Gage
of dry film thickness. In instances where dry film thickness
(English or Metric graduation (see 5.1)) is used to measure wet
cannot be measured nondestructively, wet film thickness is
film thicknesses up to 60 mils on the English scale series, and
frequently specified. Also, the ability to determine wet film
up to 700 μm on the metric scale series (Sections 5-8).
thickness during application can provide the opportunity to
1.1.2 In Test Method B, the Pfund Gage is used to measure
correct the application procedures.
wet film thicknesses up to 14.2 mils (360 μm) (Sections 9-13).
1.2 The values stated in SI units are to be regarded as the
TEST METHOD A
standard. The values given in parentheses are for information
only.
5. Apparatus
1.3 This standard does not purport to address all of the
5.1 Wet Film Thickness Gage—Two versions of the gage are
safety concerns, if any, associated with its use. It is the
now in use: The original design as shown in Fig. 1 and a later
responsibility of the user of this standard to establish appro-
design as shown in Fig. 2. Both designs consists of an eccentric
priate safety and health practices and determine the applica-
center wheel supported by two concentric wheels so as to
bility of regulatory limitations prior to use.
provide two scales that are bilaterally symmetrical. As the gage
is rolled on the film, there is a change in clearance between the
2. Referenced Documents
wet film and the eccentric wheel. The point at which the film
2.1 ASTM Standards:
first touches the center wheel measures the thickness of the
D 823 Practices for Producing Films of Uniform Thickness
film.
of Paint, Varnish, and Related Products on Test Panels
5.2 The later design shown in Fig. 2, moves the eccentric
wheel from between the concentric wheels, as shown in Fig. 1,
3. Summary of Test Methods
to the outside of the gage and closer to one of the concentric
3.1 The material is applied in the laboratory to plane, rigid
wheels. Gage reading errors of parallax across the gage are
test panels or in the field to the surface being coated. The wet
eliminated as the two scales are placed directly on the eccentric
film thickness is determined as quickly as possible to reduce
wheel and errors when measuring on uneven support surfaces
shrinkage due to solvent loss.
are reduced by placing the eccentric wheel closer to one of the
3.2 In Test Method A, a gage with one eccentric and two
supporting concentric wheels.
concentric wheels is rolled over the surface and the point where
5.3 Best precision is obtained when using the near linear
the eccentric wheel first touches the wet film is determined.
central portion of each scale, constituting about 80 % of its
3.3 In Test Method B, a gage with a convex lower surface is
total range as shown in the diagram in Fig. 1 and Fig. 2.
pushed into the wet film until the center touches the substrate.
Therefore, the range of the particular gage selected for use
The diameter of the spot of wet coating left on the convex
should be such that the measured film thickness falls within,
and preferably toward the center of the middle 80 % of each
These test methods are under the jurisdiction of ASTM Committee D01 on
Paint and Related Coatings, Materials, and Applications and are the direct Both versions of this gage (Interchemical (INMONT) and Model “C”), are
responsibility of Subcommittee D01.23 on Physical Properties of Applied Paint covered by U.S. Patents 2 507 592 and 3 128 558, and are issued to Maynard R.
Films. Euverard. Interested parties are invited to submit information regarding the
Current edition approved May 15, 1991. Published July 1991. Originally identification of acceptable alternatives to this patented item to the Committee on
published as D 1212 – 52 T. Last previous edition D 1212 – 85. Standards, ASTM Headquarters. Your comments will receive careful consideration
Annual Book of ASTM Standards, Vol 06.01. at a meeting of the responsible technical committee, which you may attend.
Copyright © ASTM, 100 Barr Harbor Drive, West Conshohocken, PA 19428-2959, United States.
D 1212
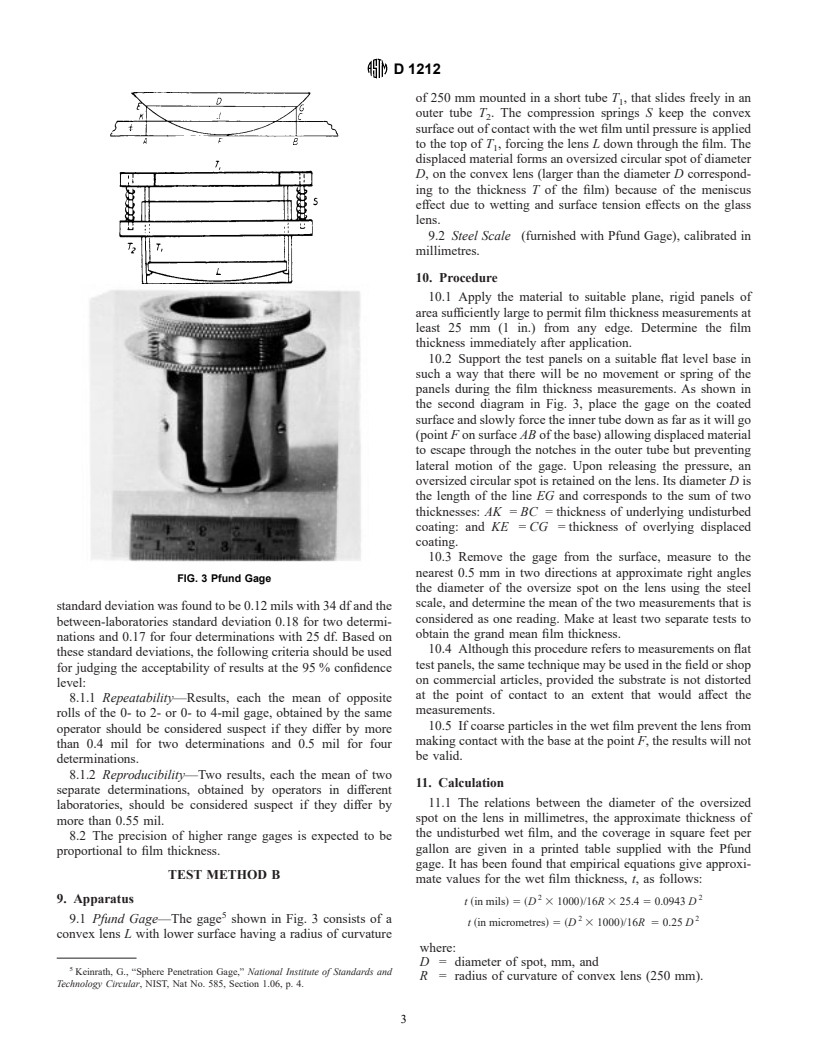
FIG. 1 Interchemical Wet Film Thickness Gages
FIG. 2 Model “C” Wet Film Thickness Gages
scale. Gages are available covering the following ranges in directly over the wet film. Roll the gage over the film one-half
mils and microns: revolution in one direction toward the minimum marking on
the gage and repeat in the opposite direction. Read the points
Smallest
Range, mils
Graduation, mils
at which the coating first makes contact with the eccentric
0to2 0.1
wheel and determine the mean which is considered as one
0to4 0.2
reading.
2to12 0.5
10 to 30 1.0
6.3 If the coating contains a solvent that evaporates rapidly
20 to 60 2.0
or if the solids content is low, make at least a second separate
Smallest
Range, μm
reading on a freshly applied film and calculate the mean of the
Graduation, μm
0to40 2.0
separate readings.
0 to 100 5.00
50 to 250 10.00
7. Report
200 to 700 25.00
7.1 Report the mean of the separate readings and the range
6. Procedure
and smallest graduation of the gage used.
6.1 Apply the material in accordance with Practices D 823
8. Precision
to suitable plane rigid panels of area sufficiently large to permit
film thickness measurements at least 25 mm (1 in. ) from any
8.1 In an interlaboratory study of this test method, in which
edge. Determine the film thickness immediately after applica-
two operators in at least six laboratories made measurements
tion.
with the 0- to 2- and 0- to 4-mil gages on three materials,
6.2 Support the test panels on a suitable level base in such
applied at two film thicknesses, the pooled within-laboratory
a way that there will be no movement or spring of the panels
during the film thickness measurements. Place the gage on the
wet film so that the minimum marking is at the top and the 4
Supporting data are available from ASTM Headquarters. Request RR: D01-
greatest clearance between the eccentric wheel and the film is 1023.
D 1212
of 250 mm mounted in a short tube T , that slides freely in an
outer tube T . The compressio
...


Questions, Comments and Discussion
Ask us and Technical Secretary will try to provide an answer. You can facilitate discussion about the standard in here.